Ark-M : OLS for Management Admin
OLS Module on Ark M
There are several roles involved in the management of OLS Modules, from creating the campaigns to tracking and managing those campaigns.
Different roles :
- Management Admin
- Create OLS Campaigns
- Allowed to access {Listing} {Type} {Module Setting}
- OLS Team
- Manage OLS Campaign
- allowed to access {Booked Campaign} only. When first login, the OLS team will see the campaign assigned under their Clients.
- Consultant
- Every centers assigned to a consultant; consultant is allowed to access all the modules under OLS, however, he can only access {Edit} under Booked Campaign
1. Campaign Types
This is the 1st step before creating campaigns.
Management Admin needs to create "Campaign Types" because [ Campaign Types ] is a mandatory data required in creating Campaigns.
Staging URL : https://ark-management-staging.proof-point-suite.com/#/dashboard/ols-campaign-types

Click on "Create Campaign Type"
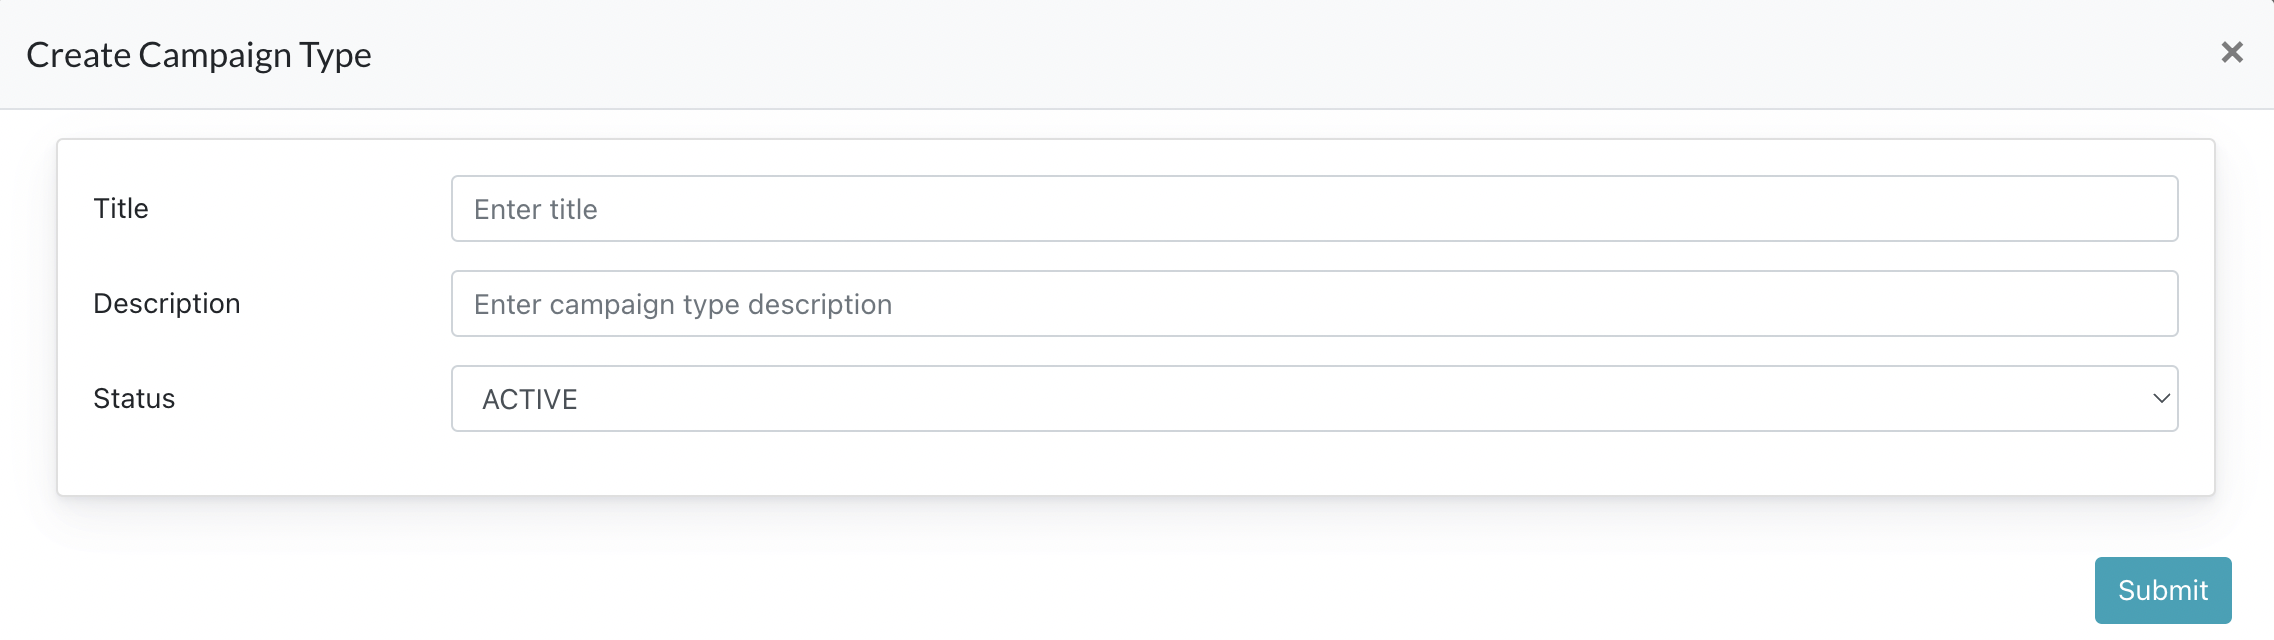
- Create a title for the campaign
- Enter description for this campaign
- Status : Active - visible for selection; Inactive - Hide from selection
- Submit
2. Listing
This is where Management Admin create a new campaign.
Staging URL : https://ark-management-staging.proof-point-suite.com/#/dashboard/ols-campaign-listings
2.1 Create Campaign

Click "Create Campaign"
- Name : Enter Campaign title
- Teaser Image : The image campaign displayed on the card
- Description : Text appeared when click on the "info" button
- Bookable Months : configure which month this campaign can be booked
- Campaign Types : which Campaign Types is this belonged to
- Target Center Group : Choose your Center Group
- Campaign can be booked in : Select which country your campaigns are available in
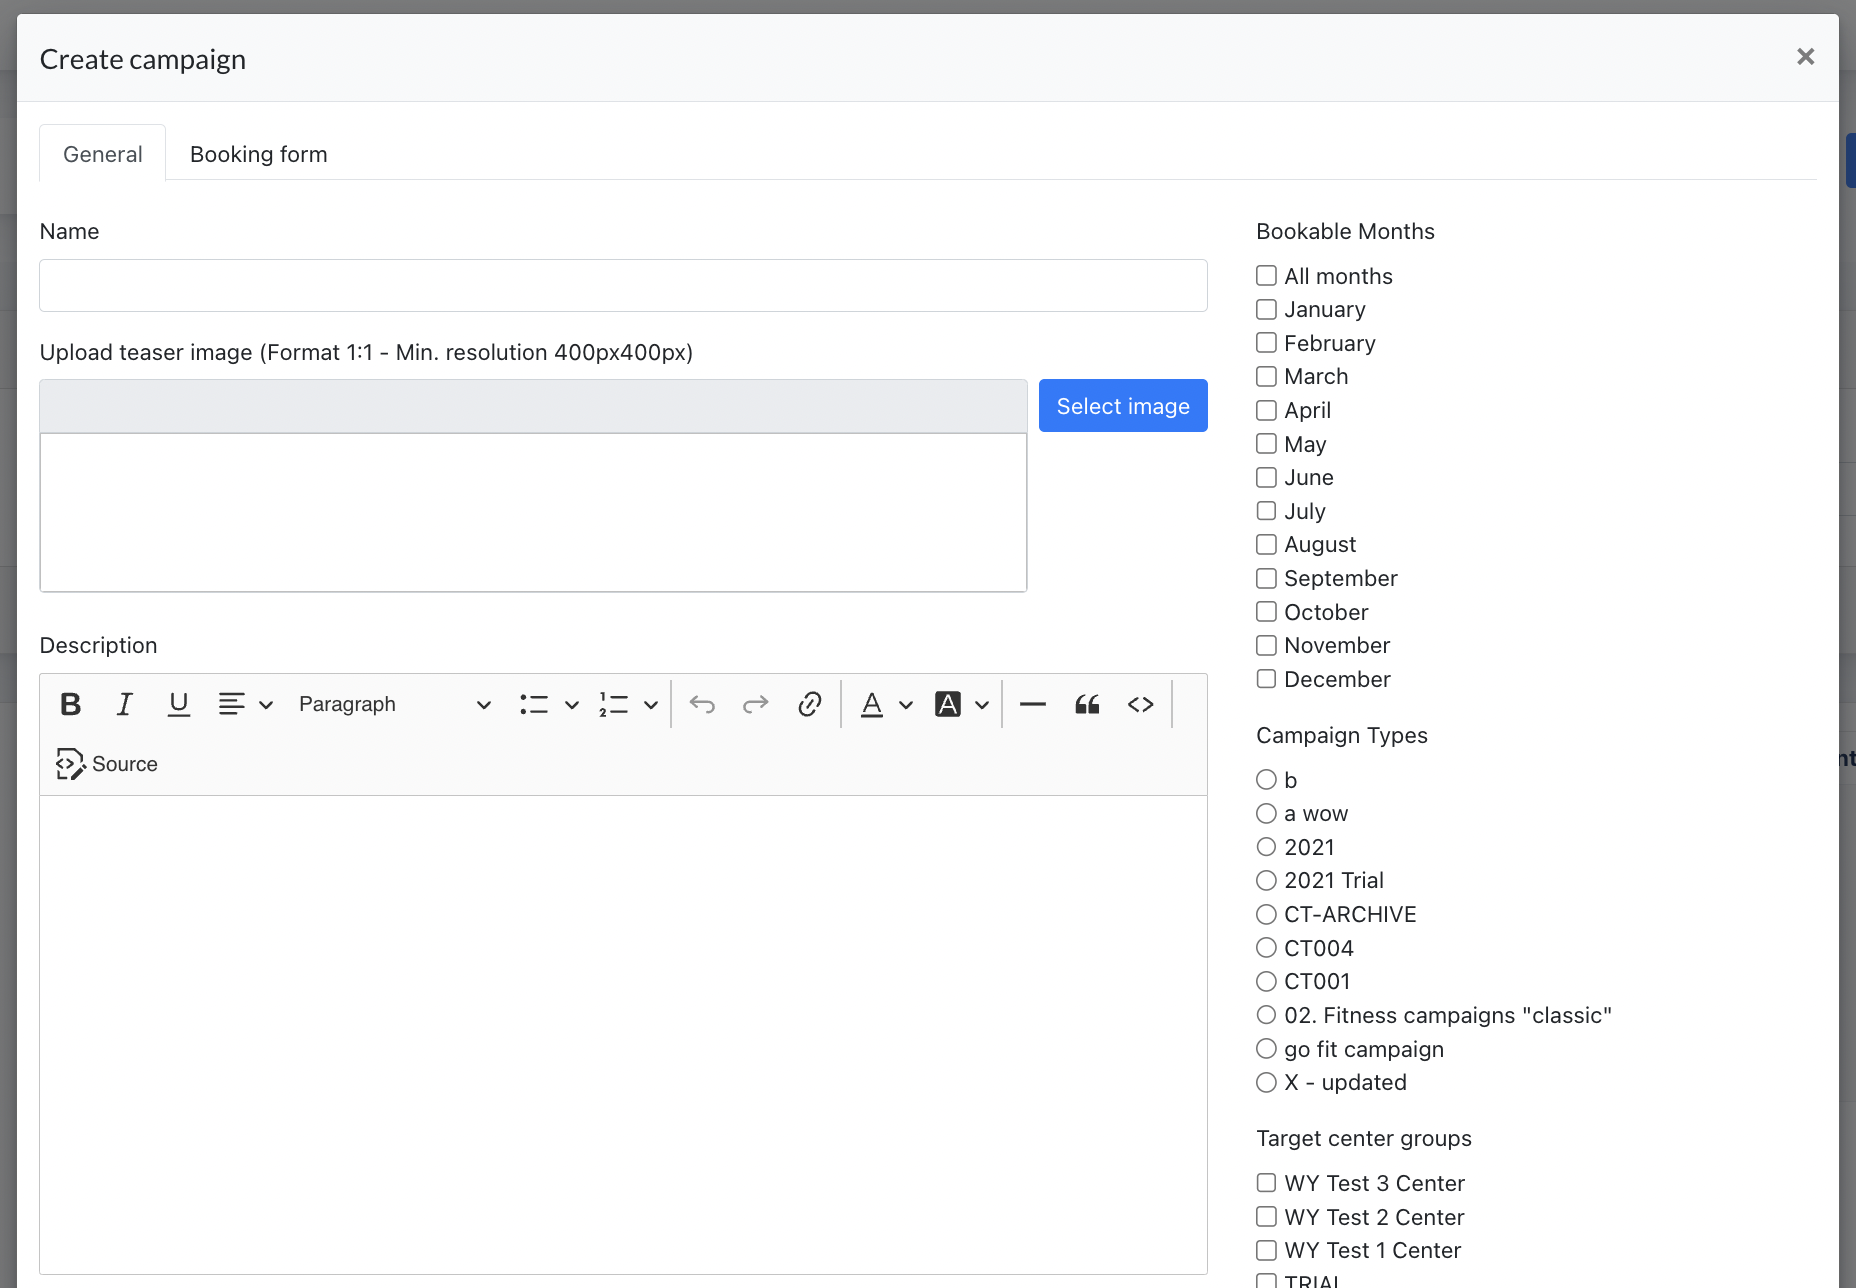
- Upload info Image : this image displayed after click on the "info" button
- Preview Text : this text displayed after click on the "Preview" button
- Preview Image : this image displayed after click on the "Preview" button
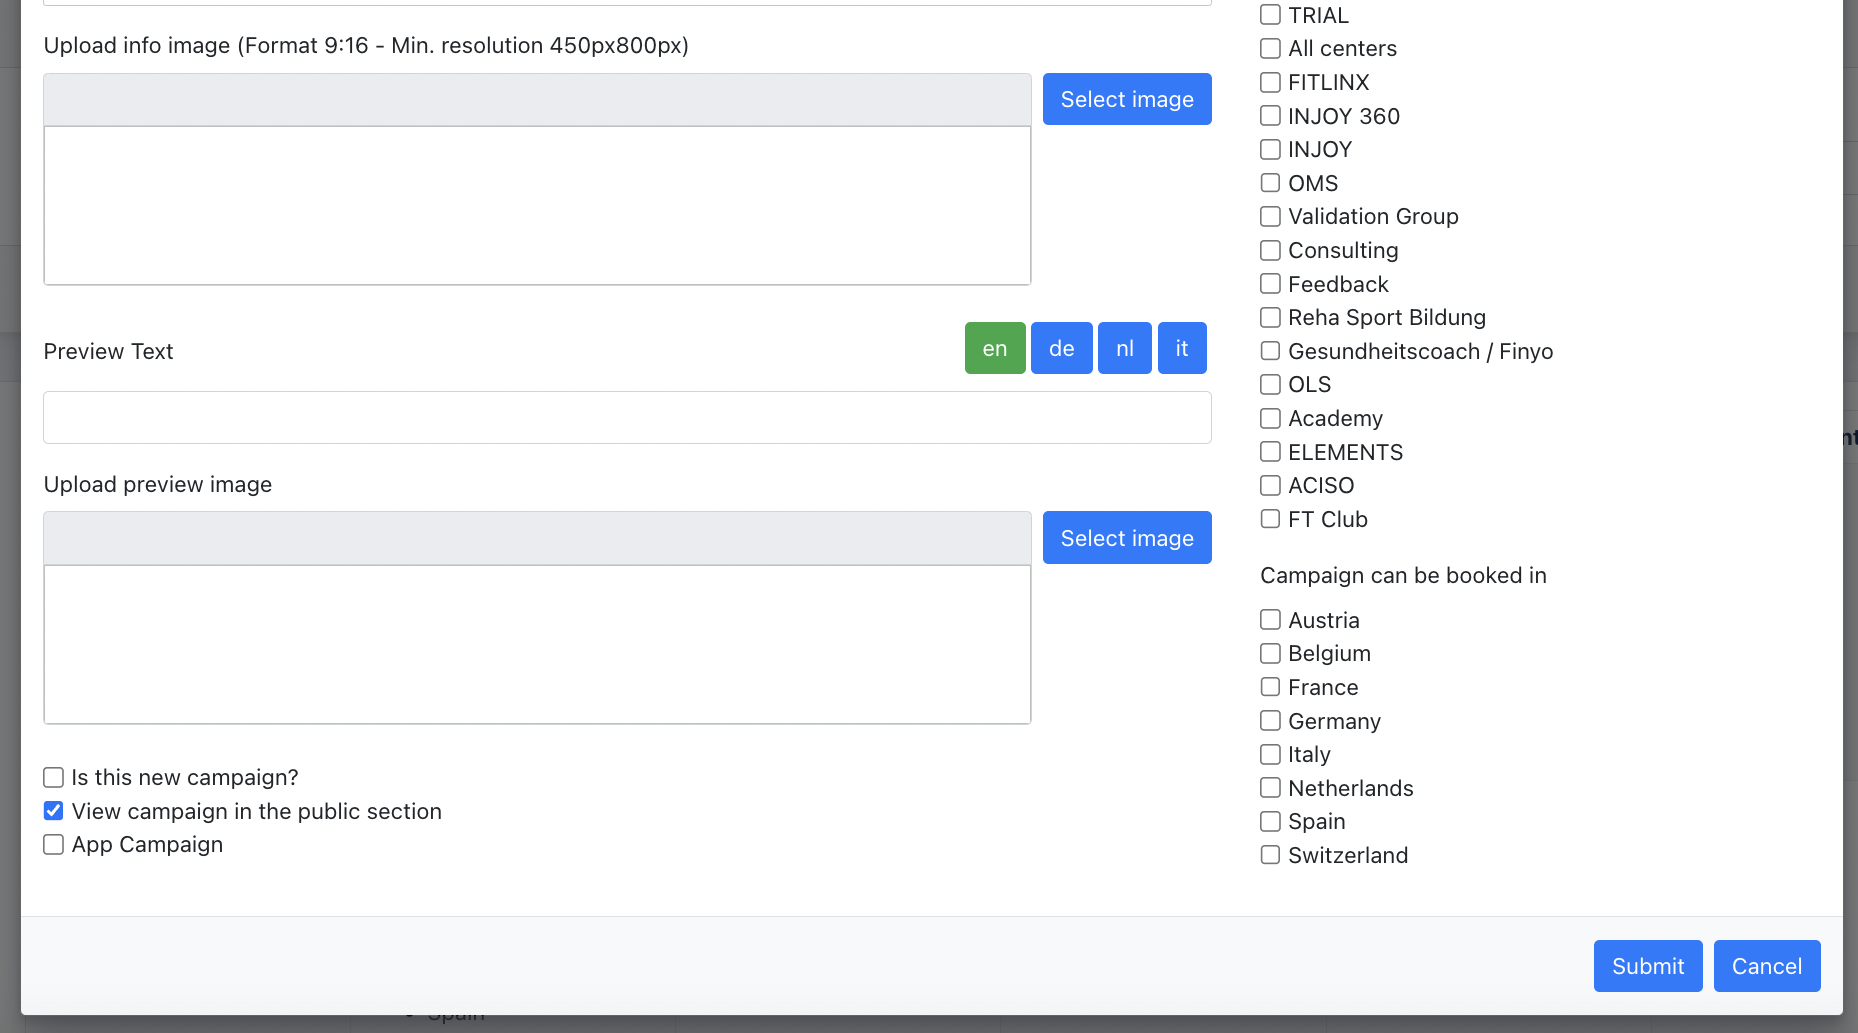
Checkboxes :
- Is this new campaign : Check this and a label "new campaign" will be displayed on the card
- View Campaign in the public section : Check this and this campaign will be displayed on the ark site section.
- App Campaign : Check this option to create an "APP Campaign"
2.2 APP Campaign
- App Campaign is a campaign created for Centers subscribed with the egym App (either Fitlinx or Injoy 360). Center Admin may book this campaign for it to be displayed on the APP.
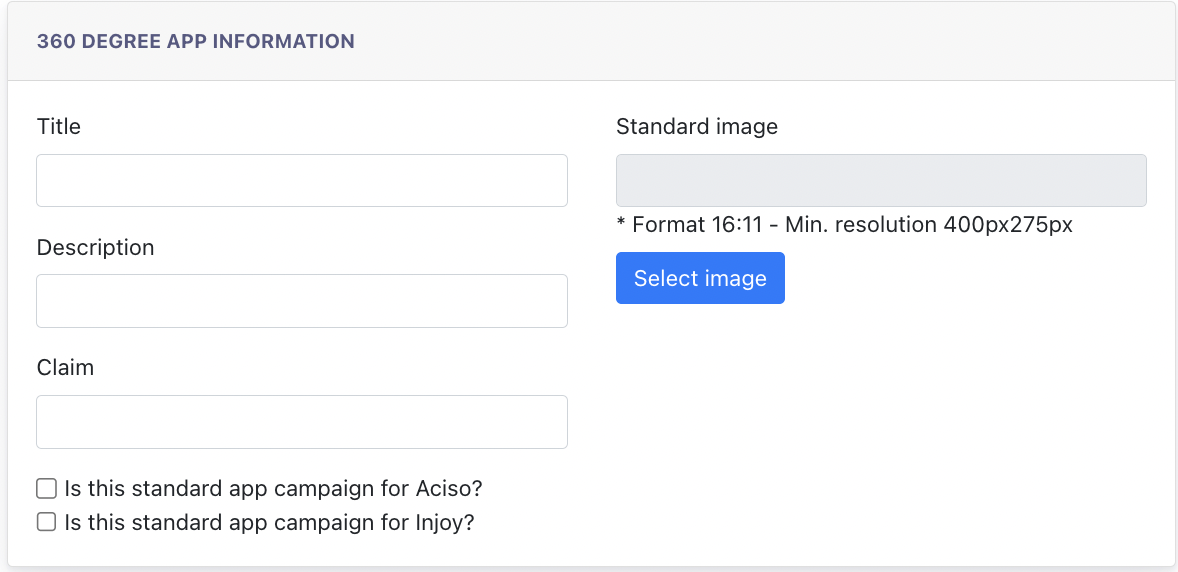
- Title : Enter a title for this Campaign
- Description : Enter a description for this Campaign
- Claim : ??
- Standard Image : Enter an image for this Campaign
Above are essential information for an APP campaign. All data input will be displayed on the APP.
Remarks : APP Campaigns created are displayed on the APP ( required members to login to view ).
2.3 Standard APP Campaign
Management Admin may further configure an APP campaign to be a Standard APP Campaign.

▢ Is this a standard app campaign for Aciso / Injoy ?
If the above checkbox is checked, this campaign will appear on the APP main screen for the public to view ( without the need to login )
Only 1 App Default Campaign is allowed to be shown on the ACISO / INJOY 360 App.
-
Landing page URL : Campaign website
-
Priority :The priority sets the order of the campaigns shown to the User Start date & End date : Duration of this campaign display on the App.
1.1 Creating an OLS Booking Form
OLS Booking Form is available on
-
Cockpit > Dashboard > When user clicks [ Book ] on any campaign advertisement box.
-
Cockpit > OLS Campaign > When user clicks [ Book ] on any campaign advertisement box.


Our System allows admin to create an OLS Booking form based on the info needed for every OLS campaign.
How to create an OLS Booking form
-
After a campaign is created, go to the tab [ Booking Form ] to customise the form. Admin can customise for both APP Campaign & OLS Campaign. Remarks : depending on which type of campaigns you are created, each type has a preliminary field which is mandatory and not editable via the form.
Examples of form Builder:

-
After customising the form, click submit.
-
This form will appear as the Campaign Booking Form when you click on [ Book Now ] button on Cockpit.

Examples of the form created by Form Builders:

The elements highlighted in blue are the mandatory fields ( non-editable) , and elements appears after them are those built by form builder.
1.2 Create an OLS Campaign
Management User creates a new campaign via here : Management Panel > OLS > Listing > Create Campaign
On the form :
-
Name : The campaign’s name
-
Upload Teaser Image : This image displayed on the OLS Booking Card
-
Description : Description of the campaign
-
Upload Info Image : This image displayed on the Info modal.
-
Preview Text : Description appear in the Preview Modal
-
Upload Preview Image : This image displayed on the Preview Modal
Screenshots for OLS Booking Card

Screenshot of the Preview Modal (open when click on ‘Preview’)

Screenshot of the Info Modal (open when click on ‘Info’)

-
Remark Label : The admin can set this Remark Field as Mandatory or not mandatory in the booking modal.
-
Is this New Campaign : Checking this will add a [ New Campaign ] Label on the booking card
-
View Campaign in the public section: When this is checked, this campaign will appear in the OLS Smart Section which can be part of an Site-Pannel( will explain further)
-
Bookable Months : Configurates the months this campaign can be booked by the Clients
-
Campaign Types : Configurates the types this campaign belongs to
-
Target Groups : Configurates the groups this campaign is available for
-
Countries : Configurates the countries these campaign is available for
1.3 Types of Campaigns
Management Admin can create three different types of campaigns for the Clients.
-
OLS Campaign
-
App Campaign
-
One timer Campaign
-
OLS campaign is an online marketing campaign which includes a landing page and FBadvertising.
-
App Campaign is a campaign created for Centers with the egym App. Clients may book this campaign and this campaign will appear on the APP for members to view by logging into the App.
Egym App refers to Injoy360 app & Fitlinx App -
Onetimer Campaign is a campaign created for potential client, who has not yet subscribed to our system. This can be seen as a trial period for the user before they officially subscribe to our system
1.4 How to create an APP Campaign
Screenshot from Create OLS Modal


Management Admin needs to tick the [ App Campaign ] checkbox to configure this as an APP campaign.
Then Management User needs to fill up the following fields :
>> Title, Description, Claim, Standard Image << These are essential information of the campaign displaying via the app Only members of the Center can view these campaign via login to the APP
For APP Campaigns, the Center Admin can book as many campaigns they like, the duration is flexible.
1.5 How to create a Standard APP Campaign
Management Admin may further configure an APP campaign to be a Standard APP Campaign.
▢ Is this a standard app campaign for Aciso / Injoy ?
If the above checkbox is checked, this campaign will appear on the APP main screen for the public to view ( without the need to login )
Only 1 App Default Campaign is allowed to be shown on the ACISO / INJOY 360 App.
-
Landing page URL : Campaign website
-
Priority :The priority sets the order of the campaigns shown to the User Start date & End date : Duration of this campaign display on the App.
1.6 How to Create Onetimer Campaign
This is created under [ Create Onetimer ] underManagement-Pannel > Content Service > OLS > Booked Campaign. Management Admin created this booked campaign directly in the modal shown.


Steps to create a One Timer Campaign
-
Select a client created for this One-timer
-
Select the campaign & click Submit
The booked campaign will appear in the listing as shown below, also amail is send to the client's email address to inform them about the booking and request additional information.


-
Cclick on the edit button in the action column to manually fill in the info for the One-timer campaign.
2. Managing / Tracking a Campaign
OLS Team is the role responsible for managing booked campaigns from Clients.
Management Panel > OLS > Booked Campaigns ( Remarks : this page is accessible by all three roles : Management User, OLS team, Consultant)

OLS Team can track the booked campaign via this page via the search filter.
-
Type - choose the type of campaigns you’re looking for.
-
My campaigns - Campaigns booked by the Center assigned to theOLS team user.
-
OLS campaigns
-
APP campaigns
-
Center name - Center that booked the campaigns
-
Campaign name - Search for a specific campaign
-
OLS team user - Campaigns booked by the enter assigned to a specific OLS team user.
-
Status - Campaign’s status
-
New : Newly booked campaign
-
In progress : OLS team is working on the campaign
-
Active : Landing page is up and the campaign starts
-
Completed : Reached the end of campaign duration
-
Facebook status
-
New
-
In progress
-
QM completed
-
Active
-
Completed
-
Google status
-
Active
-
Inactive
-
In Progress
Remarks :
Every Center is assigned to an OLS Team user via : Management Panel > Client > Edit Client.
This user is in charge of managing / tracking the OLS campaign for those Clients assigned to him/her.

2.1 Status of a Campaign
As explained above, every campaign has got a main status.
>> New, In progress, Active or Completed <<
Each status is colour- coded for a better overview.
Screenshot example: below shows all newly booked campaigns. This list will be updated once the User makes a booking in the Cockpit.

The above list columns show all the important info of a campaign. If you scroll to the very right, you will find an [ Edit ] button. Click on the button will lead the Management Admin to the [ Edit Booked Campaign ] modal, which is the place they manage these campaigns.

-
[OLS info] is filled in by Client via Cockpit > OLS > Settings, and the info is displayed here. Management Admin can edit the info here if the Client requested to do so.
-
[Consultant info] shows the consultant assigned to the Client that booked this campaign.
-
[Landing Page] is where the OLS team adds the landing page URL when it is finished.

-
When clicking on {send information to customer}, an email with the landing page URL will be sent to the Center’s email address.
-
When click { Add new landing page } , a modal will pop up for OLS team to add the landing page URL
-
[Current Booked Campaign] for OLS Campaign
-
This is the Campaign info page. OLS Team will edit this info according to the campaign status.
-
{Status}, {Facebook Status} {Google Status} is manually set by the OLS team according to the campaign status.
-
{start date} & {End Date} is automatically generated when a Center books a campaign on Cockpit. Every OLS campaign duration is eight weeks. Centers can only book one OLS campaign in the same duration. There should not be overlapping of campaign’s duration.
-
{Facebook Budget} and {Adword Budget} will display here.
-
All information filled in by user will appear under this table.
{Remarks/Individual Wishes] -For individual notifications belonging to the campaign The remarks column on the listing will display “available” if thremark is filled by the User.

-
{Internal Note} , { Ad Remark }, {Landing page comment } - is the information text field that allows the Management team to add any remarks for internal reference.
-
When {Internal Note} is filled, the { internal remark } column on the listing will show “available

-
[Trial / Onetimer Billing] - This form is for the Management team to write down internal remarks for billing on one-timer/ trial clients. The field has no dynamic function and is only for internal reference.

3. Email Setting of a Campaign
Whenever a Center books a campaign, an email will be sent to the consultant of the center and the email address configured via
Cockpit > OLS > Module Setting

Example email:

4. OLS Landing page
Management Admin can build a landing page template here, which is available for User to import and build an OLS landing page on their Site Panel or a standalone landing page.
4.1 Creating a page

-
Page title : The Title of the page which will be shown on the browser tab
-
Description : The description of the page, which will be shown also in the google search preview
-
URL : The URL-Ending will be added to the pages domain together they create the individual url for the pageHide footer for landing page :
-
If active, the landing page doesn’t have any footer when you import into the Site Panel
-
If inactive, the landing page will have a standard footer.
-
This landing page is created for : Select which groups / Clients this landing page template is available.
-
Select page to copy : Creates a new page with the content of an already existing one.
After a new page is created, it will appear on the listing on top. The status of this page is by default “inActive” when it’s created. When the page is completely built and ready to use, it has to be set to “active” manually.

4.2 Building a page
Click on the Edit icon and enter the section editor.


Click on the empty section, a [ + ] icon will appear. Click on the [ + ] icon to add a section template into this for further editing.

-
Select Template
-
Select Categories
-
Select Section template
-
Preview available to show how does the template looks like
-
Press [ Submit ]
-
Page is successfully created
Site Panel : Importing a landing page template
After the page is finished building up & status changed to ACTIVE, then it’s ready to be imported to the Client.
Following an example of how this site i’ve just created { jess-page-15March } can be imported via the Site Panel.
Go to [ Create new page ] and select { Landing Page Template }. Then you will find a list of all the landing pages built by the Management Users that are available for this Client/group .

5. OLS Smart Section
OLS Smart Section is a feature that allows Management Admin to configure a specific campaign to appear on any SitePannel Smart Section.
This is a special feature created for the Management Admin only. Screenshot of an OLS Smart Section on the public website

5.1 Include a OLS Campaign in a Smart Section
Go to Management Panel > Create OLS Campaign Modal, make sure this checkbox is ticked.

When this is checked, this campaign will appear on the OLS Smart Section.
5.2 Public Website with OLS Smart Section Configuration
If theManagement Admin likesto create a website with a OLS Smart Section, he can find the smart section in the section selector. :

The section can be further edited by clicking on [Edit Section]

Edit a Smart Section Modal :

-
Center Groups : Management admin can select which OLS Campaign to appear on the smart section. Example screenshot below:

Campaign Types : All campaign types are displayed on the smart section, however, the management admin can configure the sequence of display.