Cockpit : Newsletter tools for users
Newsletter Modules
Client that subscribes to Newsletter modules may manage their newsletter via Cockpit platform.
1. Creating Newsletter
Go to Cockpit > Newsletter > Listing, Click on "Create Newsletter" :
Under Step 1
- Configure your Subject & Title for your newsletter
- Select senders
- Select the recipient group
- Click [ next ]
Remarks : At least 1 sender & 1 recipient group needs to be configured for newsletter creation.
Under Step 2
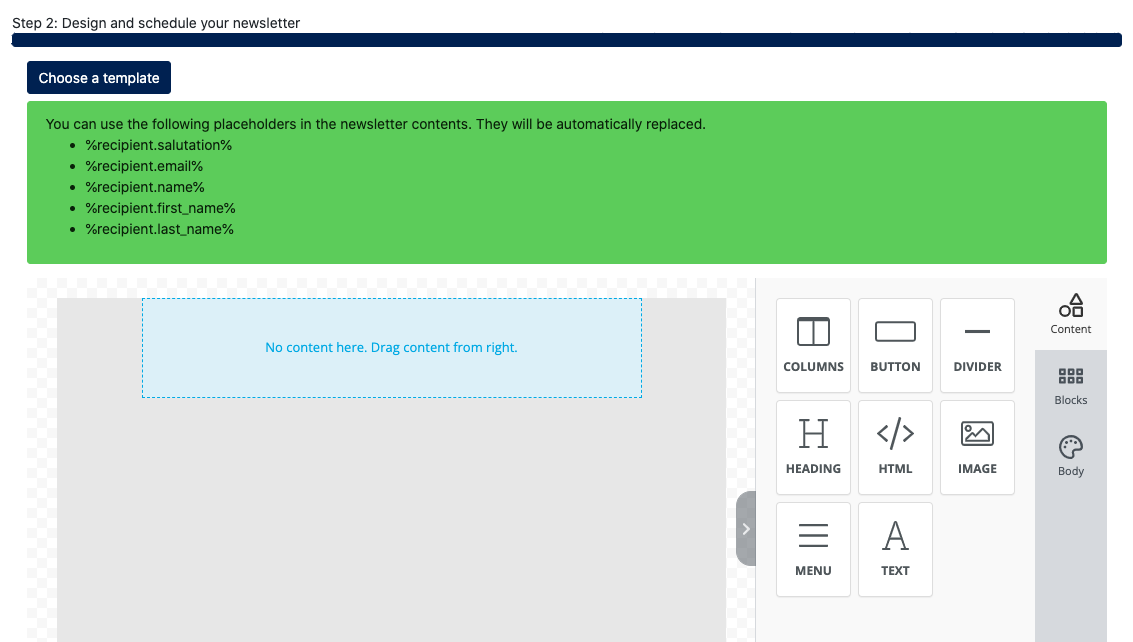

- Click [ Choose a template ] or build your newsletter content from scratch.
- Use our newsletter editor to build the content you like to have. May use existing placeholders to display data on newsletter when received by recipients.
Example :
"Hello %recipient.salutation% %recipient.last_name%,
we like you to inform about our summer sale."
This will create an email that automatically starts the newsletters content with the salutation and the last name of the recipient.
! important note !
A salutation will only be shown if the recipient's salutation field is not empty.
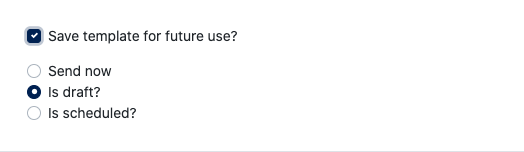
After the content is ready, you have the following options:
- Save template for future use? - Save your design as a template for future use
- Send now - send this newsletter to recipient instantly
- Is draft - Save as draft
- Is scheduled - schedule a preferred date & time to send the newsletter


After this newsletter is submitted, new data will be updated on the Newsletter listing.
1.1 Newsletter Listing
Example Screenshot
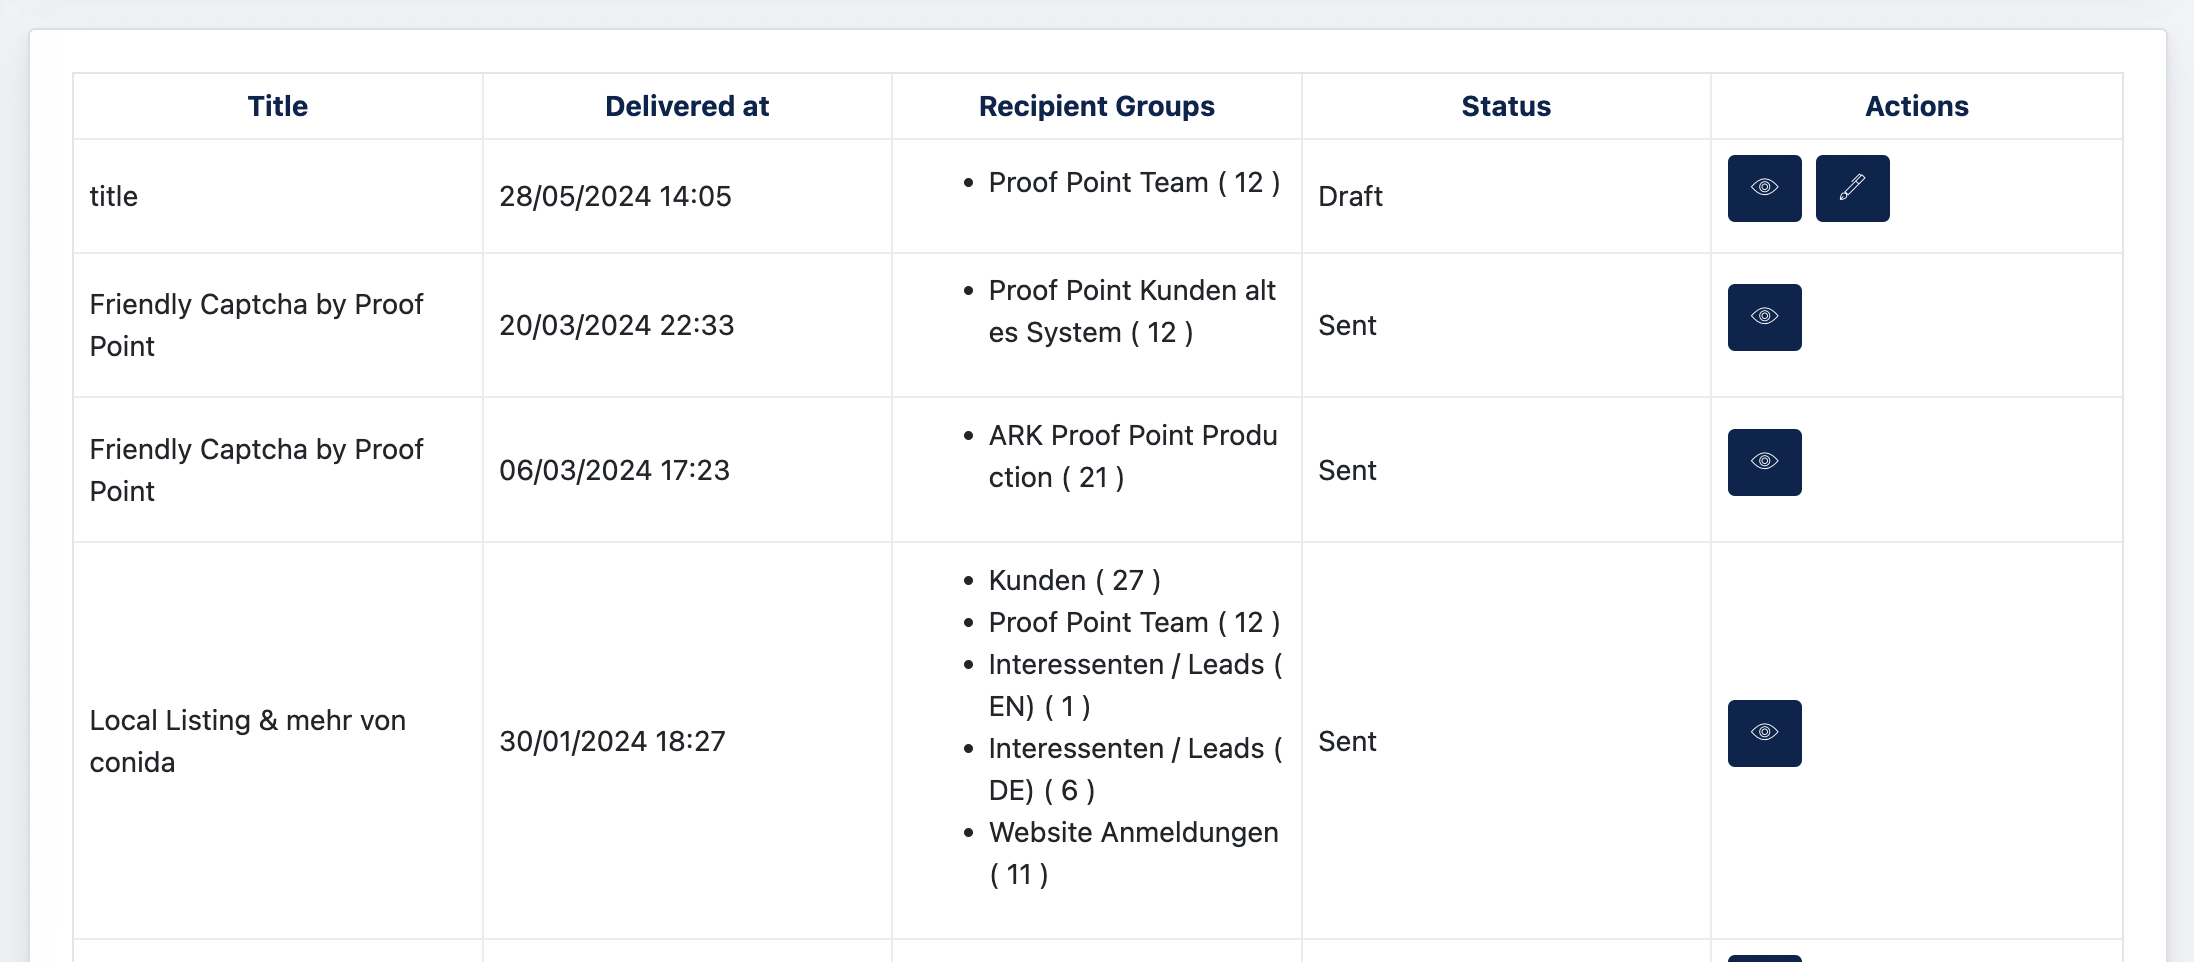
This listing showcases the following data:
- Title - The title of newsletter
- Delivered at - Date & time this newsletter is delivered
- Recipient Group - which recipient group this newsletter is sent to. The number behind the group indicates the total number of recipients in this group.
- Status
- Whether this newsletter is sent, saved as draft, or scheduled.
- Actions (different action buttons will show if the status is different)
- View icon - if the newsletter is already SENT
- Edit icon - if a newsletter saved as Draft/Scheduled
- Resend icon - if a newsletter is Failed to Send
2. Newsletter Recipients
There are 4 types of Recipients [ Active, Inactive, DOI, Blacklist ], Client manage and view their recipients on this page.
2.1 Active Recipients :
These are recipients who agrees to receive a newsletter from Client. Recipients came from subscribing newsletter on the Ark Site, and providing a 2nd confirmation via email.


2.2 InActive Recipients :
Recipients that unsubscribe from the Newsletter will become an 'Inactive Recipients'.
There are 2 ways to unsubscribe:
- Via the website
- Via the newsletter "unsubscribe link"
Or, Admin can manually change the status to 'Inactive'.
2.3 DOI Recipients:
A DOI recipient is someone who has subscribed to Newsletter via Ark Site, but have yet to make another confirmation via the email.
An example of the DOI email:

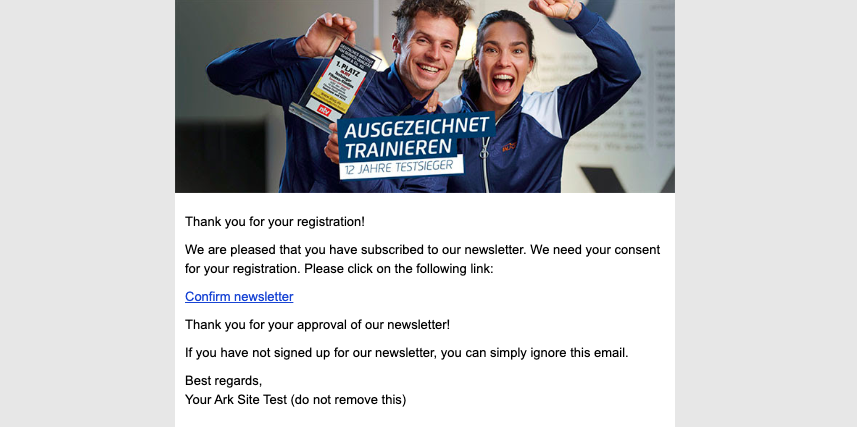
When a user receives above email, she needs to click on [ confirm newsletter ] and be officially added to the Active Recipients listing, and start receiving newsletter.
2.4 Blacklist Recipient :
Blacklisted recipients are created by Admin manually. If a Recipient is blacklisted, he/she can no longer receive any newsletter from the Client, and if he/she tries to subscribe again, an error message will appear as { This email is blacklisted }
Remarks : If there is an existing blacklisted email in the database, and Admin tries to upload a list of Active/InActive/DOI recipients which contains this blacklisted email in them, the blacklisted email will remained as blacklisted.
Blacklisted recipients is manually create/remove by Admin.
2.5. Bulk upload recipients
Here, you may bulk upload your customer listing as recipients
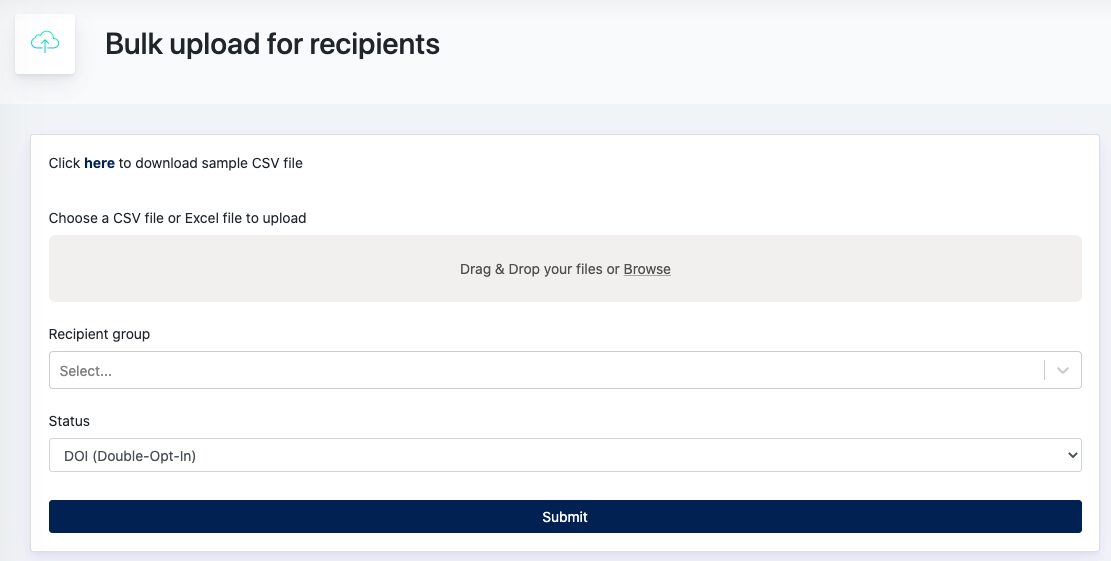

Step-by-step guide to upload bulk Recipients :
- Download a CSV sample file.
- Input/Create your email listing following the sample file’s format
- Upload this file ( only CSV / Excel file is applicable ) and choose which Recipient Group these users belonged to
- Select Recipient Status ( Active / InActive / DOI )
Remarks :
When User uploads a listing of Active Recipients, all these names will go under Active Recipients directly (without needing to go through DOI process).
!important notification!
Client has to take full accountability for Recipients whom have already gone through DOI procedure. This happens when newsletter recipients are imported from other systems.
When the User uploads a listing of DOI Recipients, these recipients need to click [ Confirm Newsletter ] in their DOI email. After clicking, the status of Recipients will be updated to 'Active'
3. Creating Recipients Group
Recipients Group is a group of emails under specific name. Users can create different recipient groups for different purposes.
How to create:


Remarks :
- 1 email can belong to more than 1 group
- Only active recipients can be assigned to groups.
3. Create Senders
"Senders" refers to the person who sent the newsletter. This is a mandatory data for newsletter creation and sending.
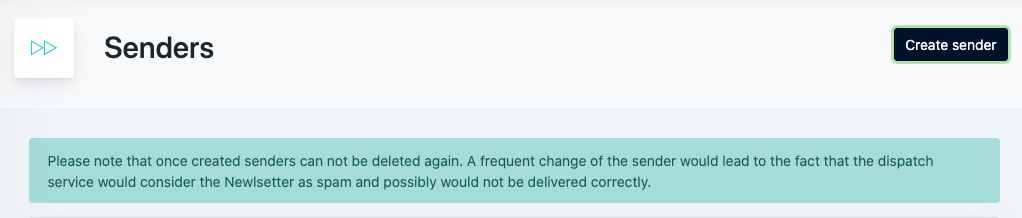

Click on "Create Senders". Add your name and email and click 'Submit'.
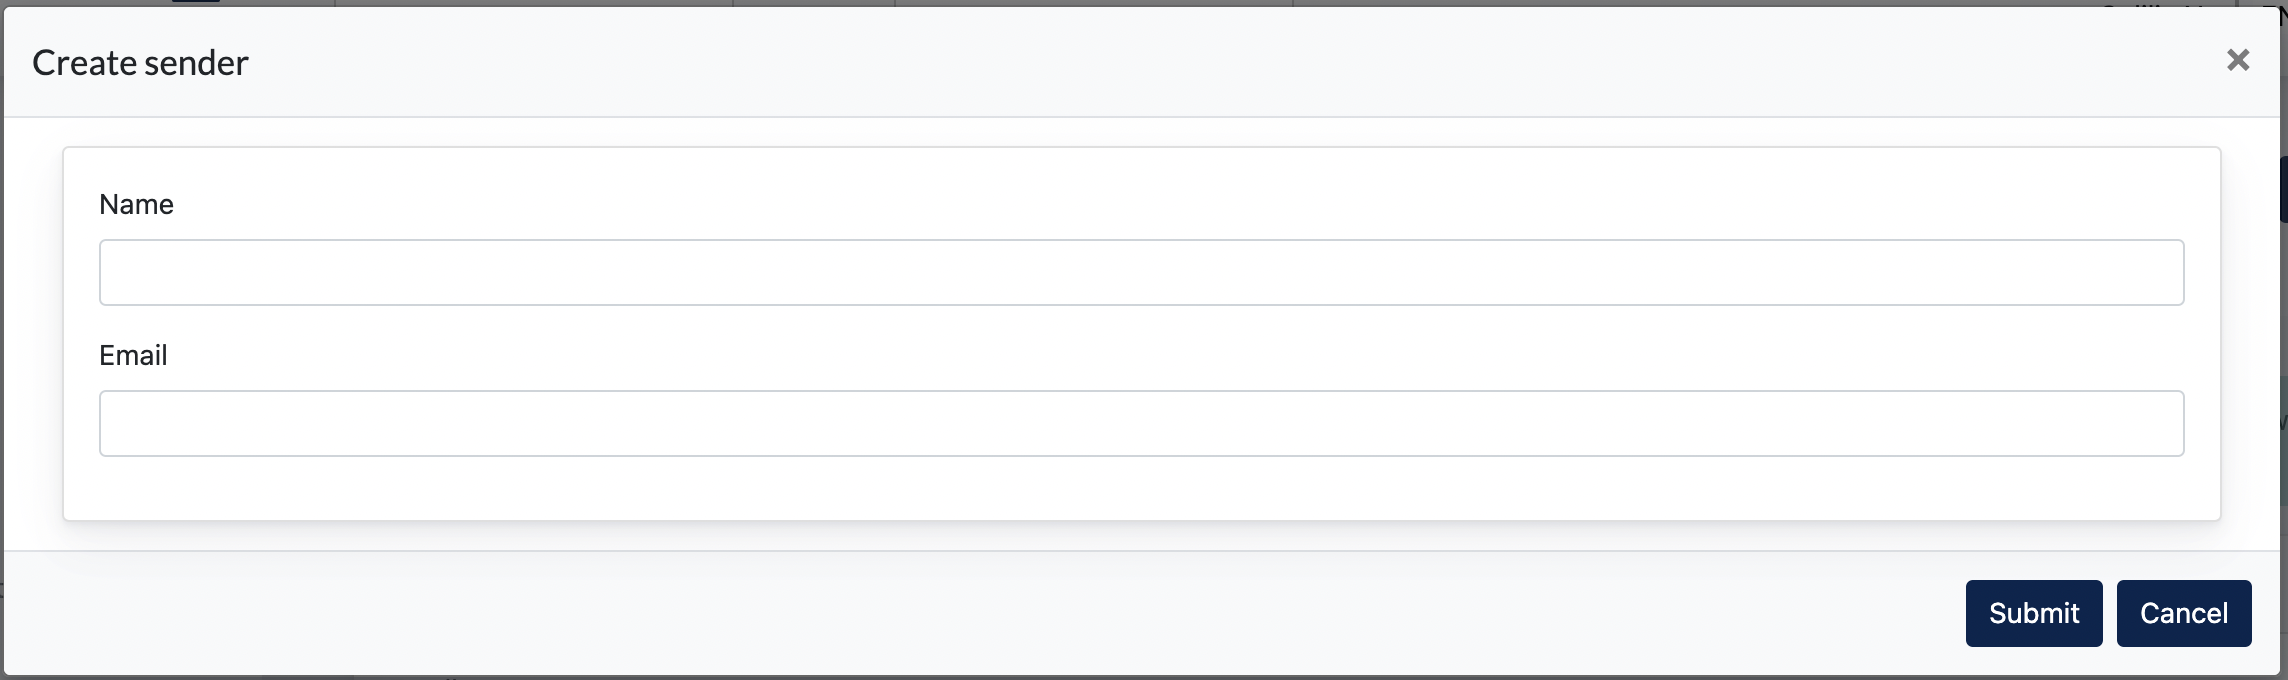
After senders are created, you can start to create and send newsletter using this sender.
4. Template
Templates page stores all newsletter which is created and configured as 'saved template for future'.


Client may continue to edit the newsletter content here.
5. Newsletter Statistic
Under Reporting > Statistic, Users can check the statistic of newsletter to better understanding their recipients.

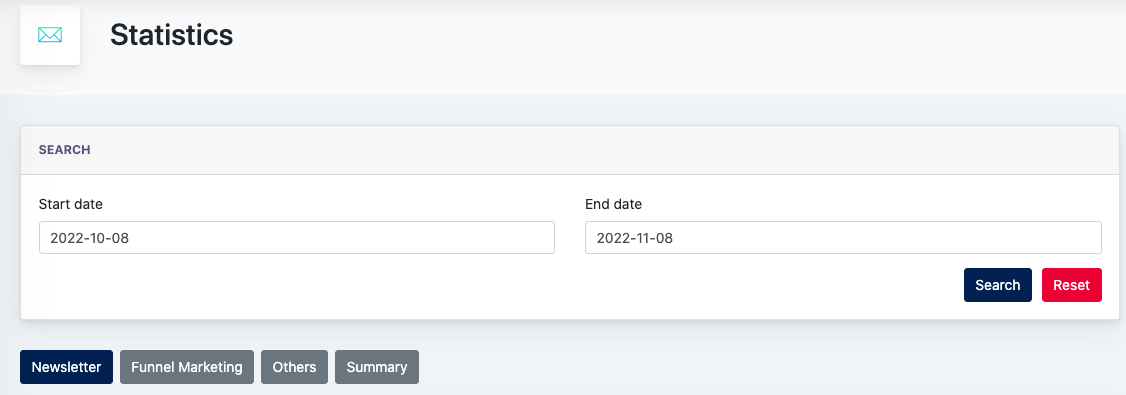
Admin may select a 'Start Date' and 'End Date' to look for statistic data within this duration.

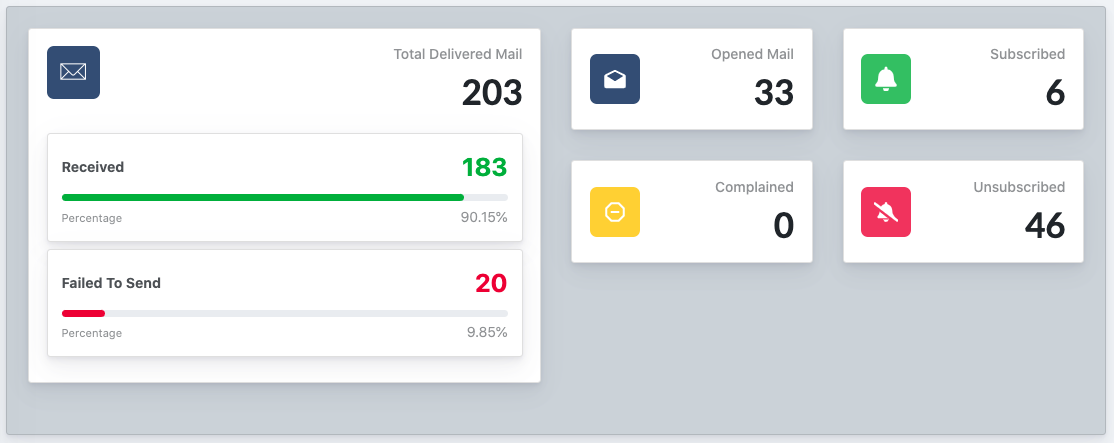
From the above, we can see there is several data available:
- Total Delivered Mail - Total number of emails delivered to the recipient’s address
- Received - Total number of emails received successfully by recipients
- Failed to Send - Total number of emails unable to send out from the system
[ Total delivered mail - received = failed to send ]
- Opened Mail - Total number of email clicked open by recipients ( Count only the first-time-click)
- Complained - Total number of email marked as [spam] by recipients
- Subscribed - Total number of users subscribed to the newsletter
- Unsubscribed - Total number of unsubscribe action being taken ( by clicking on the unsubscribe button on the email / Ark Site )
Example Scenarios :
[ A user subscribes newsletter in October, and unsubscribe from newsletter in November ]
- October statistic will display:
- Subscribed : 1
- Subscribed : 1
- November statistic will display:
- Unsubscribe: 1
- Updated October statistic (after above scenario) :
- Subcribed : 0 (Earlier number is removed)
- Subcribed : 0 (Earlier number is removed)
Different Tabs


Under different tabs shows statistic for different modules :
Remarks : Mail count in the statistic are mailings sent out manually OR triggered automatically when specific modules are used. It DOES NOT include emails sent from the center admin to their members or others.
- the end -