Cockpit : Messe
Übersicht
Das Messemodul wurde für einen FEX-Kunden entwickelt - einen Messeveranstalter in Deutschland. Dieses Modul läuft nur auf Proof Point Production.
Das Messe-Modul umfasst die folgenden Plattformen:
- Cockpit
- Teilnehmer-Portal
- Ark-Site
Cockpit
Hier kann der Administrator alle Kunden- und Messedaten anlegen, bearbeiten und verwalten.
Teilnehmer-Portal
Für Messeteilnehmer zur Verwaltung ihrer Unternehmens-/Nutzerdaten
Ark Site
Dies ist derdie Marketing Website der Messe, jede Messe hat eine Website.
Wenn ein Kunde das Messemodul abonniert, teilen sich alle Webseiten unter diesem Kunden EIN Teilnehmerportal.
Business Workflow
HerebyHier isist anein exampleBeispiel offür aeinen businesstypischen workflow:Workflow:
ClientKunde A abonniertsubscribesdasto Fair Module.Fair-Modul.- Fair Module is added to Cockpit
- Participants Portal is added to the Center’s ark site.
- Every Ark Site represents a fair. If a client has 3 fairs in one year, this client needs 3 centers to create 3 fairs site.
- Every fair site under the same client will share the same Participants Portal. Example: Center 1 logins to ark site admin panel & add/edit/delete any content for the participants portal, the content is updated in Center 2 & Center 3 ark site admin panel.
ClientKunde Aloginsmeldettosich am Cockpittoan,doumtheFolgendesfollowingzu tun
- Create/edit fair info
- Create/edit user info ( exhibitor, consultant, speaker)
- Manage other data : Industries, Media, Forms, Automation, Email Config, Fair Passes.
- Center Admin
loginsmeldettosichArkbeisitedertoArk-Sitedoan,theumfollowing:Folgendes zu tun:- Setting up the fair site content
- Setting up participants portal content
UserDer Benutzer (Aussteller/Berater/Referent)Exhibitor/Consultant/Speaker)meldetloginssichtobeimParticipantsTeilnehmerportalPortalan,toumdoFolgendesthezufollowing :tun:- Manage their own data
- Upload logo & images
- Upload brand logo & images
- Upload Speakers Portraits
- Fill in Match-making data
- Fill in Fair passes data
Remarks: all data above are sync with Cockpit > Fair Module. FEX admin can always view/edit the same data on cockpit and these data are automatically updated on the Participants Portal as well.
Cockpit : Fair Module
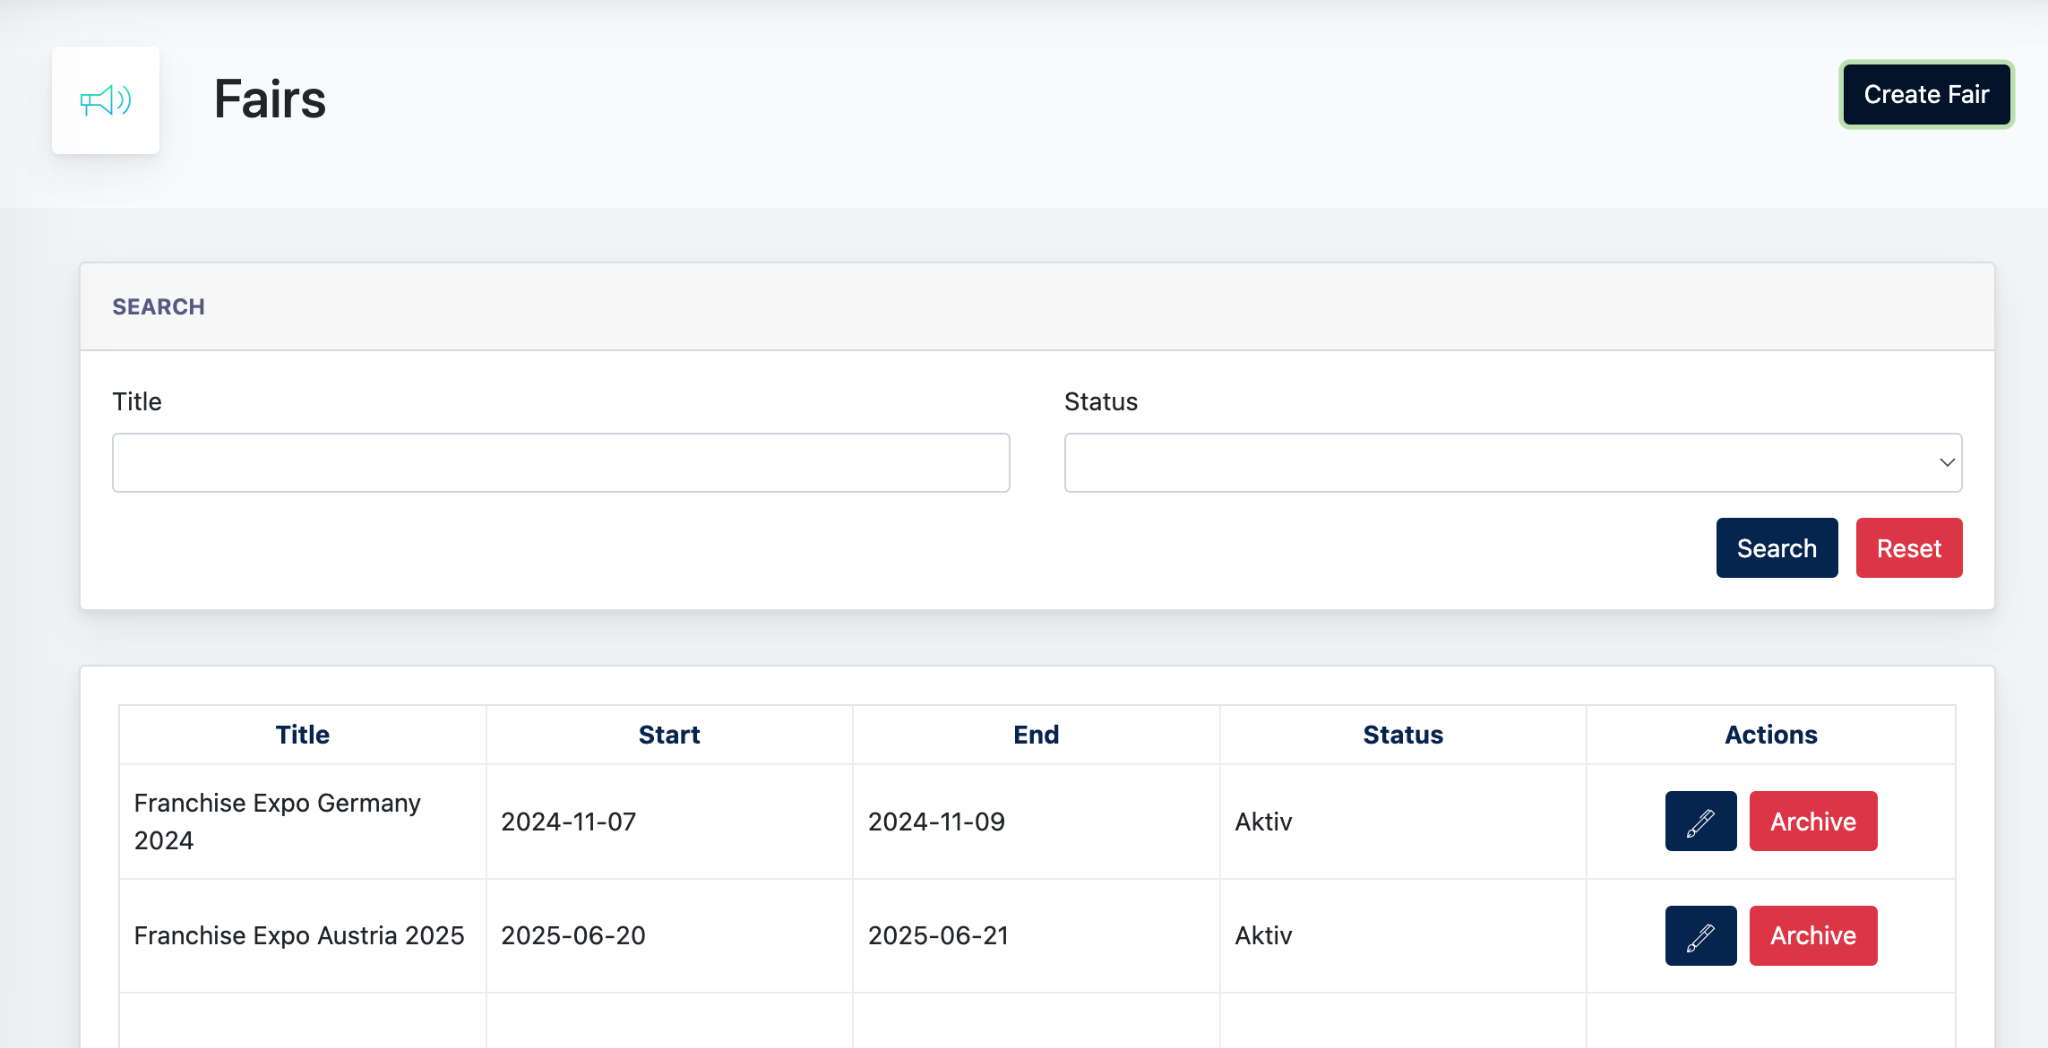
1. Fair
This is where you create a new Fair and view the listing of fairs available.
https://cockpit.proof-point-suite.com/#/dashboard/fairs
Go to [ Create Fair ] and fill in the modal and submit. A fair will be created and added onto the listing.
2.0 Exhibitor/Consultant/Speaker
This is where Admin manually creates users. 3 types of users are Exhibitor, Consultant and Speaker.
- Exhibitor - Companies that will exhibit during the fair
- Consultant - Consultant that works for the fair
- Speaker - Speaker that speaks during the fair
2.1 Exhibitor/Consultant/Speaker
Create exhibitor/consultant/speaker role via Cockpit > Fair > Exhibitor/Consultant/Speaker
Above are mandatory data required when a new user is created. Once a user is created, the system will send login credentials to the user, and user may login to Participants Portal with given credential.
All created users will be displayed on the listing.
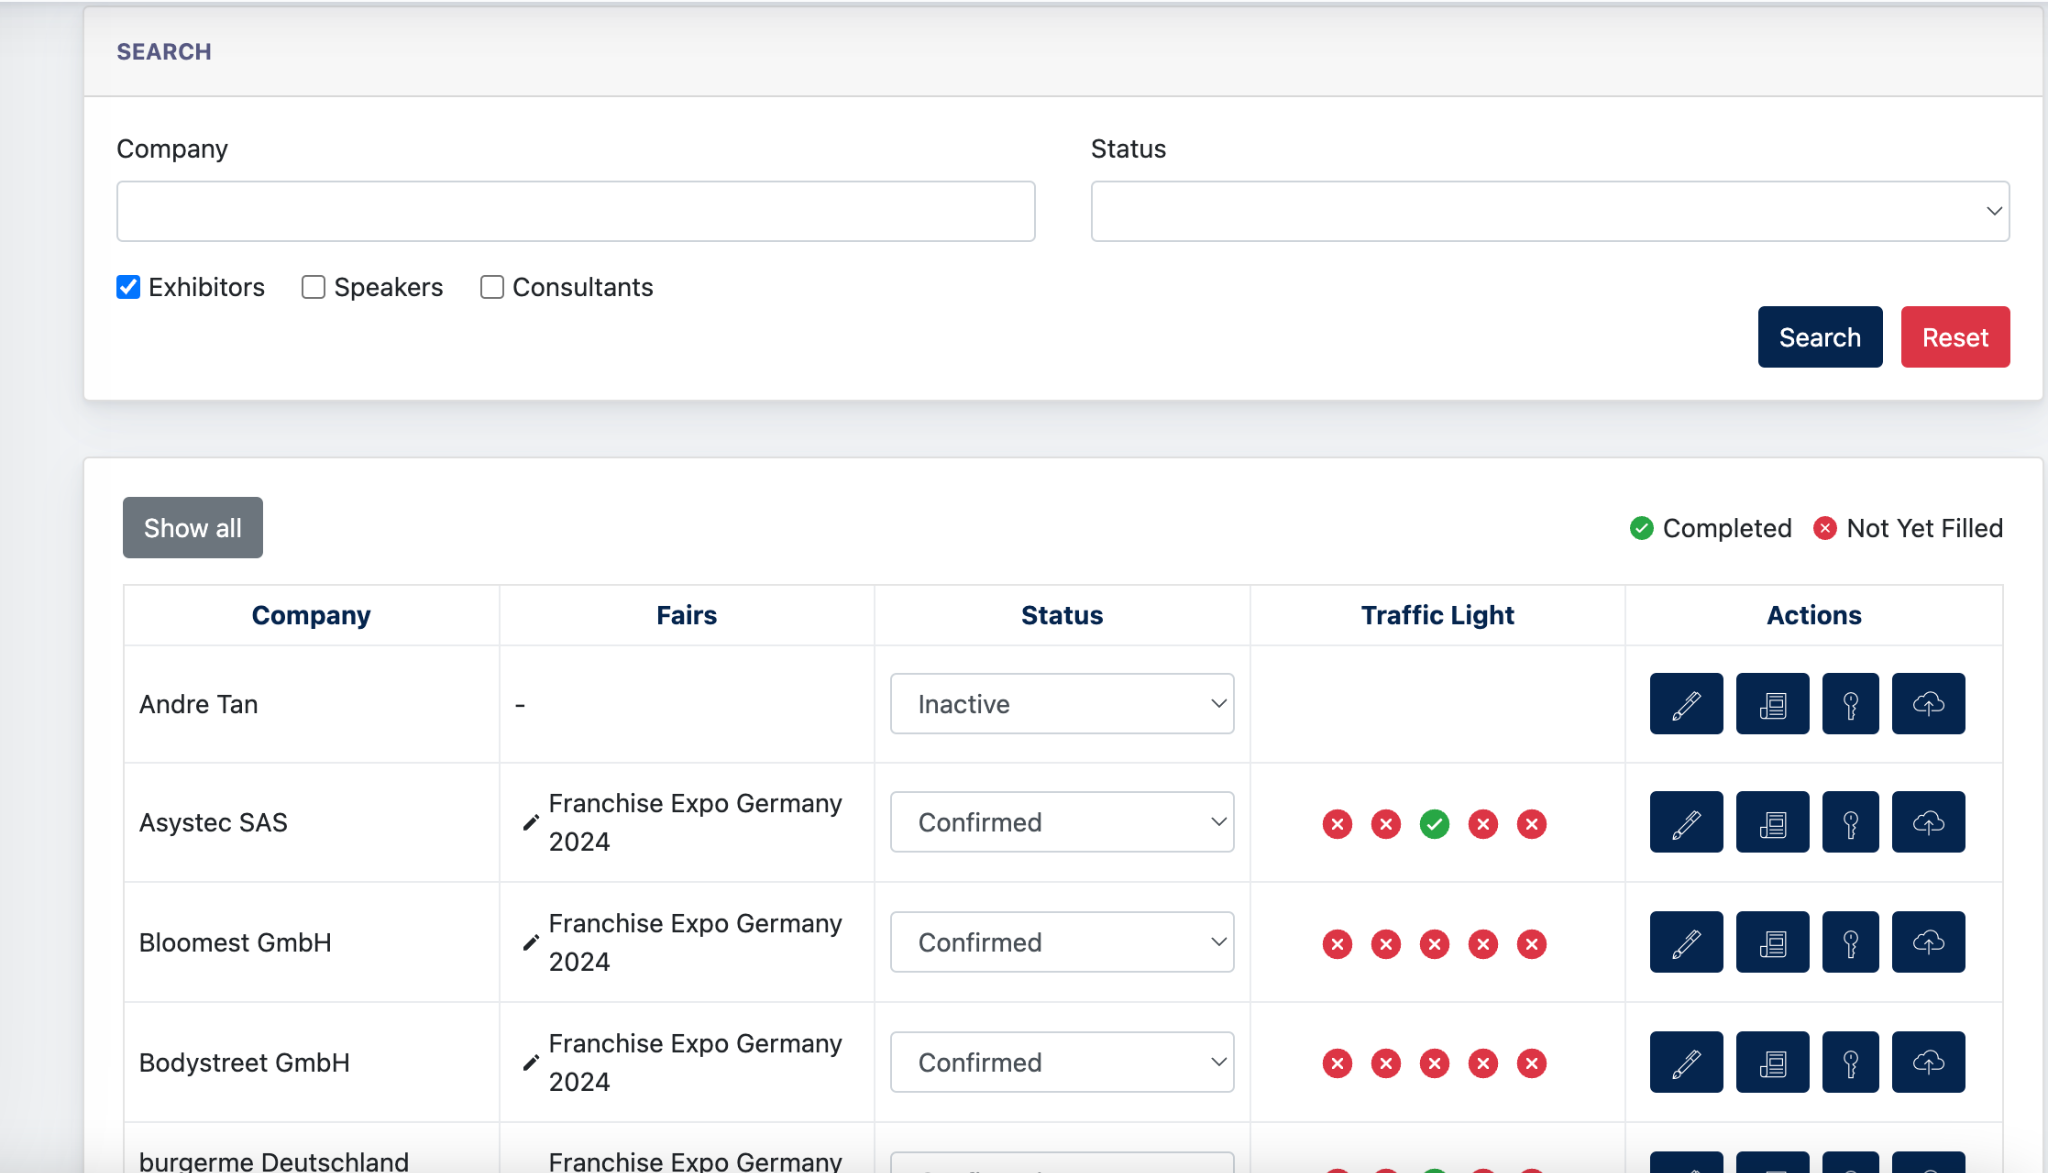
Explanation on the Listing
This listing is shared amongst 3 users : Exhibitor, consultant, speakers.
Our system sets the listing to show either exhibitor/consultant/speakers by default based on the search configuration.
For example, for Exhibitor listing, ‘Exhibitor’ is checked by default thus showing all the exhibitor users on the listing.

Admin may use this setting to search for different users with different status.
Under the Action column, there are 4 functions :
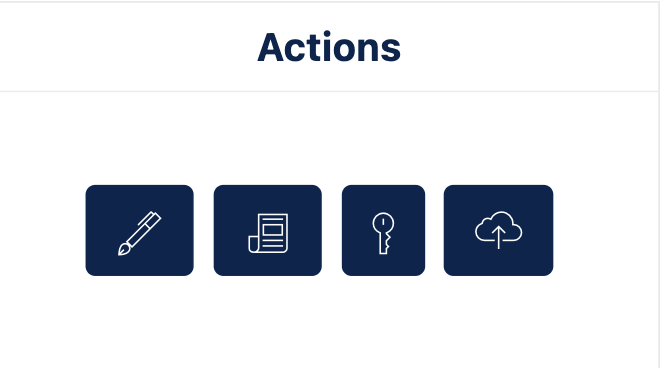
From left to right, these 4 buttons represents the following:
- Edit - allow admin to edit / add data into the form
- Log -
- Log me in as - allow admin to login to the user’s participants portal dashboard directly from this link.
- Upload - allow admin to view data uploaded from participants portal and edit the data here as well. The data here is sync with participants portal.
Under the Fair column, Admin may click on the fair name, and view/edit the data related to the Fair. 
- Stand Number
- Promo Code
- Social Media Post
- Email Banner
- Press Release 1 & 2
All the above data are sync & displayed on the Participants Portal.
Under the Status column, admin can directly change the status of a user from ‘interested’ to ‘Confirmed’. When the status is confirmed, this mean the user is booking a fair, thus, admin needs to select a fair when update the status to ‘confirmed’
When the status is ‘inactive’, this means this user’s booked fair has already expired. And there is no other active fair booking at the moment.
Traffic Lights - This is an indicator to show the admin which participant’s portal form is completed by users. When in red, the form is incomplete, and in green, the form is completed. Will share more on this topic later in this documentation.
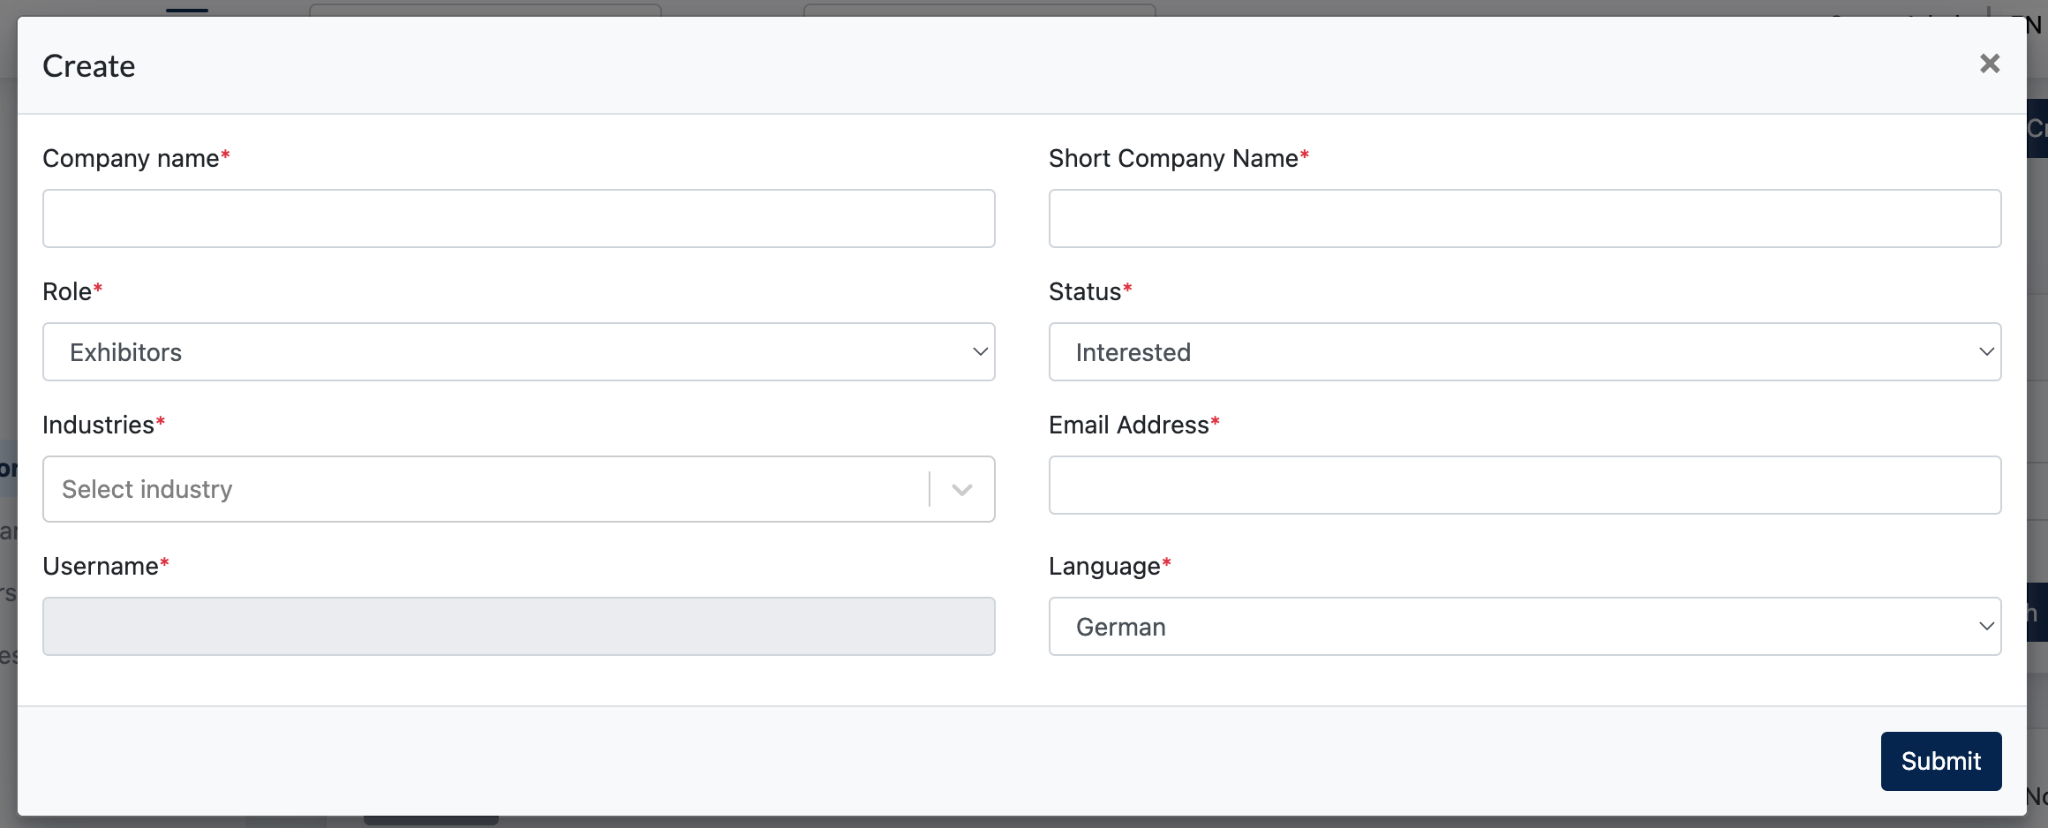
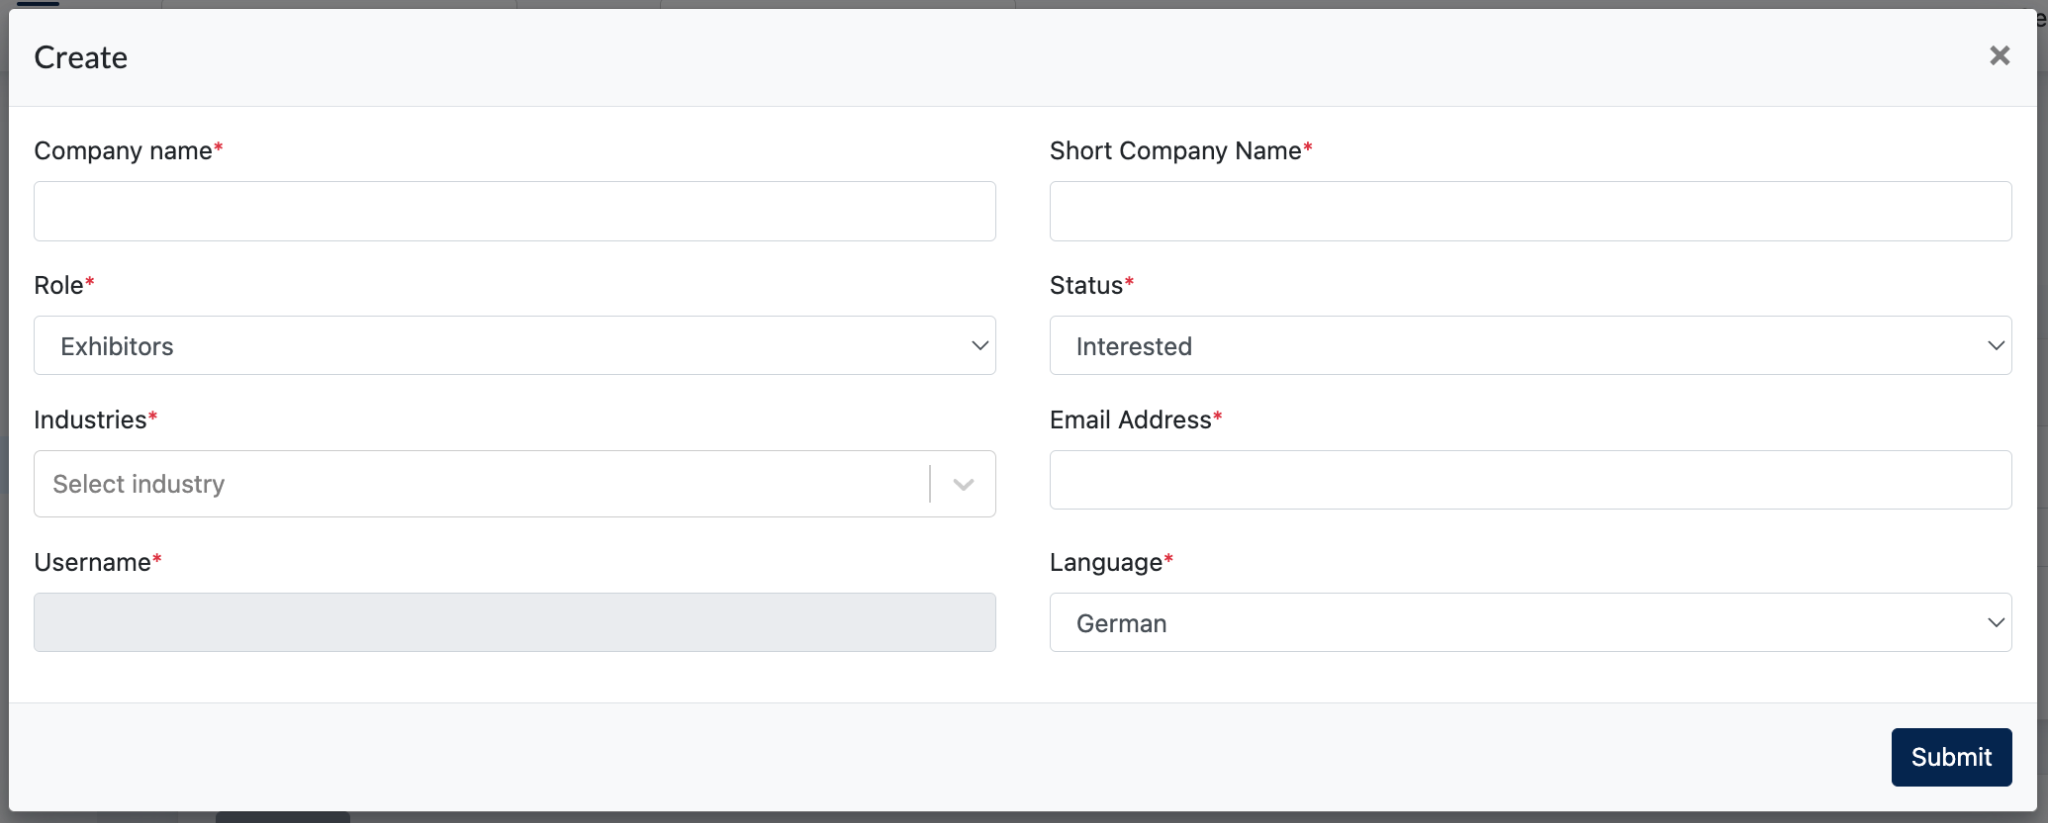
2.2 Create User Modal
When we click [ Create Exhibitor/Consultant/Speaker ] button, the same modal will pops up and admin are required to fill in the form below
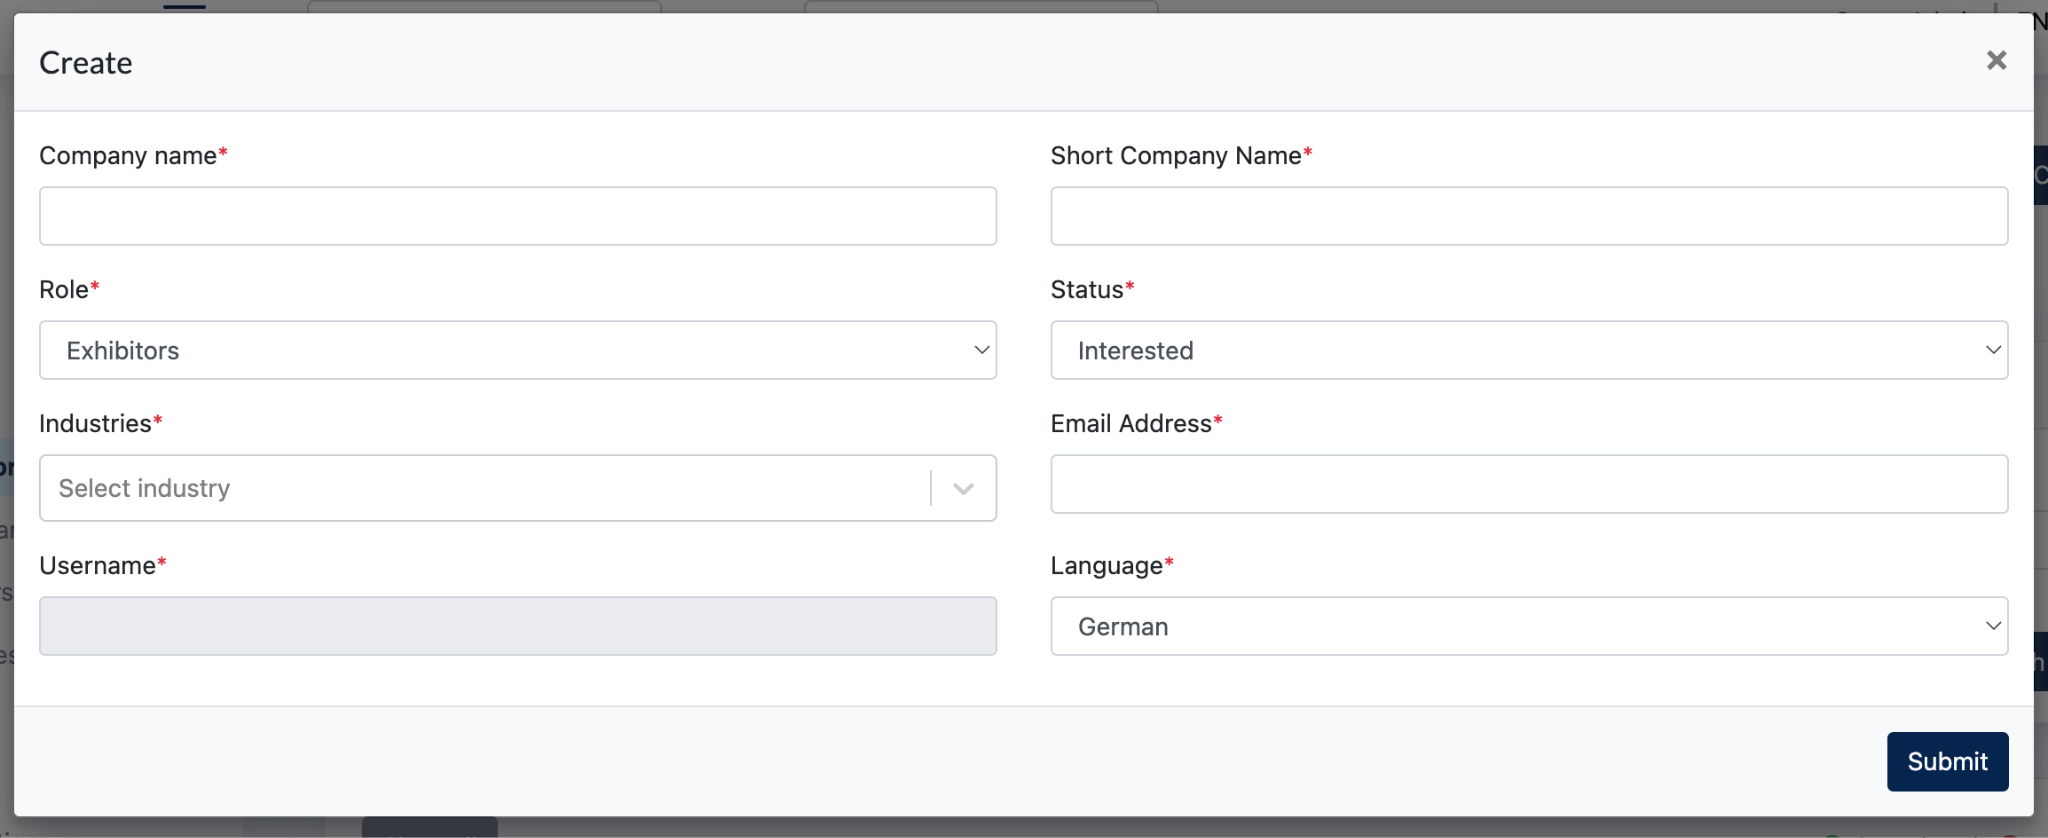
- Company Name : Name of the companies interested in joining the Fair
- Short Company Name : short display of the long company name
- Role : Select from ‘Exhibitor/Consultant/Speaker’
- Status : Every newly created user comes with default status - ‘interested’
- Email Address : This email address will be used as ‘Username’ for the login into the Participants Portal.
- Language : admin to select the default language of this user.
- This language setting affects :
- The email content sent to this user
- The language displayed for user upon login to the portal.
- This language setting affects :
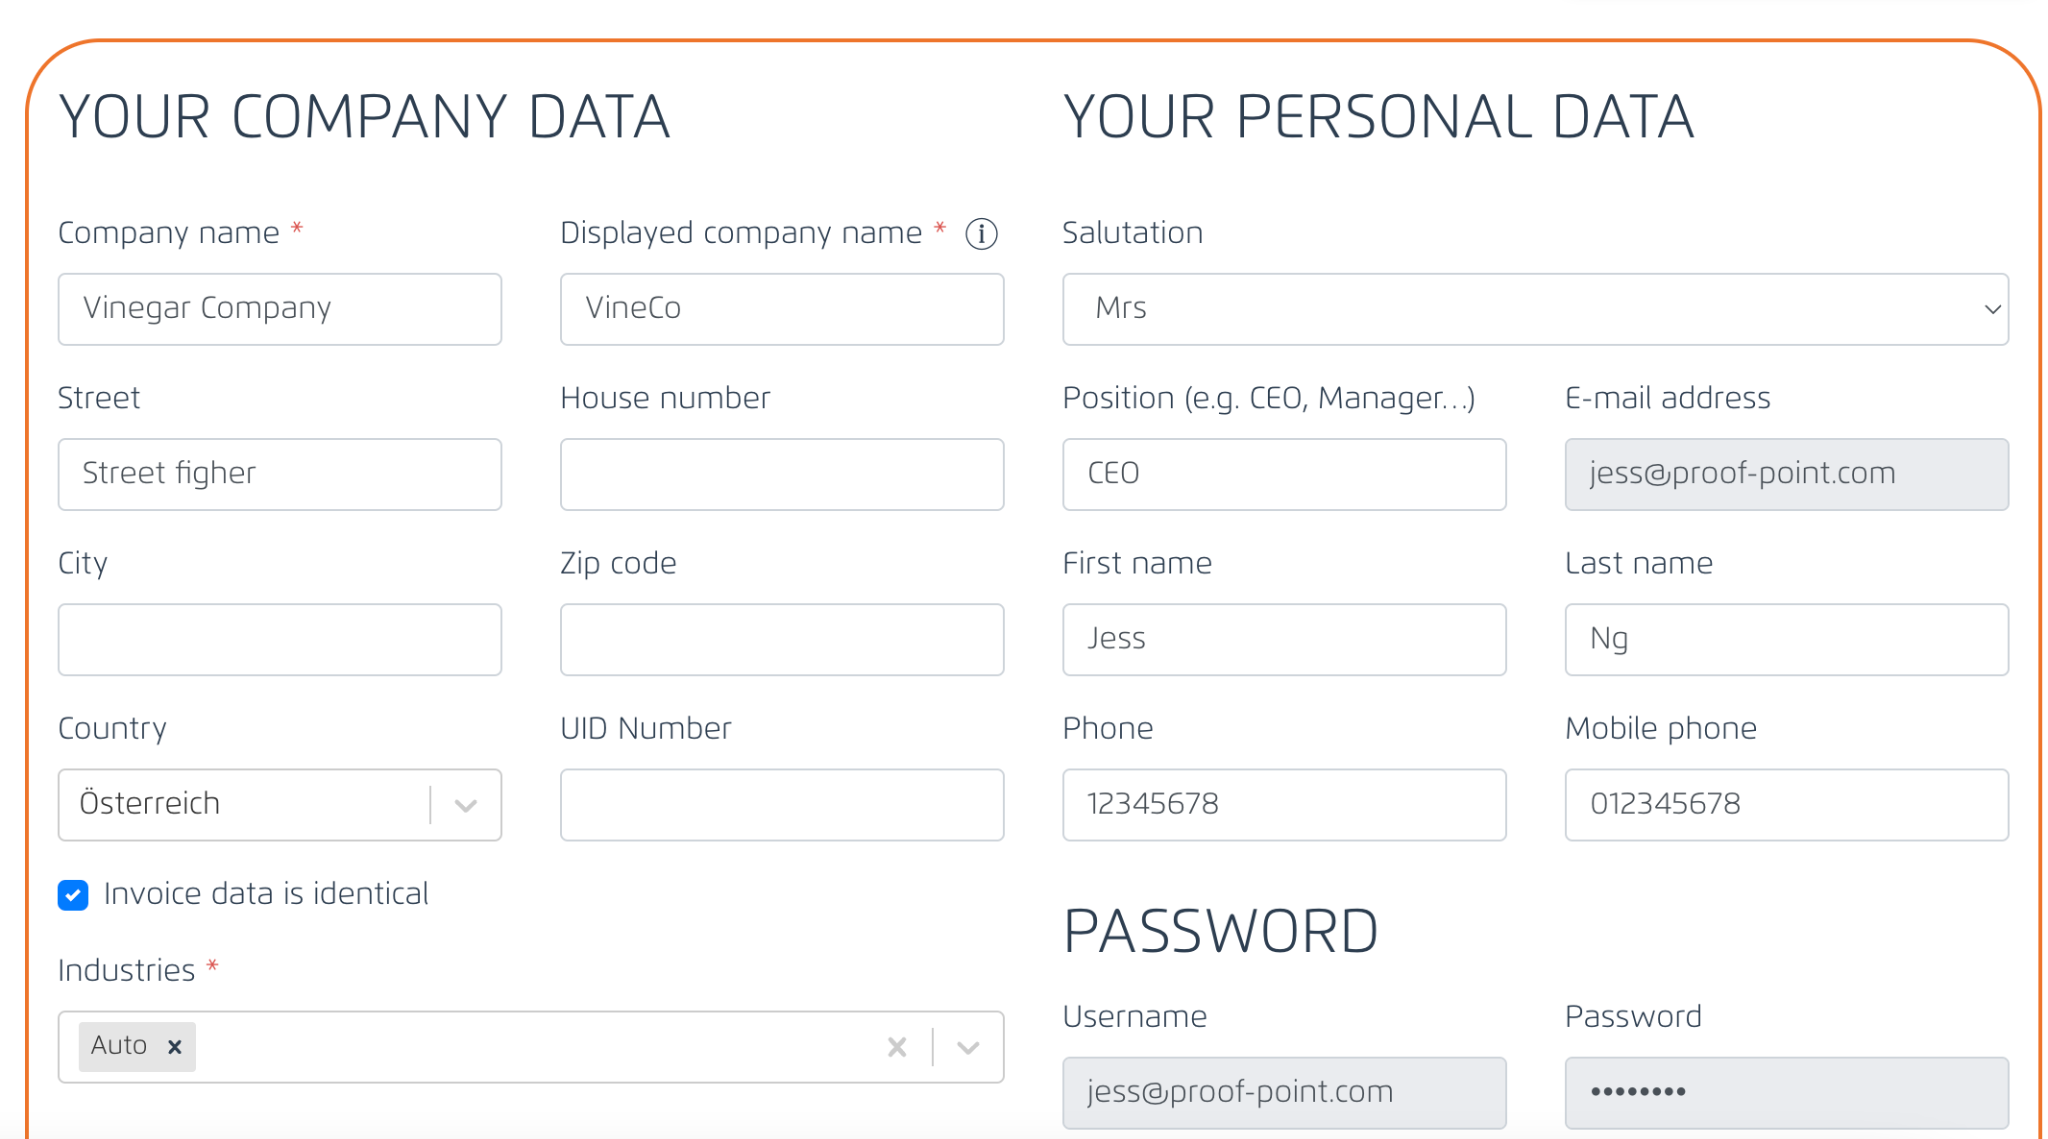
2.3 Edit User Modal
[ Edit User ] modal is a forms which consists of multiple fields to fill in. All these fields are categorised under 5 tabs.
- Company Data
- Personal Data
- Contact Person
- Social Media
- For Invoice
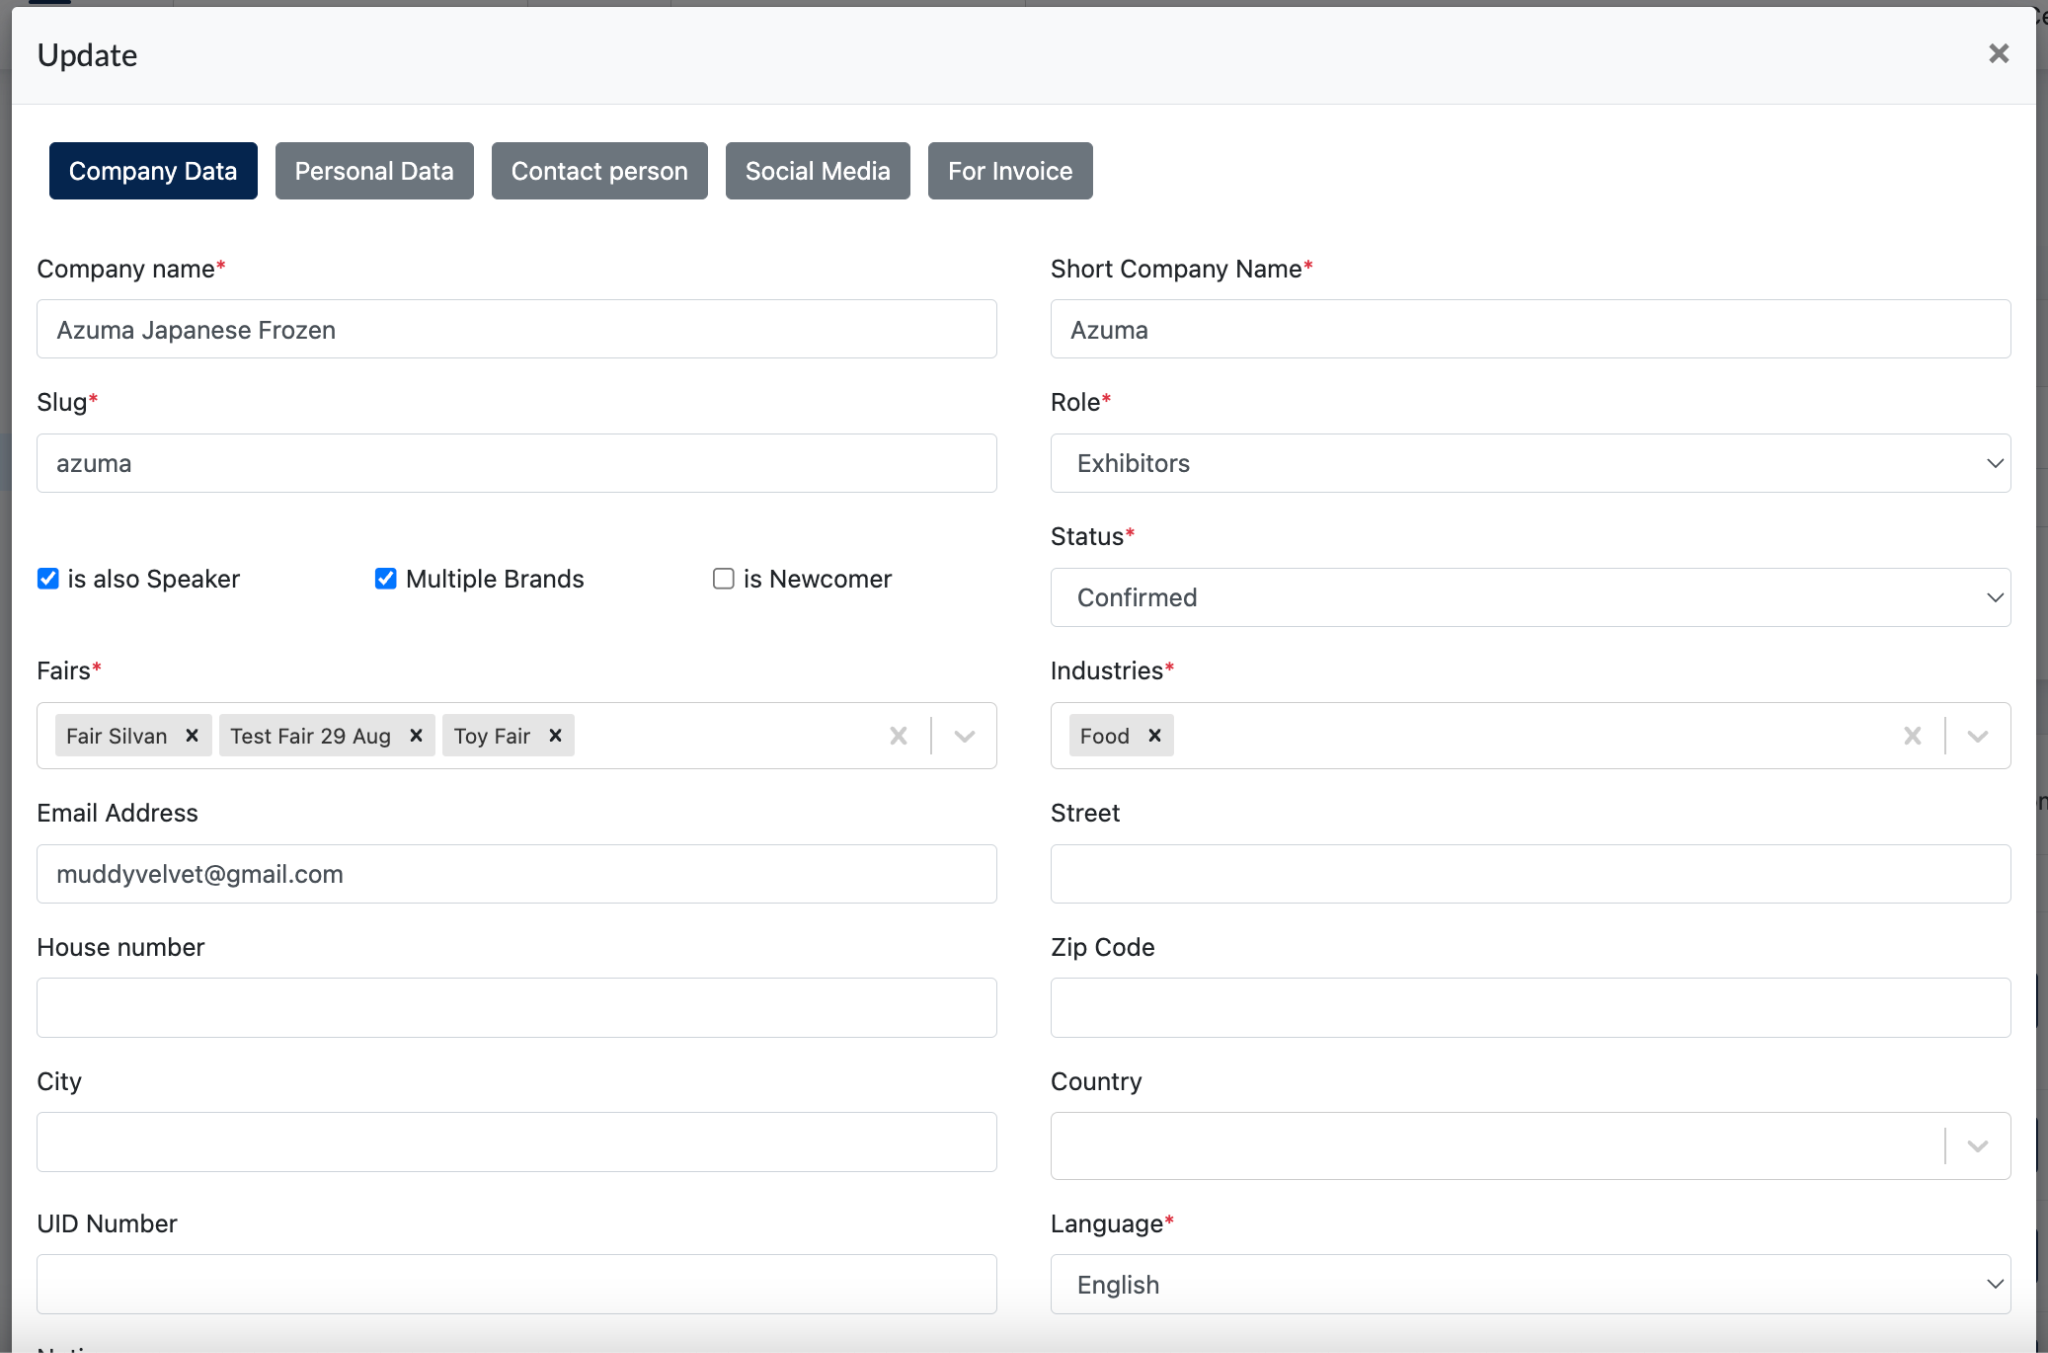
A few things to take note under this form:
- One user can have multiple booked fairs
- [ Is also Speaker ] [ Multiple Brands ] only available in Exhibitor/Consultant form:
- When [ Is also Speaker ] is checked, this exhibitor/Consultant also speaks during the fair. Thus, they are required to fill in ‘Speakers’ form in the participants portal.
- When [ Multiple Brands ] is checked, this exhibitor/Consultant consists of brands under their company. They are required to fill in ‘Brands’ form in the participants portal.
- When [ Newcomer ] is checked, this exhibitor will have a remark highlighted under Exhibitor Overview, that they are newcomer to the fair.
- The following fields data from [ Company Data ] & [ Personal Data ] tab is directly synced to the [ For invoice ] tab.
- House number
- Street
- Zip Code
- City
- Country
- UID number
- Phone
- Email Address
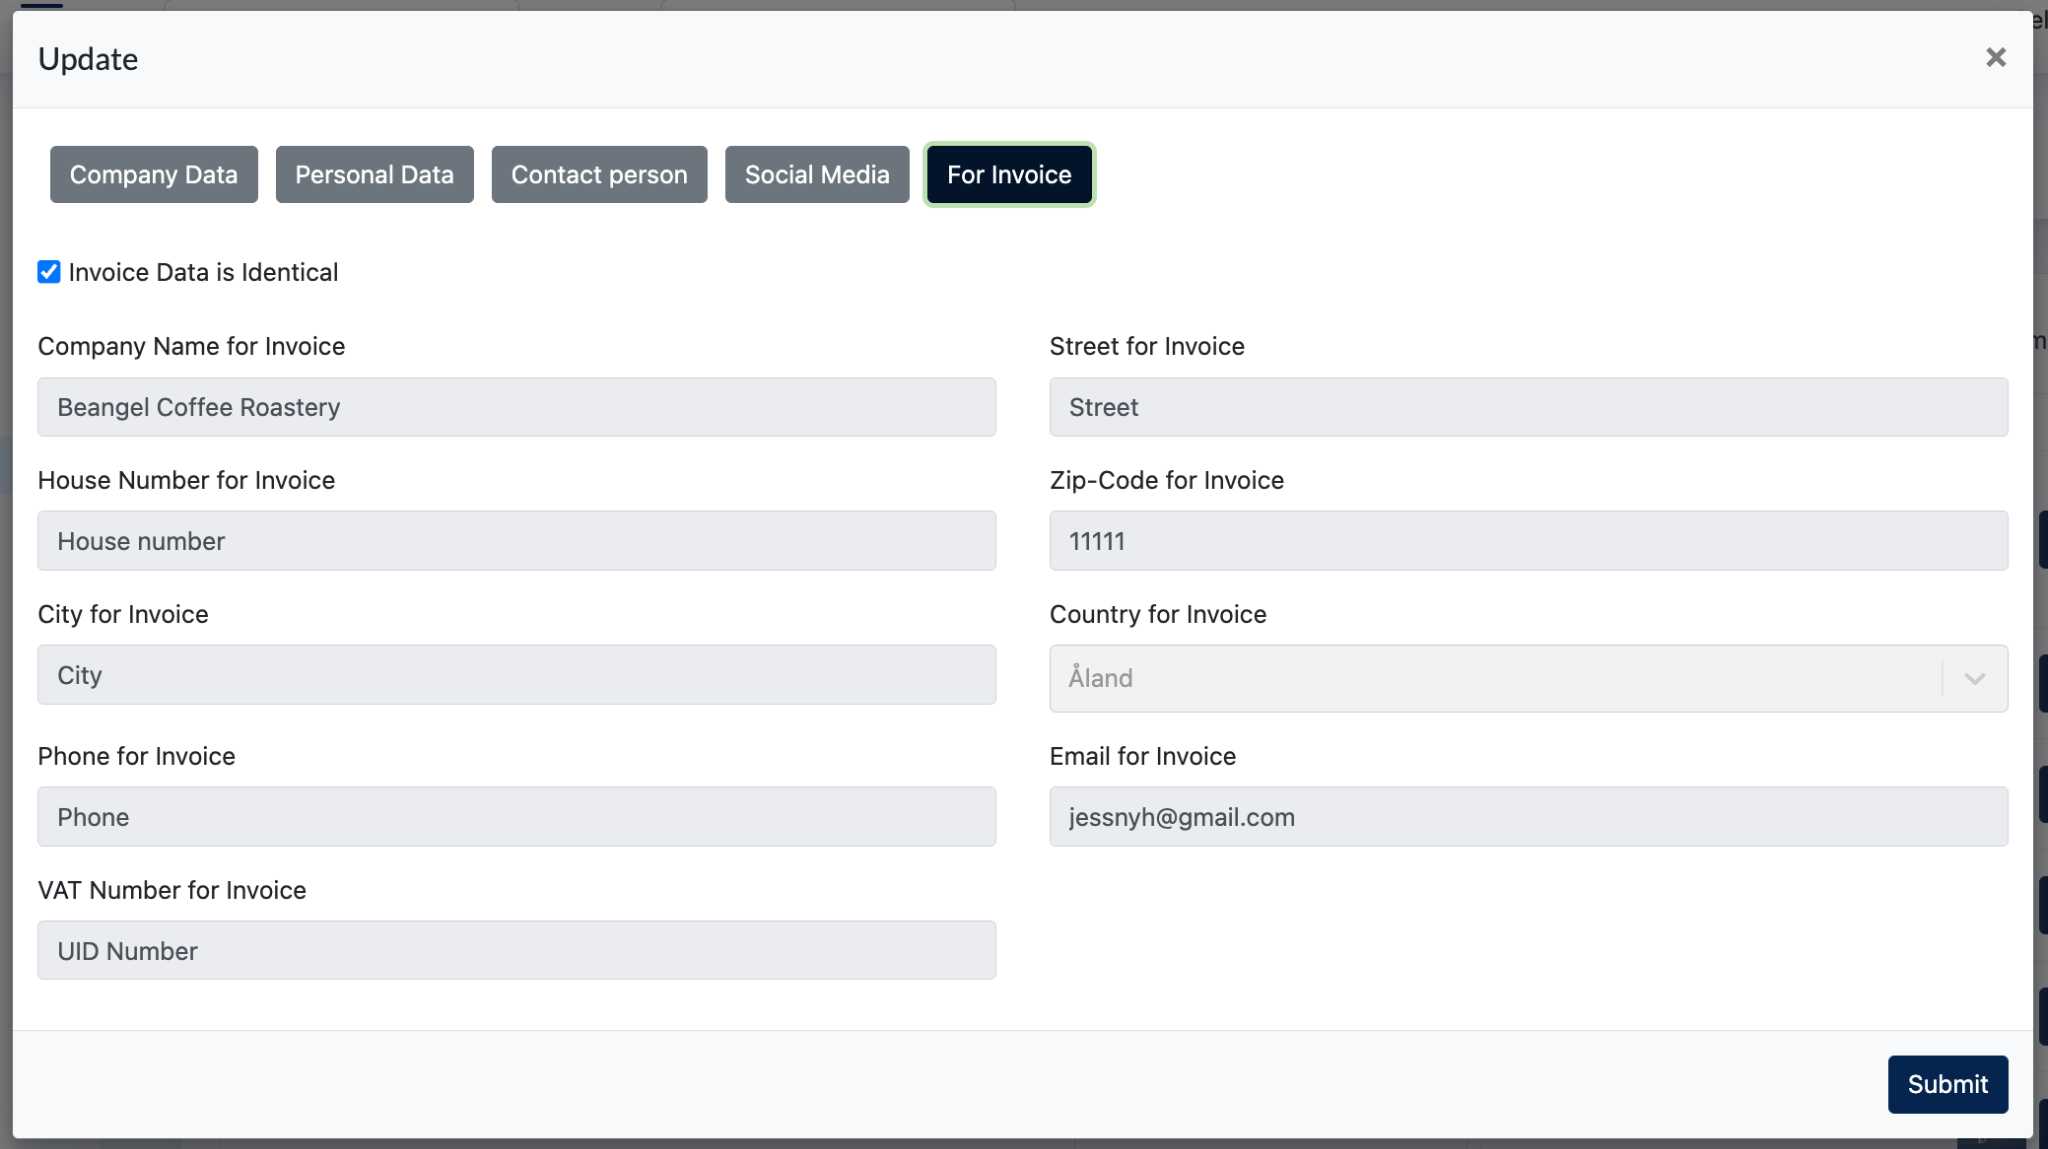
If the company’s invoice data is different, then admin can uncheck [ invoice data is identical ] and fill in the correct data.
3.0 Traffic Lights
Traffic lights are an indicator to display which form is already filled in by the registered user.
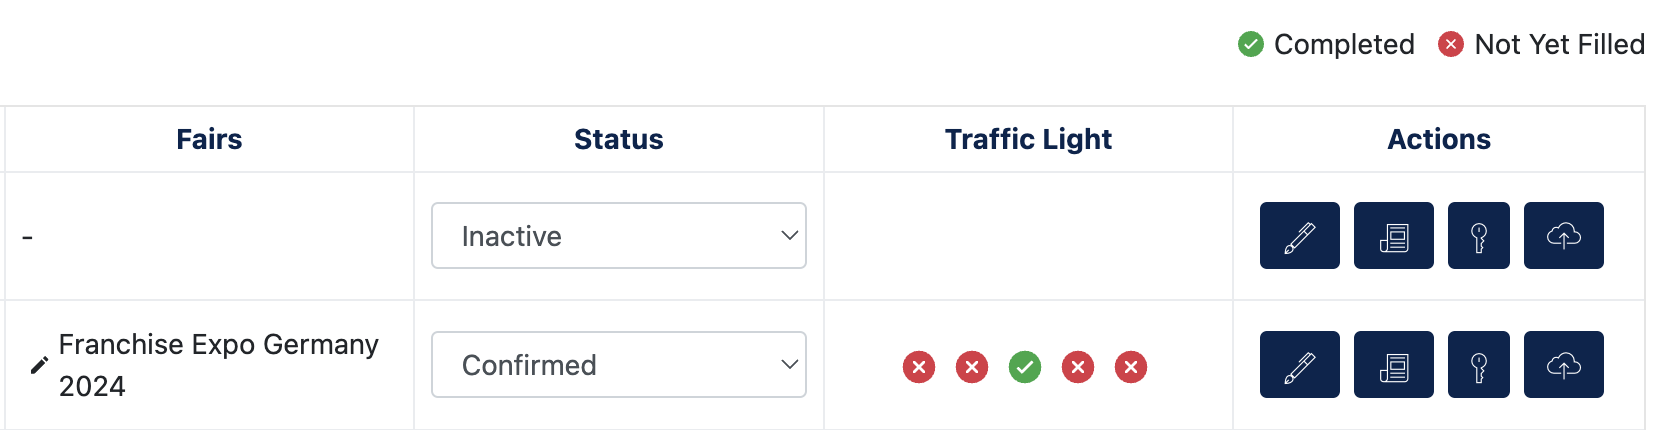
Green Color : indicates required data is filled
Red Color : indicates required data is not yet filled.
There are 5 forms represented by Traffic Lights ( from Left to Right )
- Masterdata (Your Data) form
- Match-making form
- Fair pass data form
- Booking form
- Your Uploads form
Below explained the criteria required for each form to turn green. All forms are found in the Participants Portal. Screenshots provided are taken from the Participants portal.
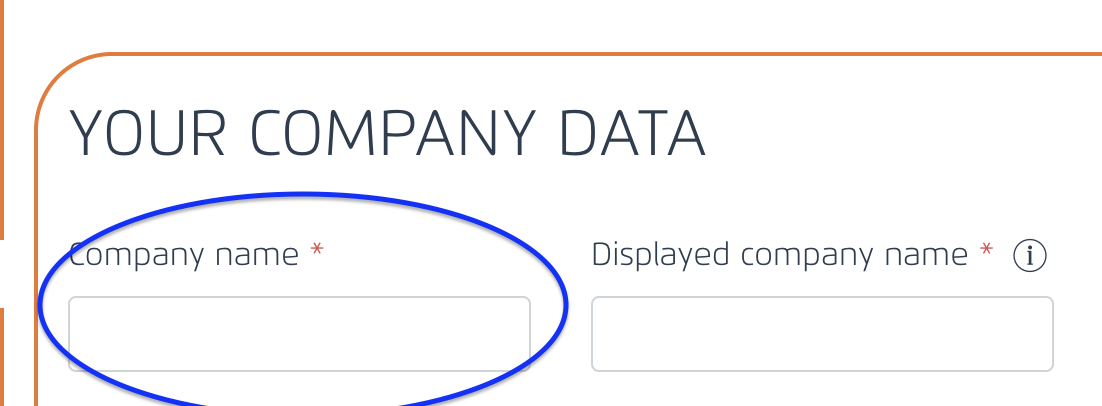
3.1 [ Your Data ] form
- If the following data is all filled in, the traffic light shows green icon - [ Is completed ]
- Companyname
- ShortCompanyName
- Industries
- Company Name for Invoice *
- Address for Invoice *
- Zip-code for Invoice *
- Country for Invoice *
- Telephone Number for Invoice *
- Email for Invoice *
- VAT-Number for Invoice *
- * = Prefilled fields : If the prefilled fields are all filled, then the whole list is completed and traffic lights can turn to green.
Screenshot example ( data shown are all dummies)
URL : https://www.center_url.com/portal/data
3.2 Match Making form
- If the following forms’field are filled, the traffic light will turn to green.
- From ‘Match-making’ form : “We look for partners in this region/country” field
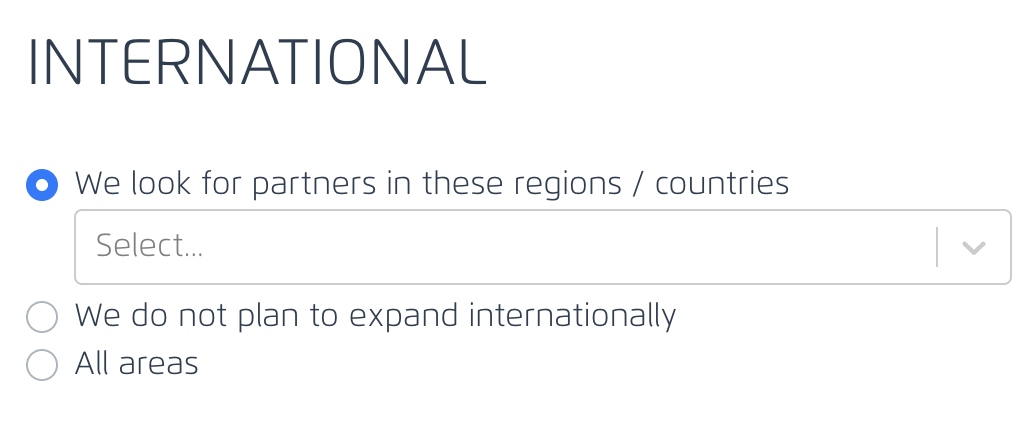
-
- From ‘Your Company Data’ form : [ Company Name ] field
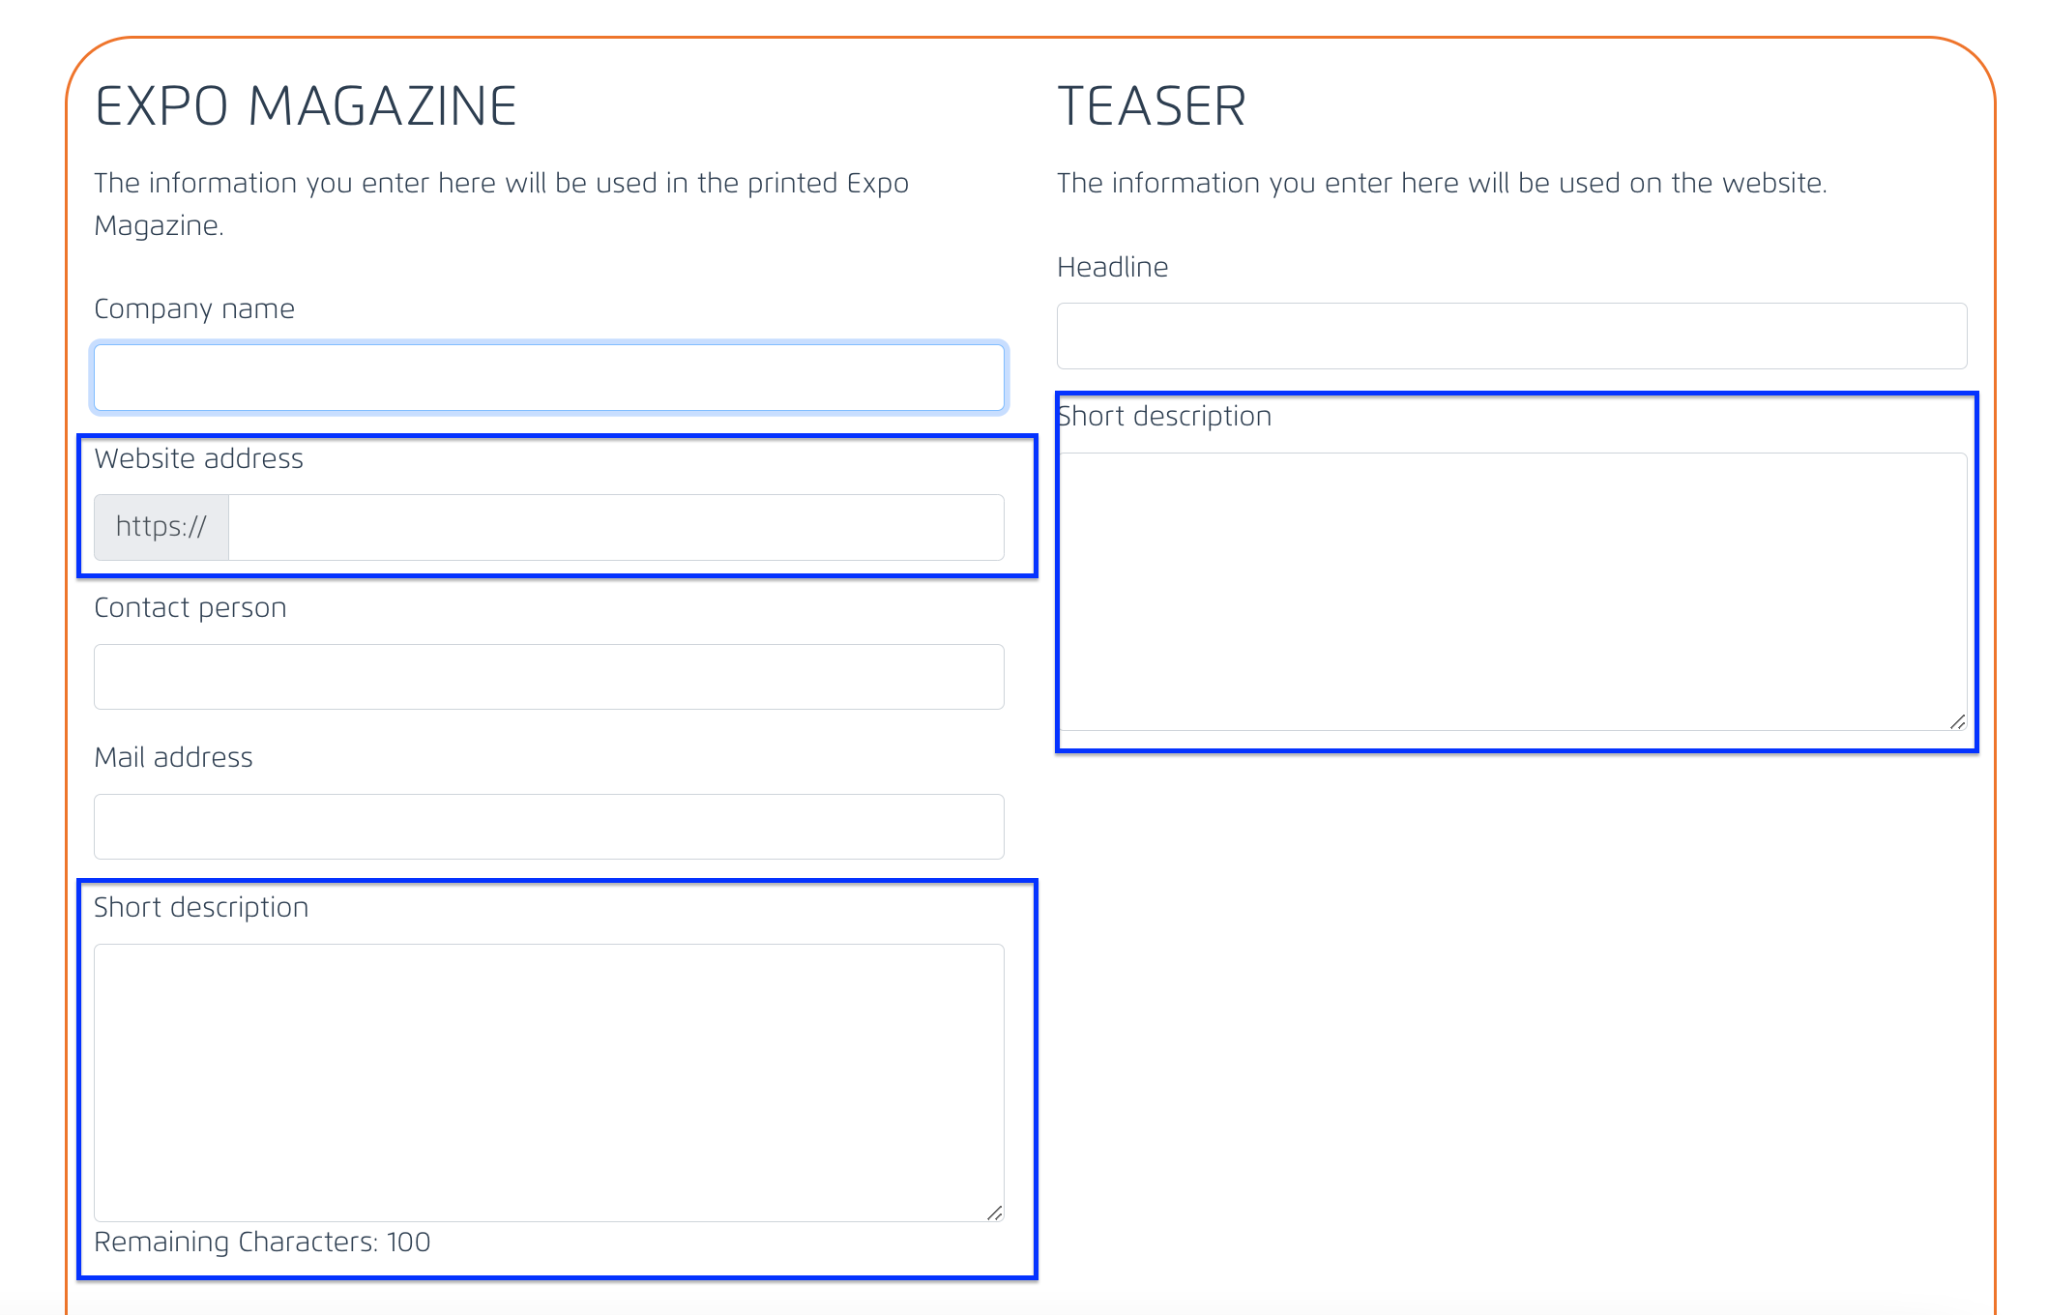
- From ‘Expo Magazine’ form :
- [ Short description] field for printed catalog
- [ Short description ] field for website
- [ Web address ] field
- From ‘Your Company Data’ form : [ Company Name ] field
3.3 Fair Passes form
- As long as there is one fair passes data is uploaded via the smart form, the traffic light will turn green.
3.4 Marketing Booking form
- Still under discussion
3.5 Your Uploads form
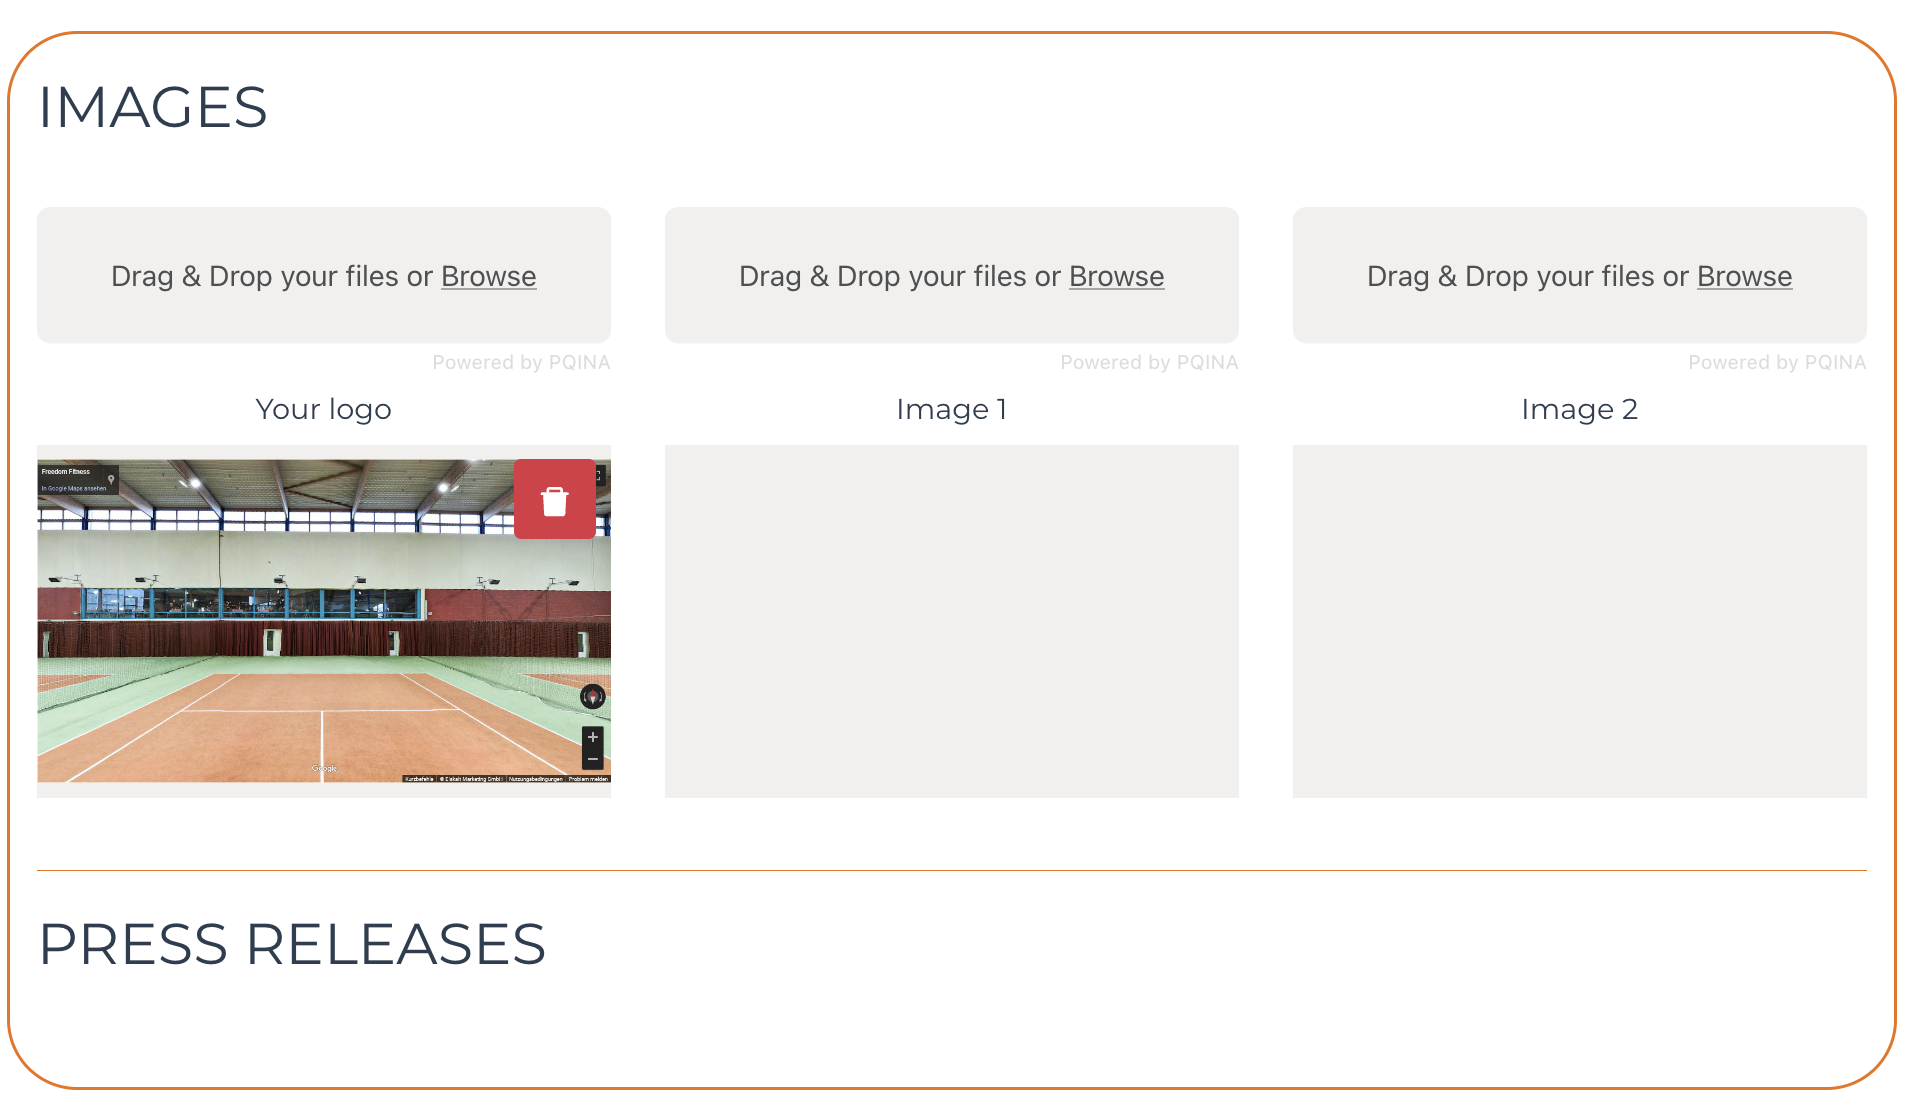
- Logo, at least 1 image & 1 Press Release is uploaded - traffic light will turn green
4.0 Assigning Speaker to a Program
Speaker listing on cockpit display Companies of which the speakers are from. Out of these companies, there may have several speakers speaking during the event.

There are 2 other pages under the Speaker main menu.
- Stages - Admin to create stages where the speaker will be speaking, and assign them to a particular fair.
- Programme - Admin to assign different speakers ( person ) to different programme during the fair
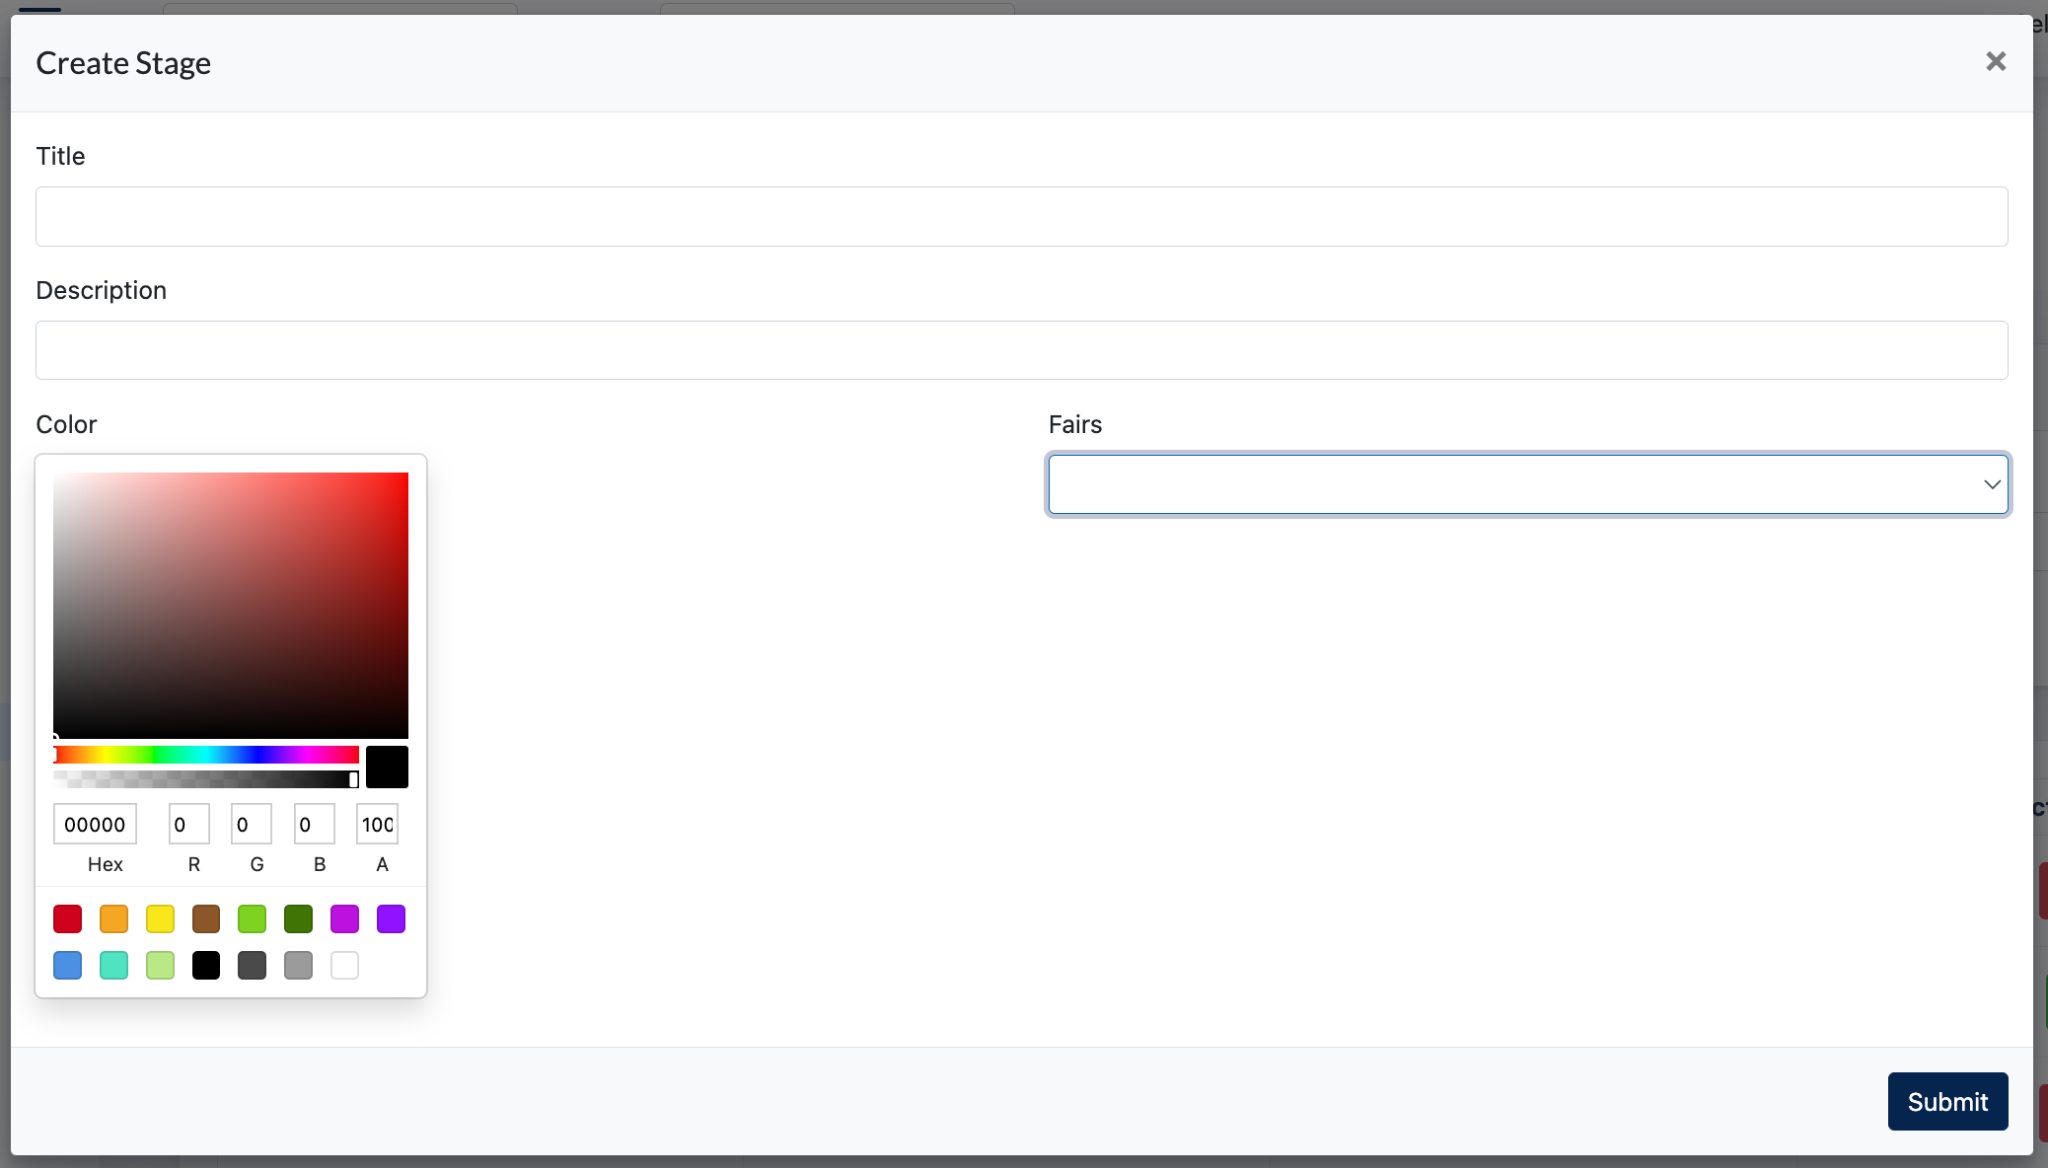
4.1 Create Stage
Create stage by filling in the Title & Description, and assign a fair to it.
This means this stage is for this particular fair.
Choose a color for the stage, as this will be displayed in the smart section later.
4.2 Create Programme
This is the place where the admin assigns a stage to a speaker.
The speakers data, which includes first/last names, languages, title of lecture, description of lecture. These are data coming from Participants Portal Speaker’s form.
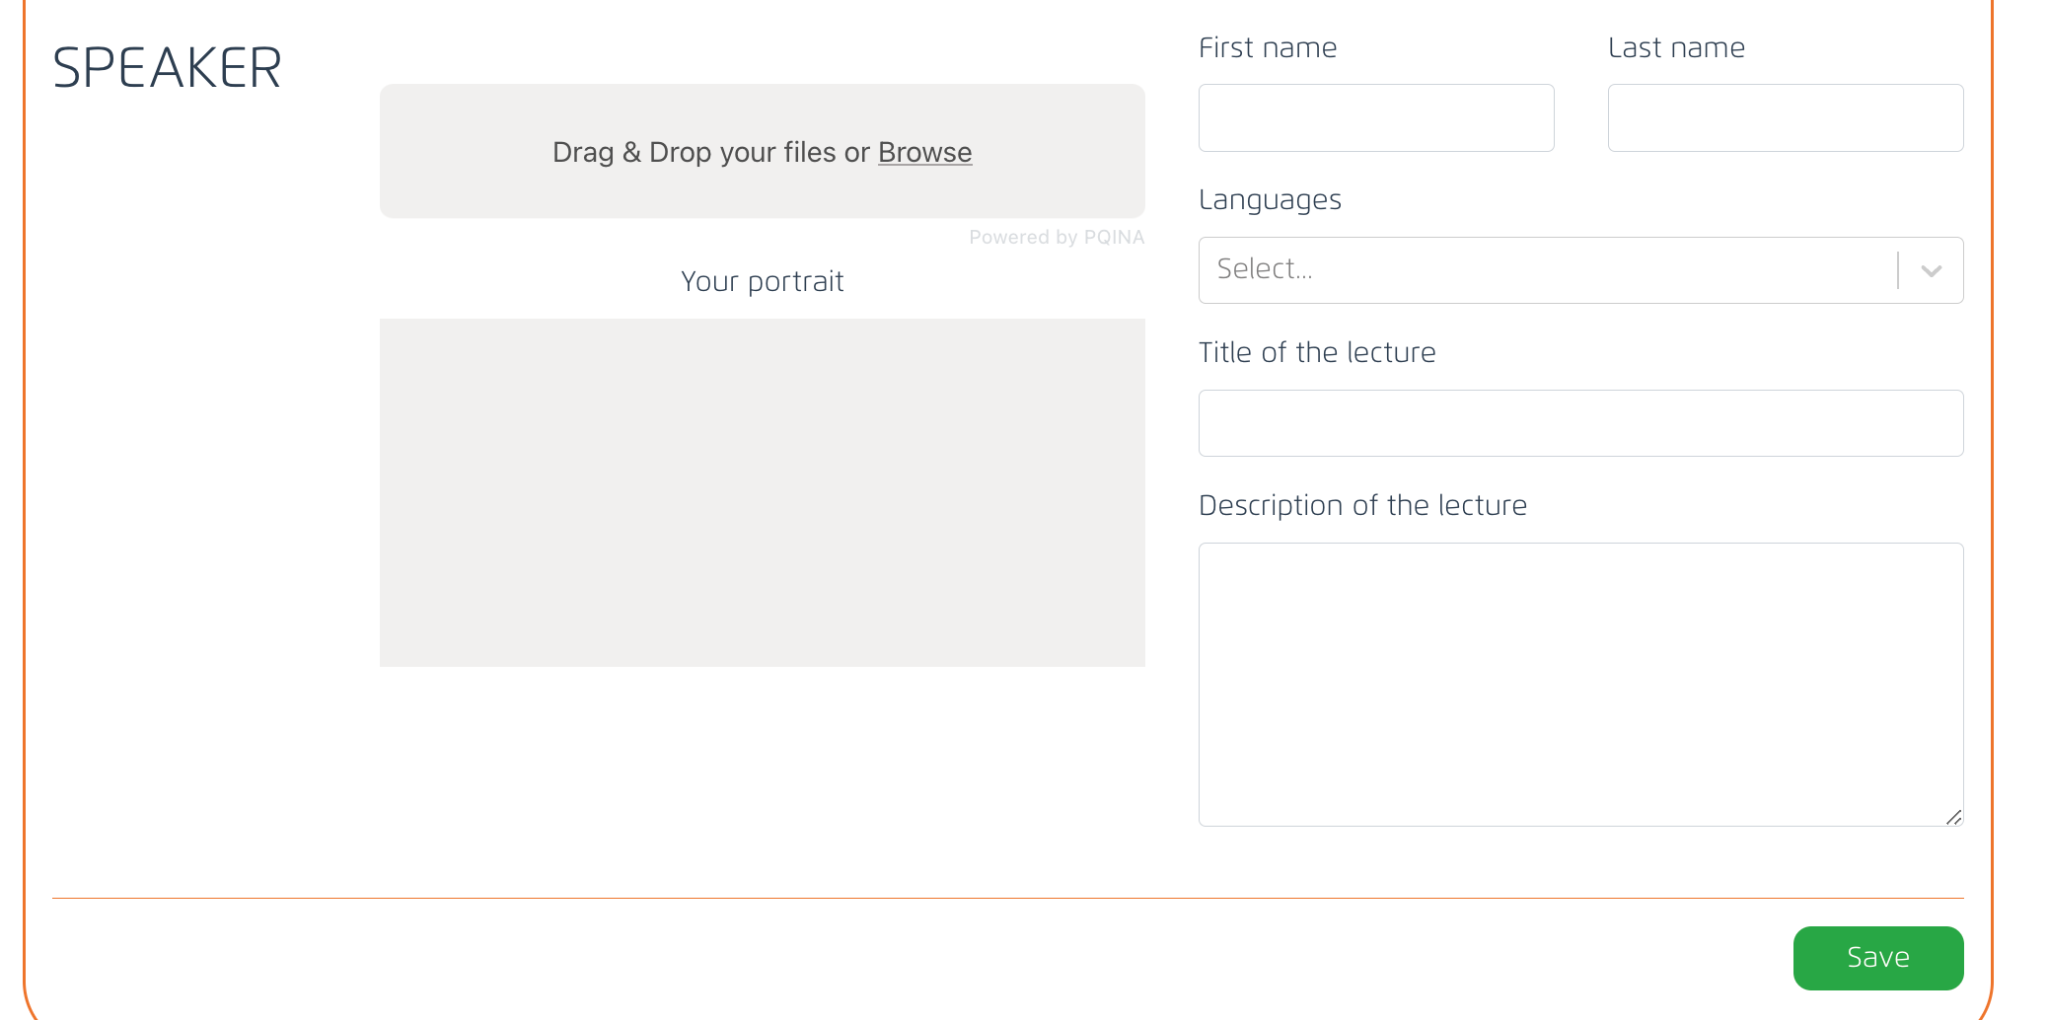
Company users fill in the data here, and this data will be sync to Cockpit > Speakers > Programme Listing.
Below is screenshot of dummy listing on staging:

When these data is created, the required ‘date’ , ‘stages’ and ‘time’ is empty because this required admin to fill in.
Admin will click on the edit button, and open up this modal, and assign the above to a speaker.
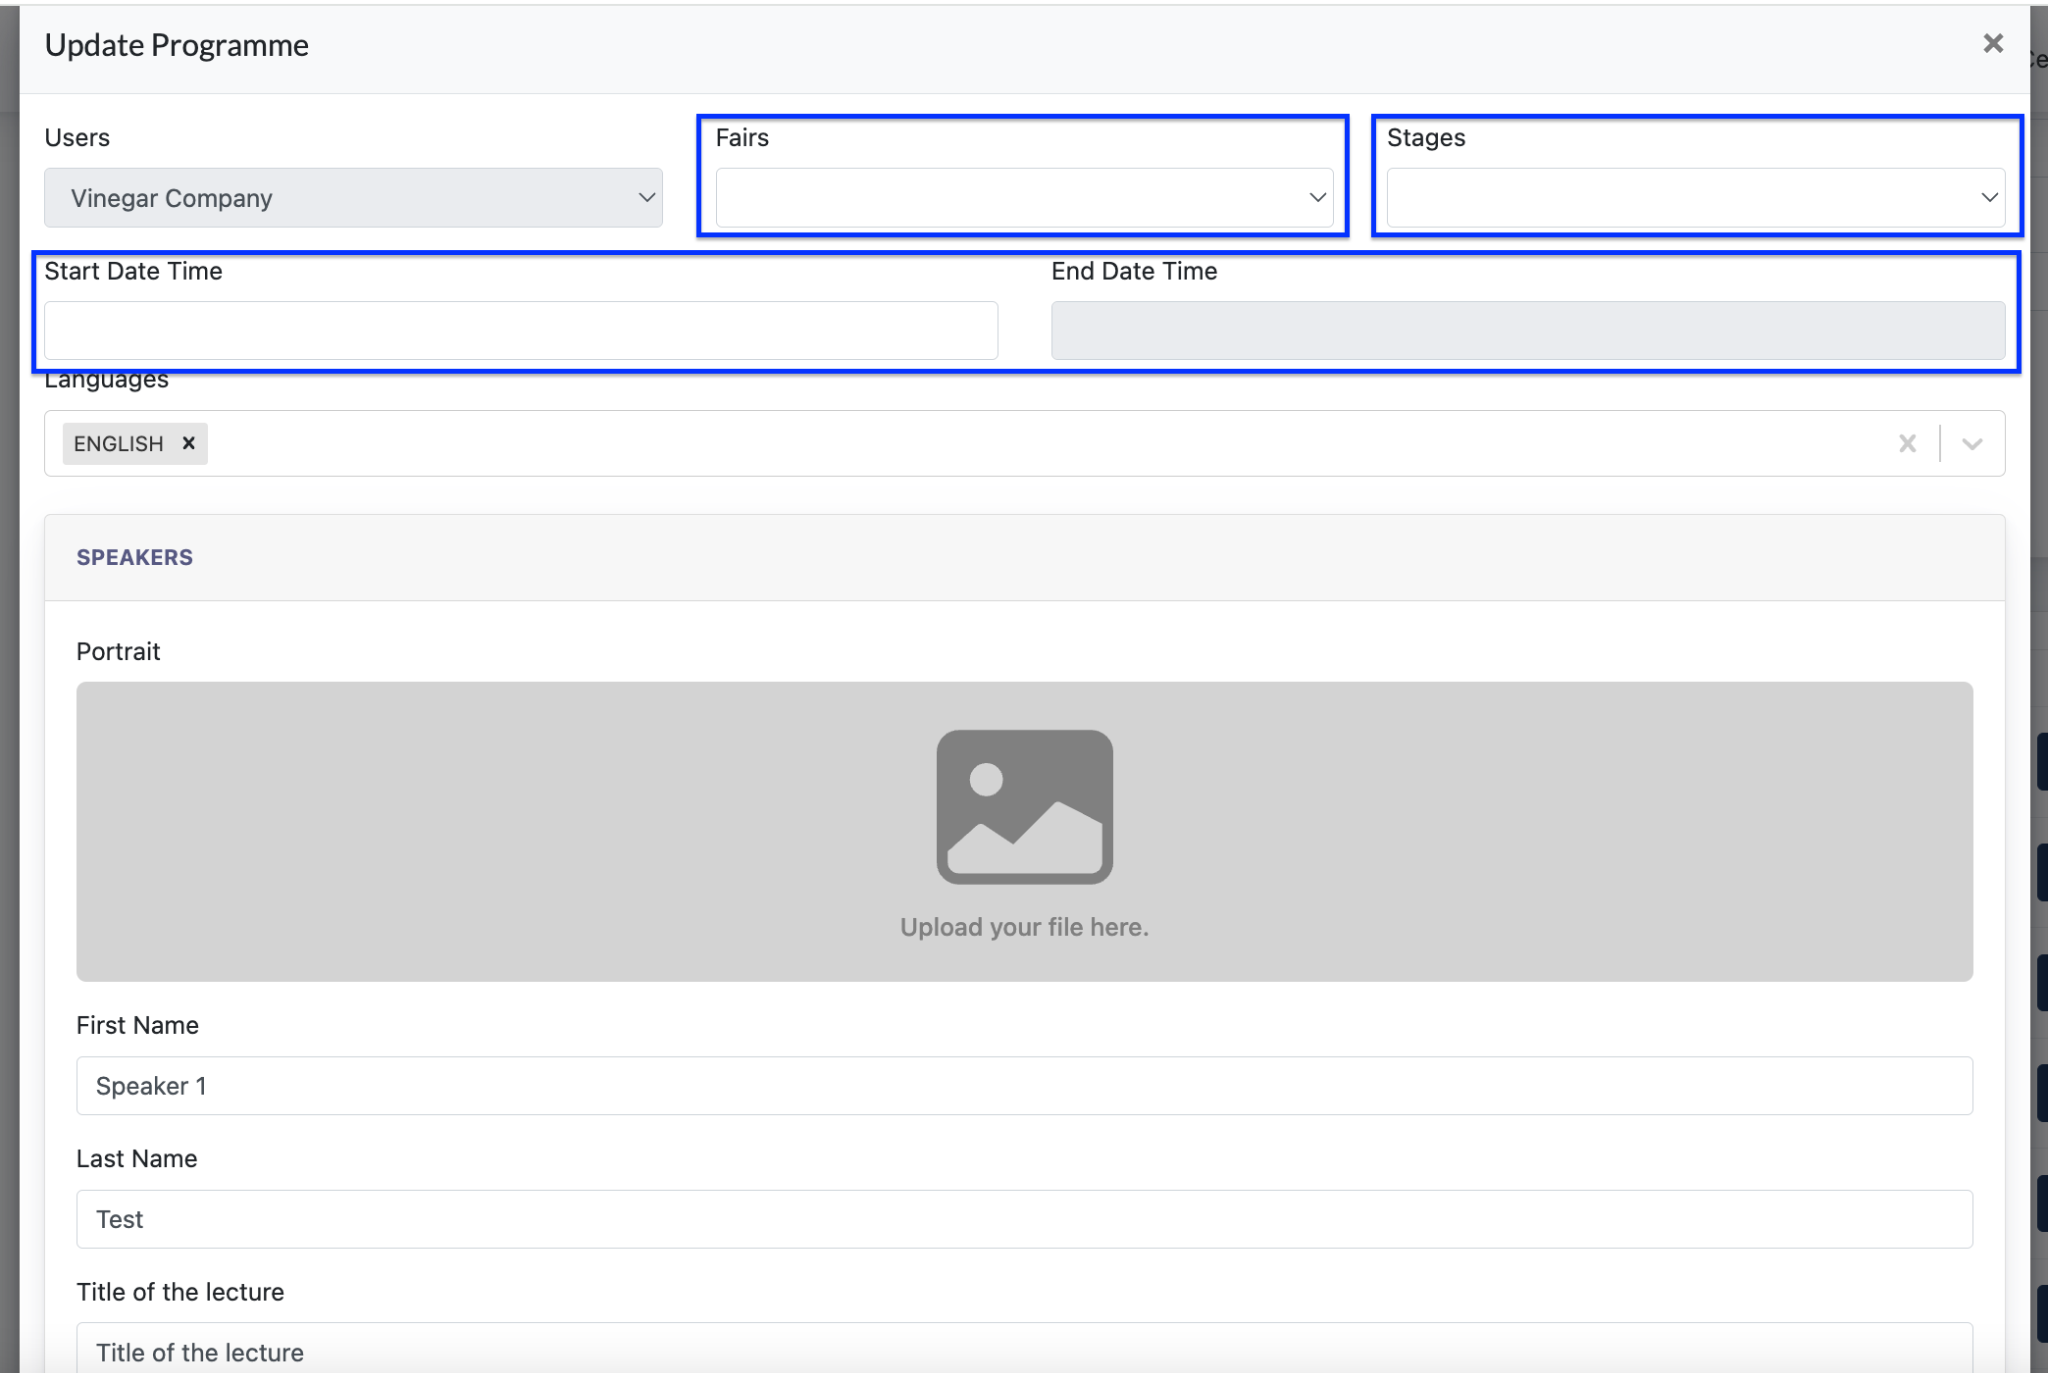
The program is complete with above data, and will appear on ‘Programme Smart Section’ under ‘Trade Fairs Template’.
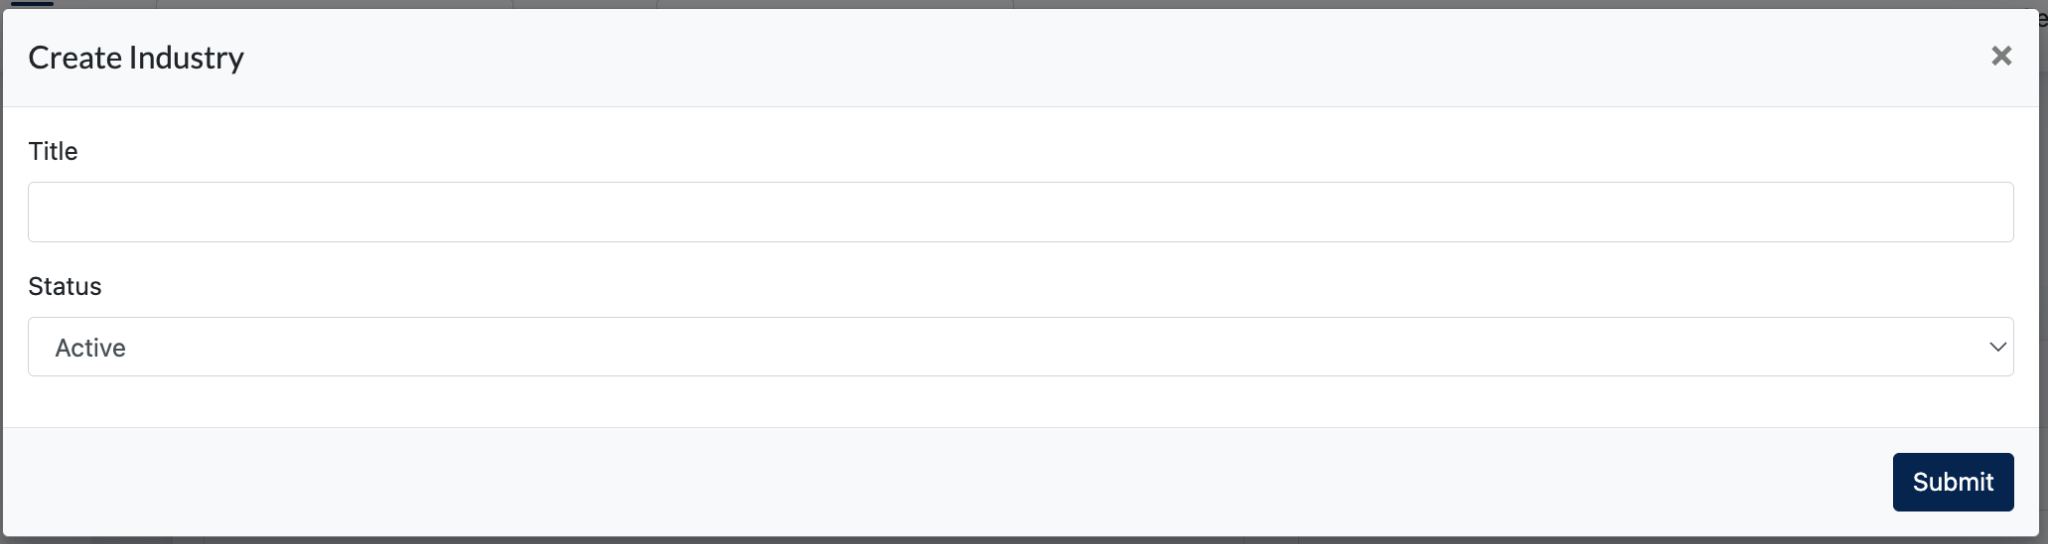
5.0 Industries
Admin creates industries tag via this page. The industries tag is used when creating a user.
6.0 Media
7.0 Forms
This is where admin creates all forms required in the Participants Portal.
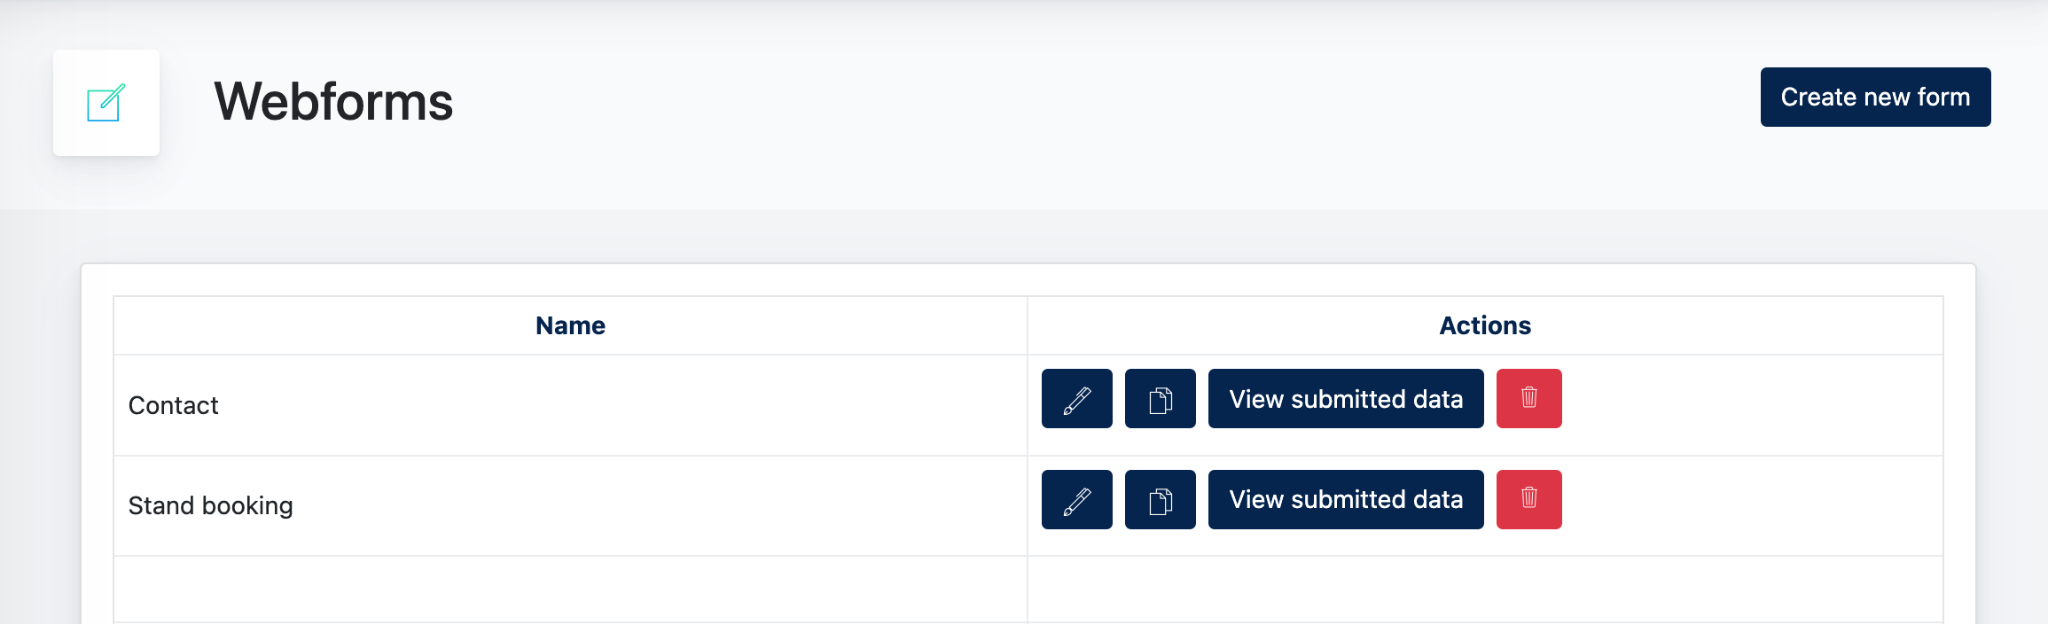
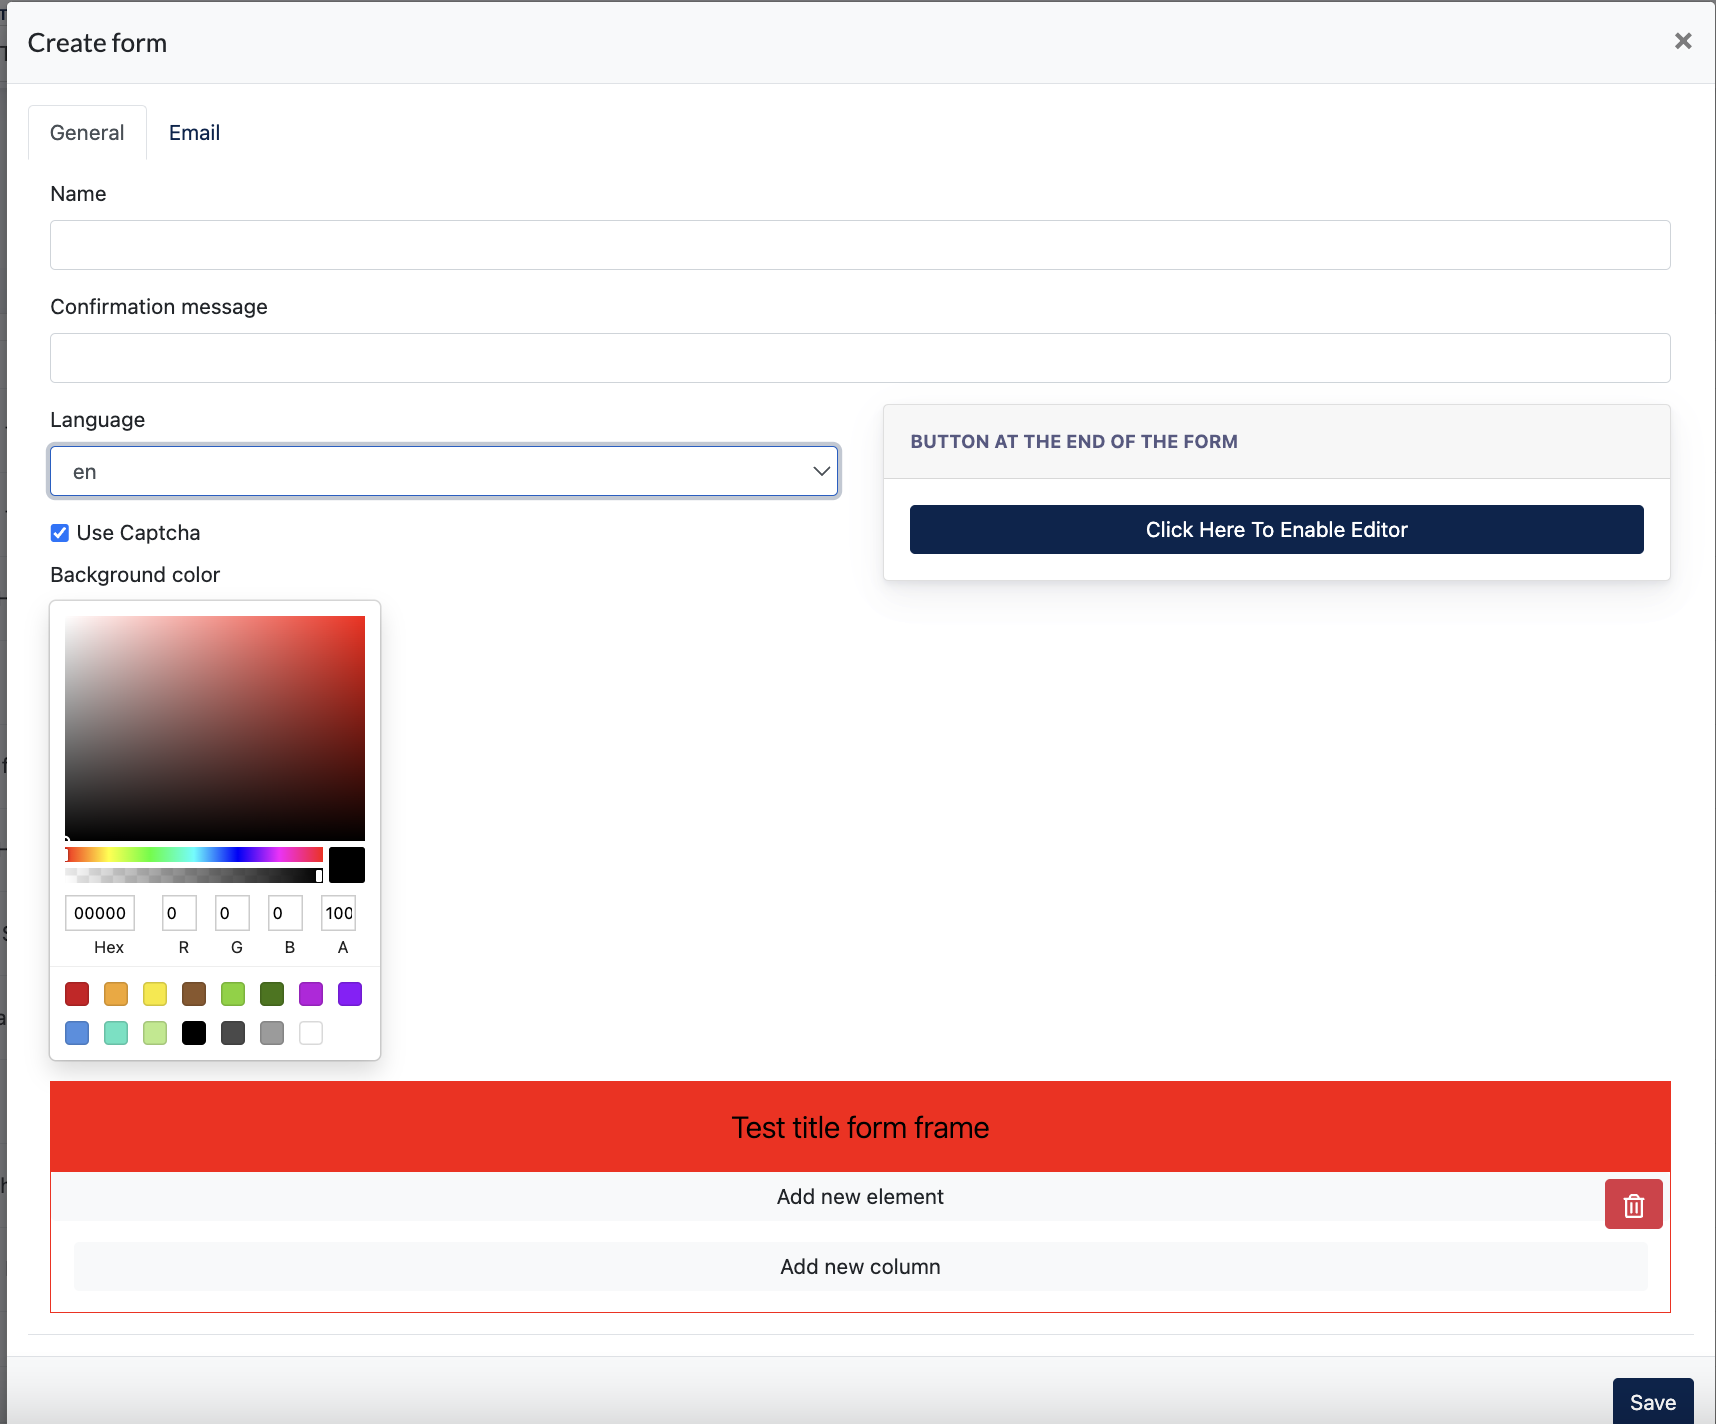
7.1 Creating new forms
Steps to create a form :
- Fill in a name for this form - this is the name appearing on the Form Listing
- Confirmation message - this is the message shown to the end user after a form is successfully submitted.
- Button Editor - this let admin configure the button layout and link for the submit button.
- Language - Language display for this form configuration( for admin viewing purpose)
- Background color - Admin may configure a background color for this form.
- Form Editor - Admin to create a form using different components. This is the same with Ark Site Web Form.
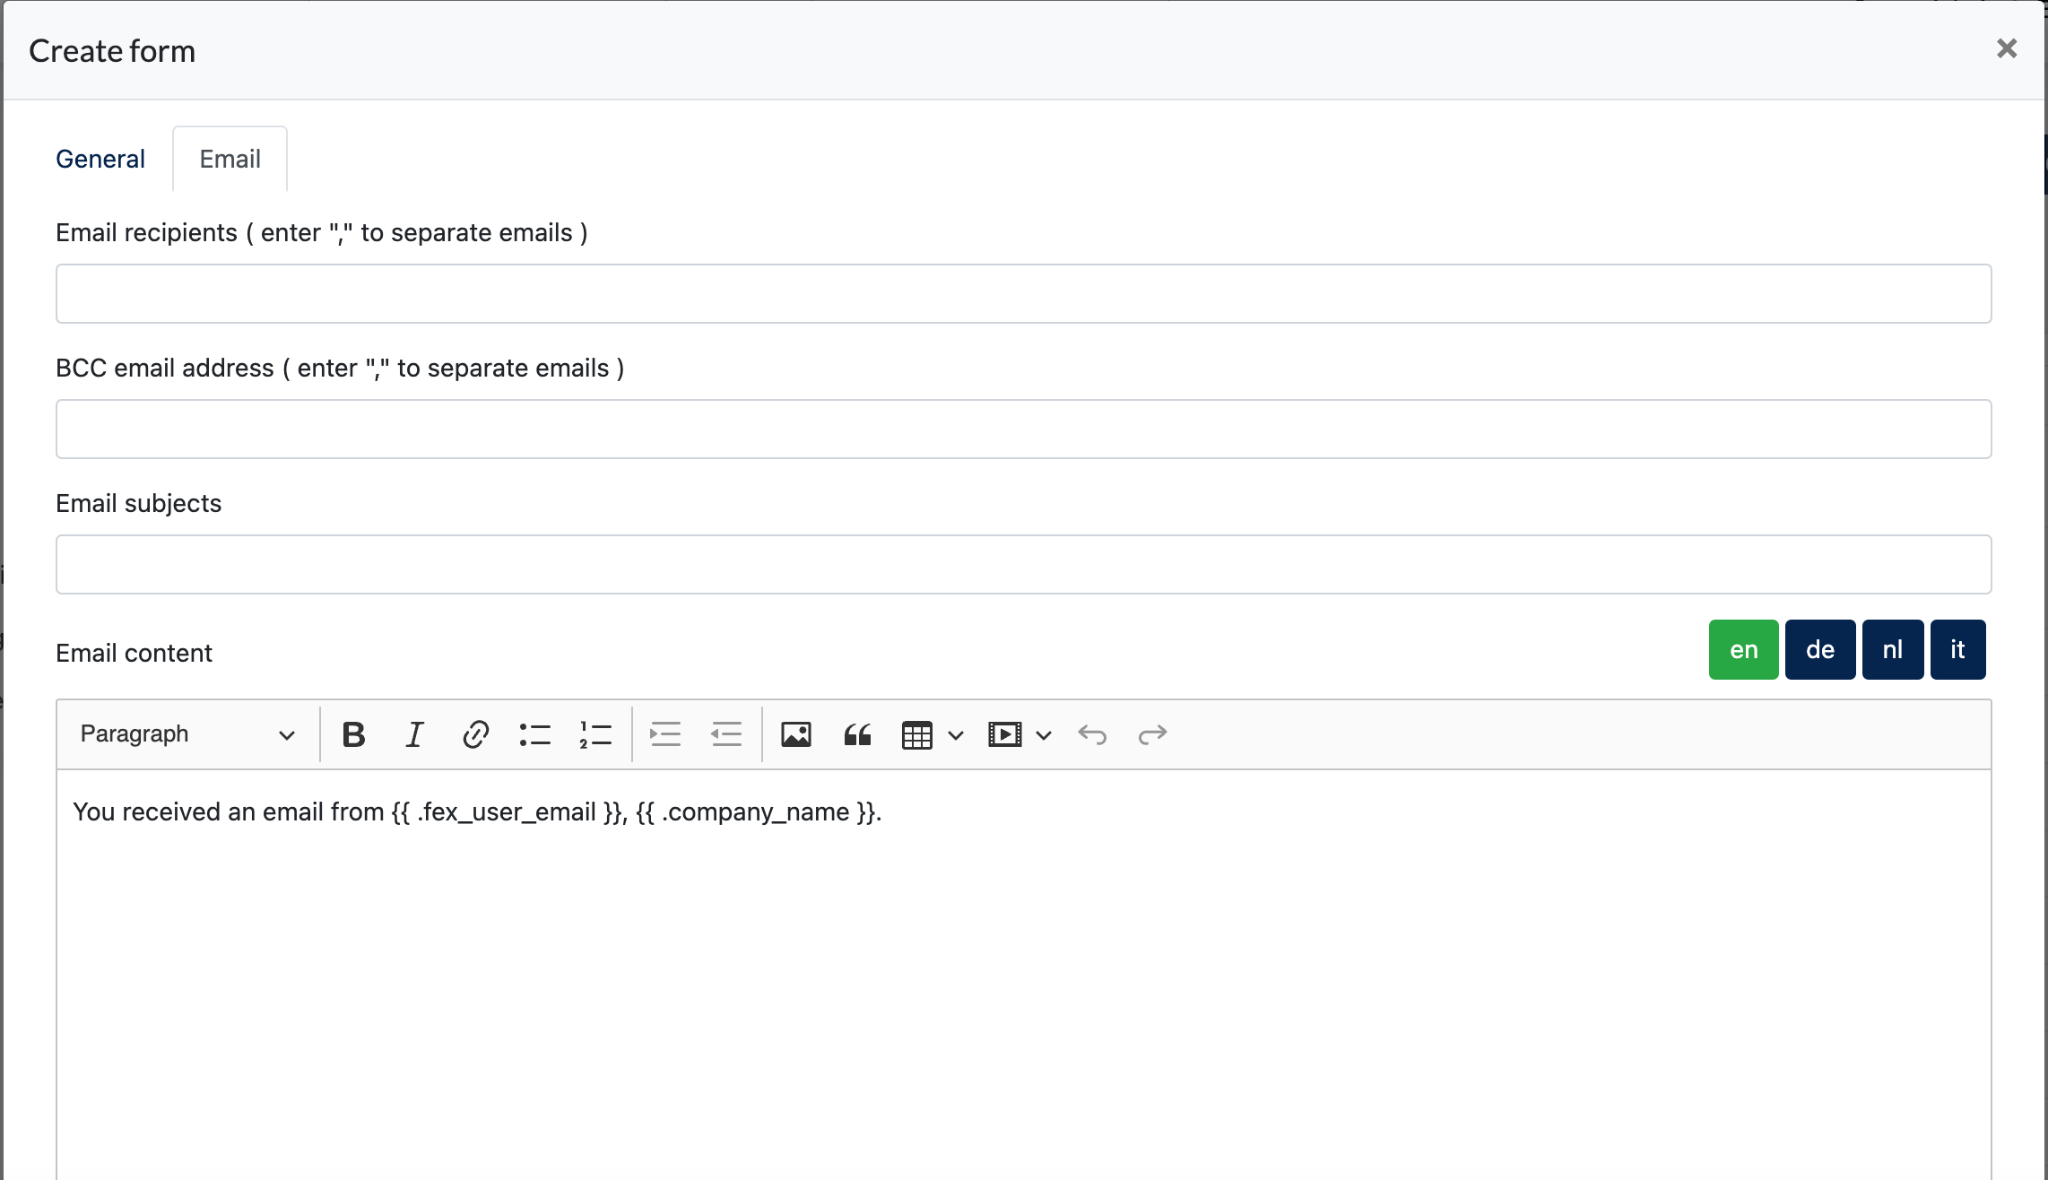
7.2 Email tab
This email configuration allows admin to configure the following :
- Email Recipients : Someone that receives an email notification together with submitted data.
- BCC email address : other person whom admin would like to also send a copy of the above to them.
- Email Subjects : Subject of the above email
- Email Content : Content of the above email.
8.0 Automation
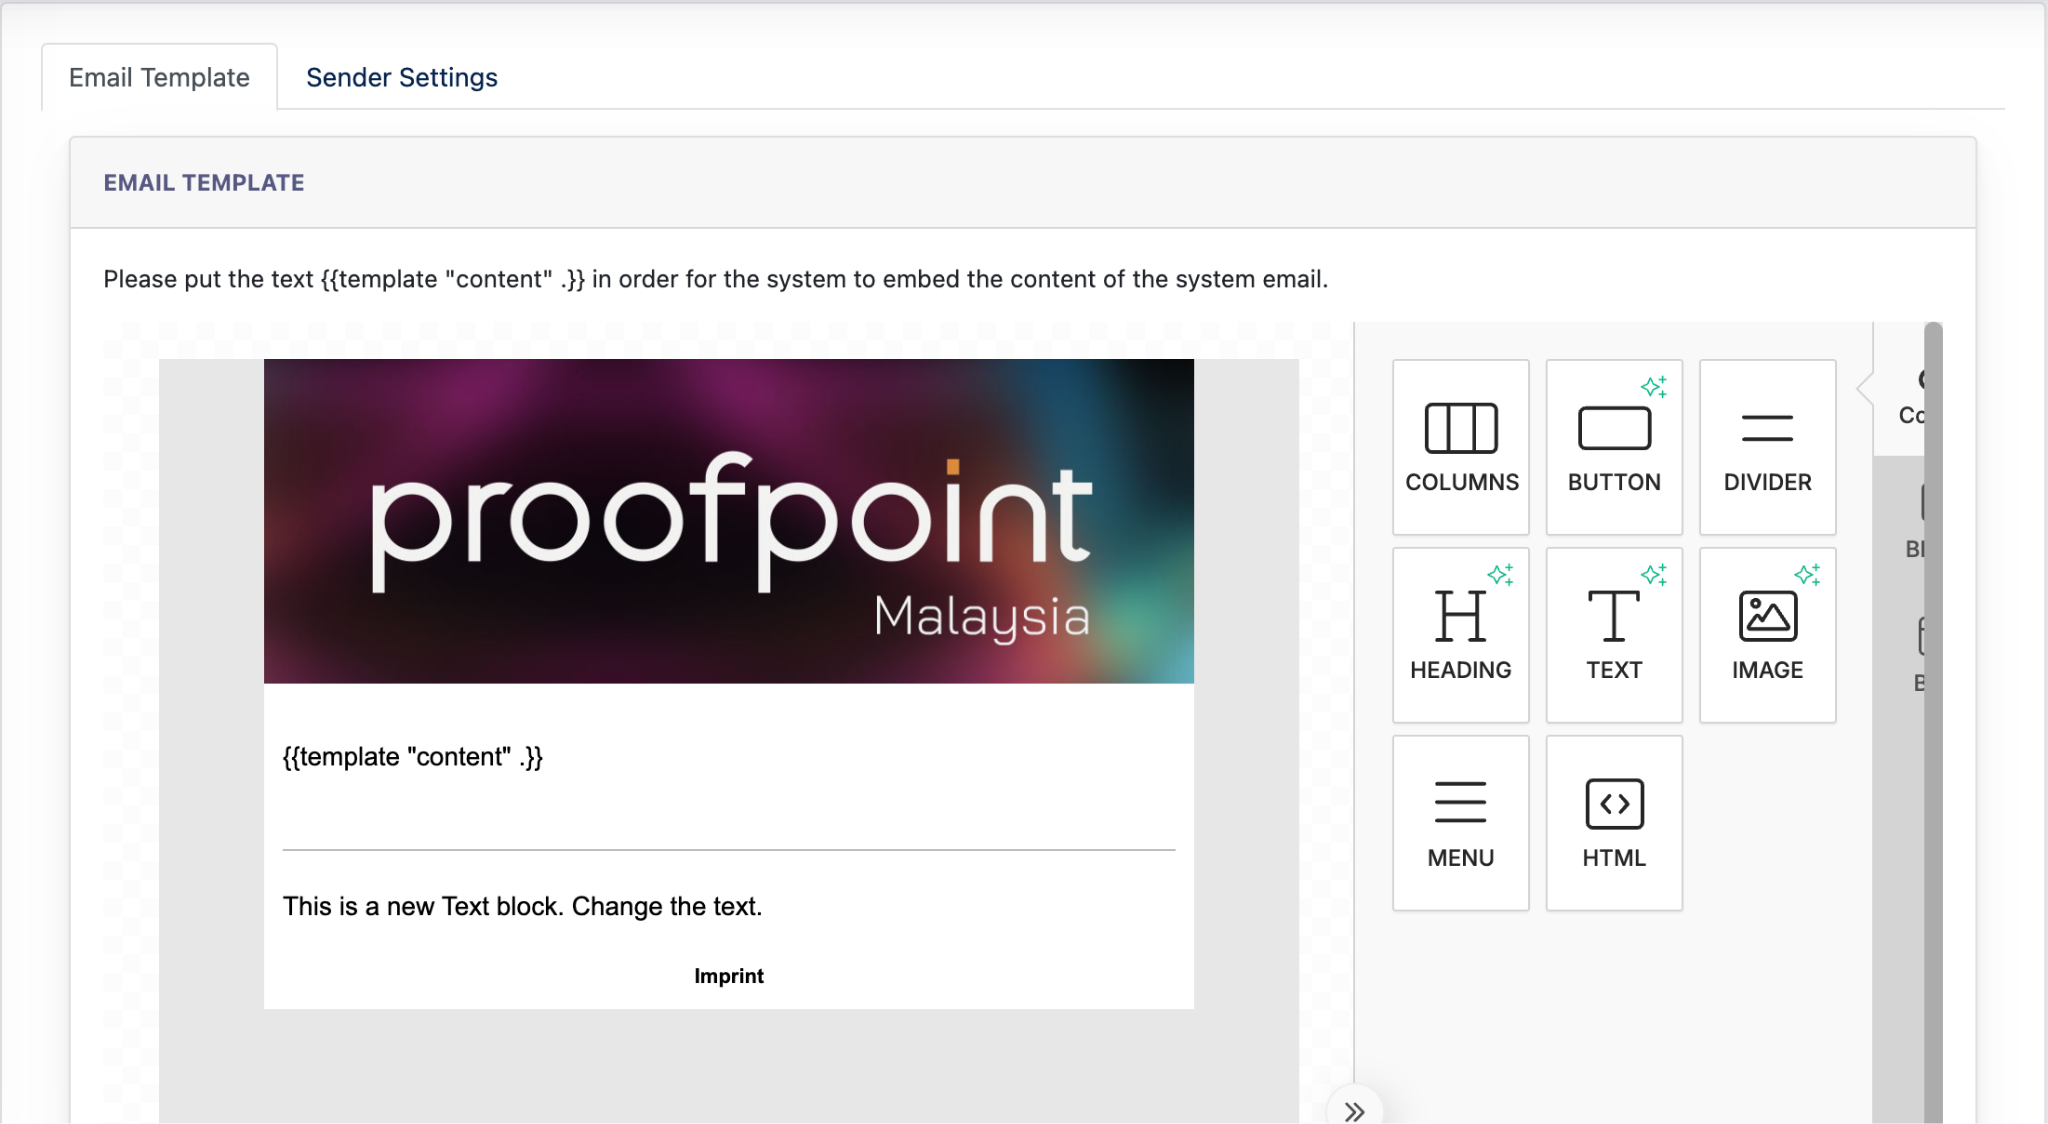
9.0 Email Config
This feature allows Admin to create email templates for all automation emails sent from System to users.
Below are the emails sent using this template:
- All emails configured under ‘Automation’ module
- Login Credential Emails
- Reset password Emails
- Automated emails triggered from Web Form submission
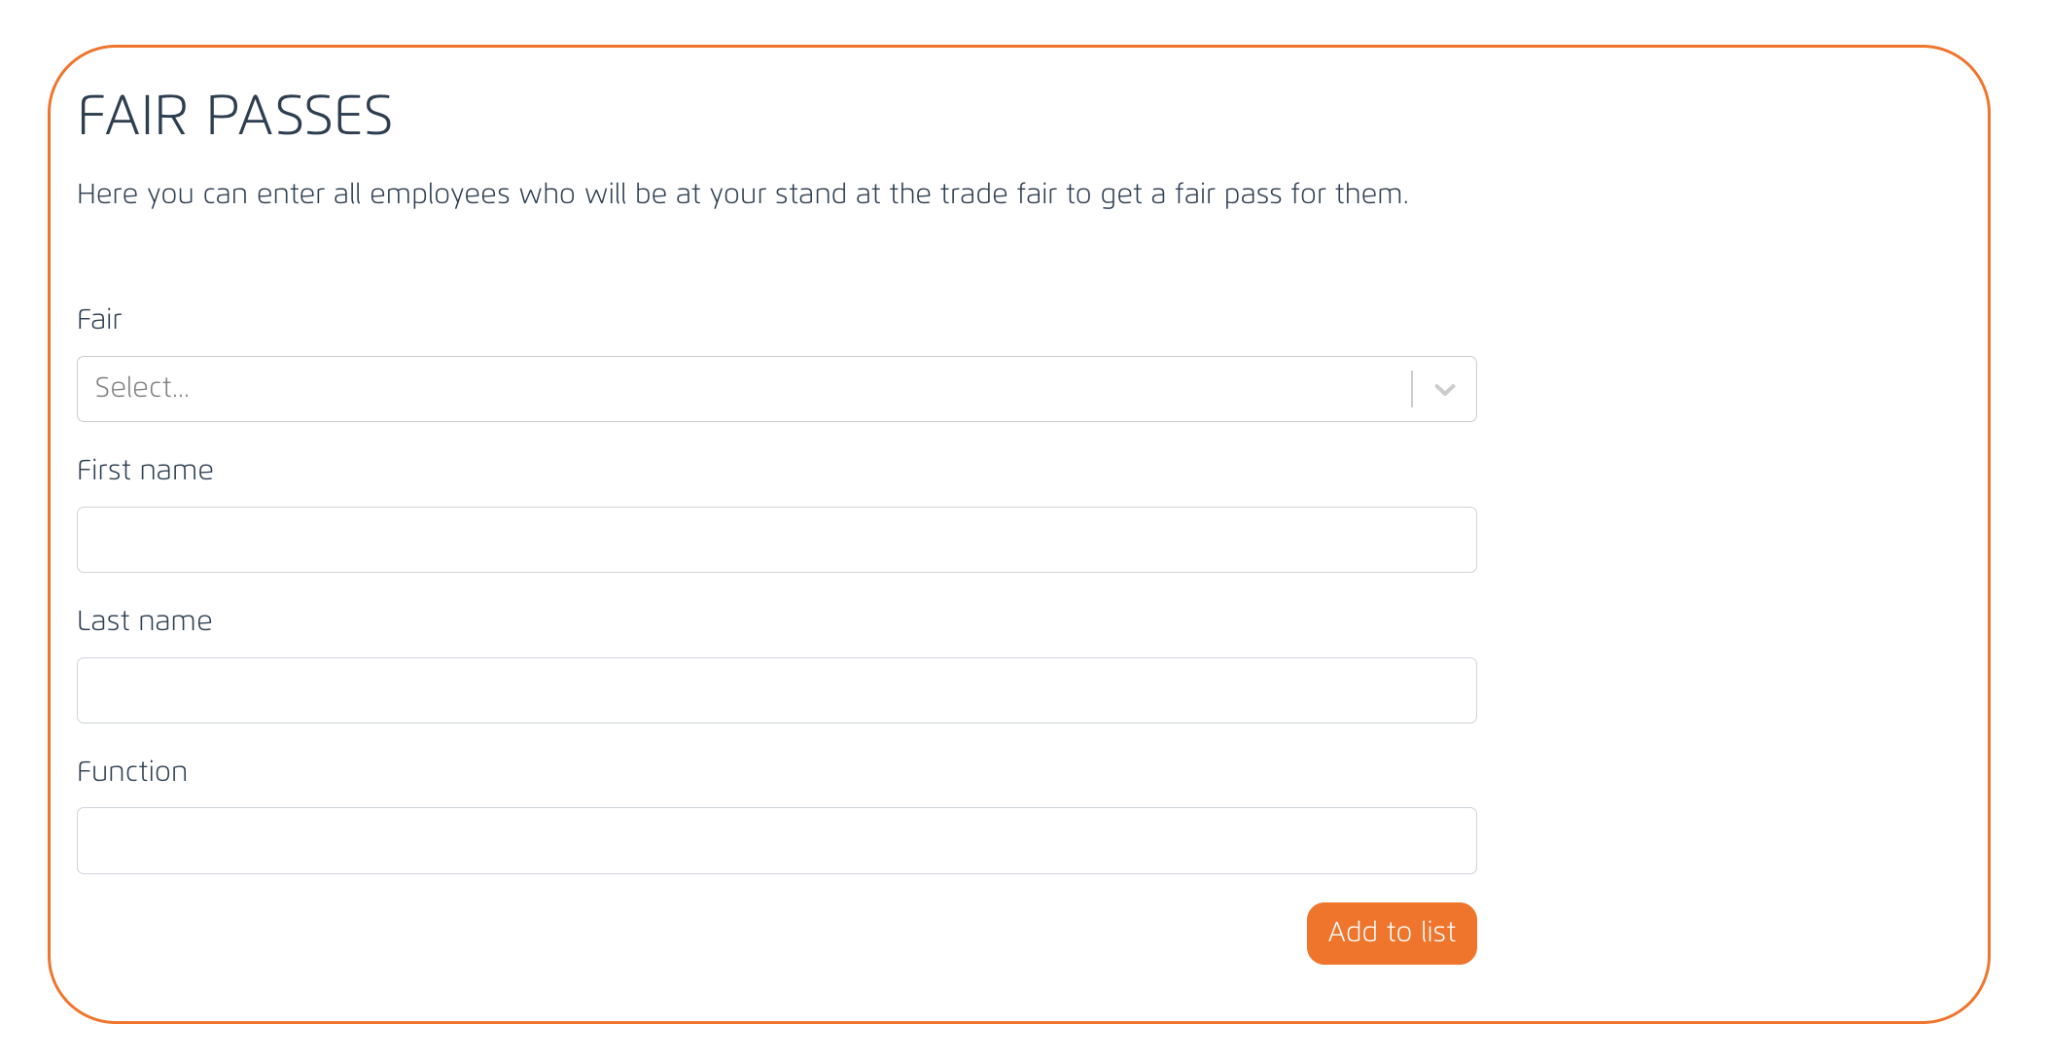
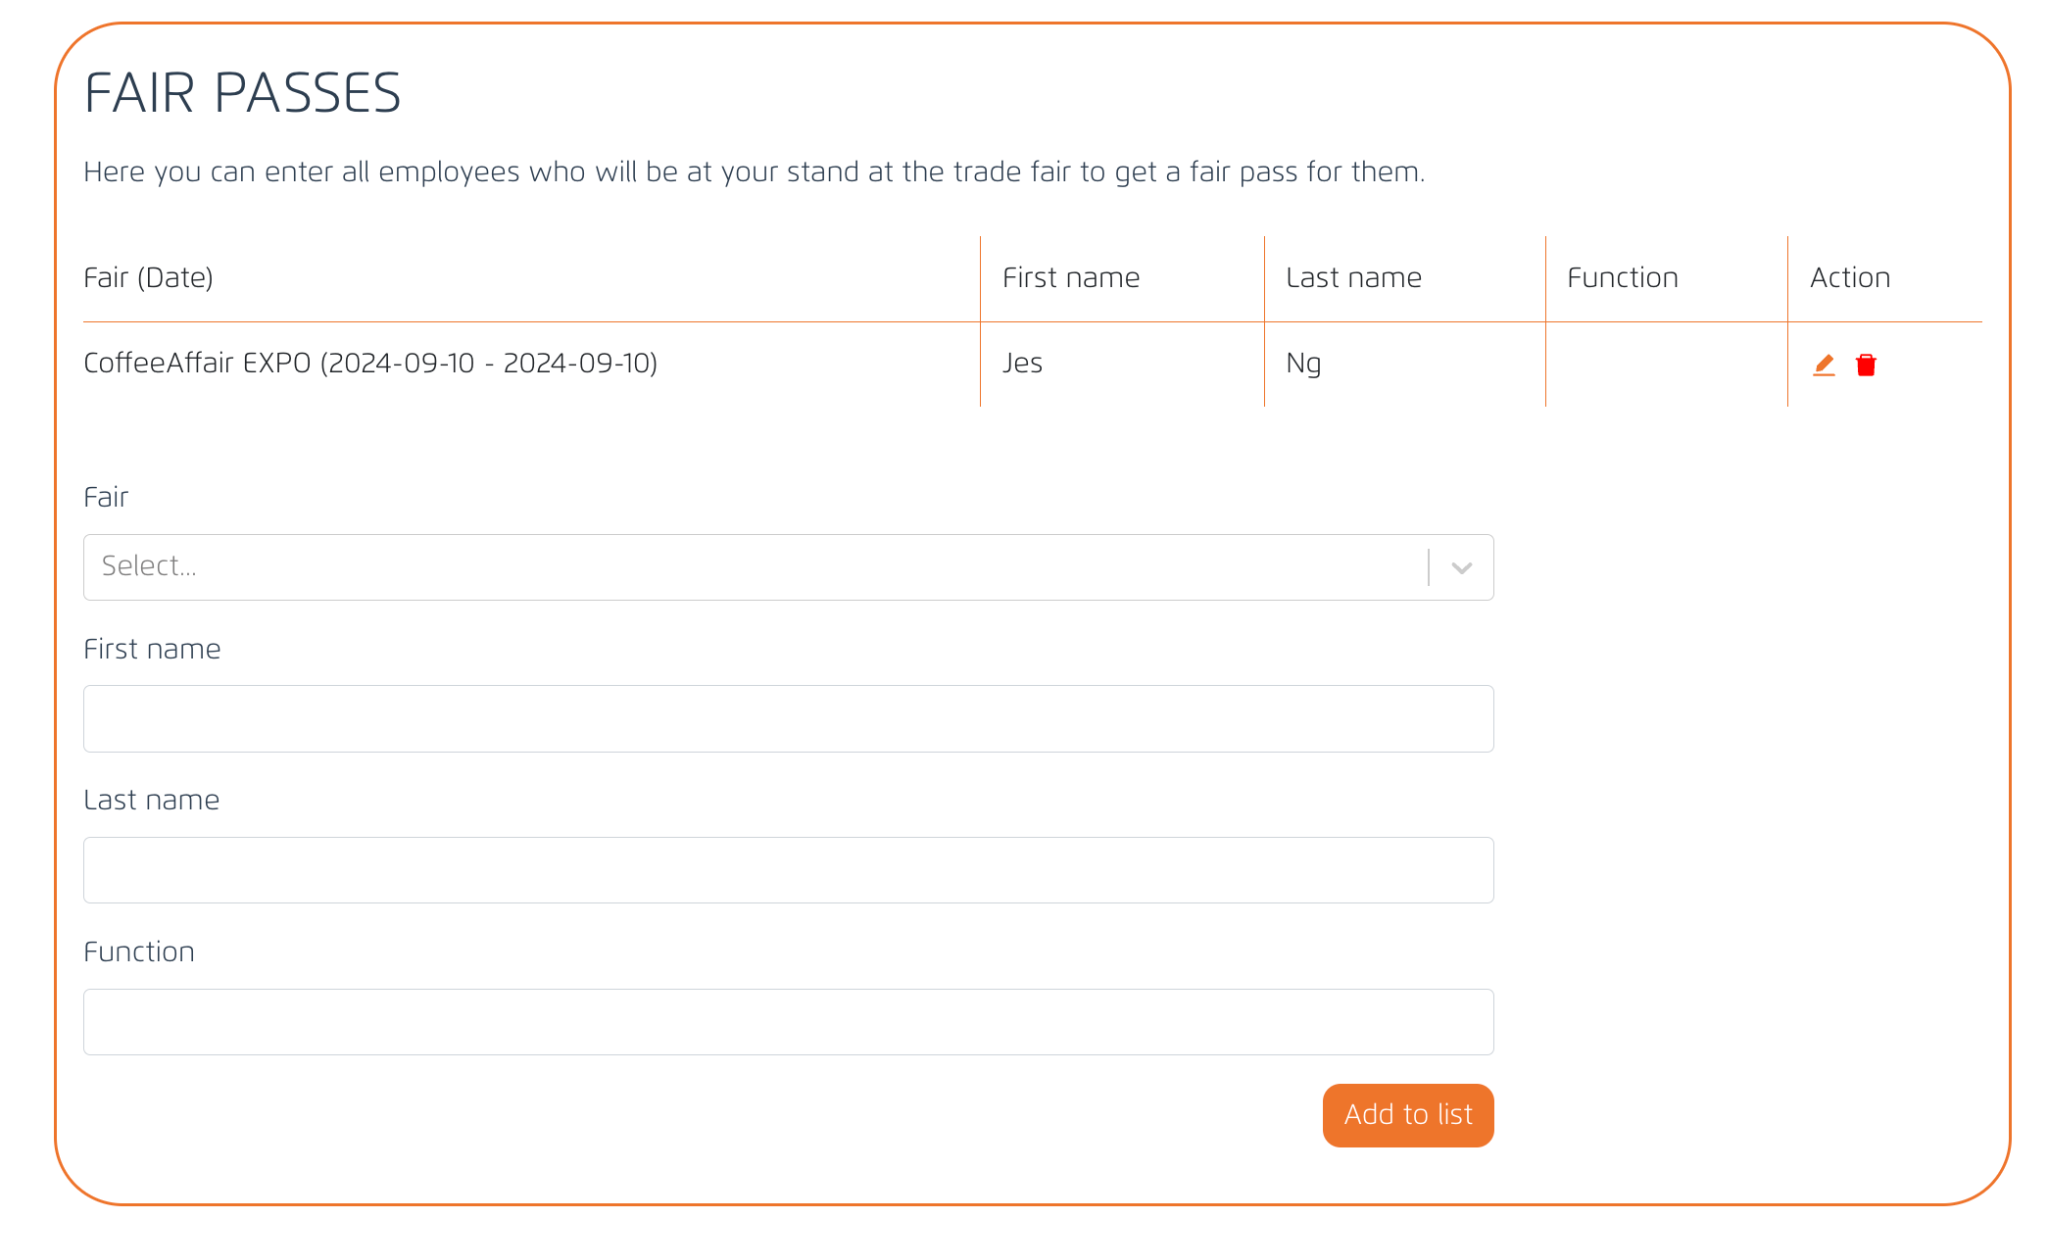
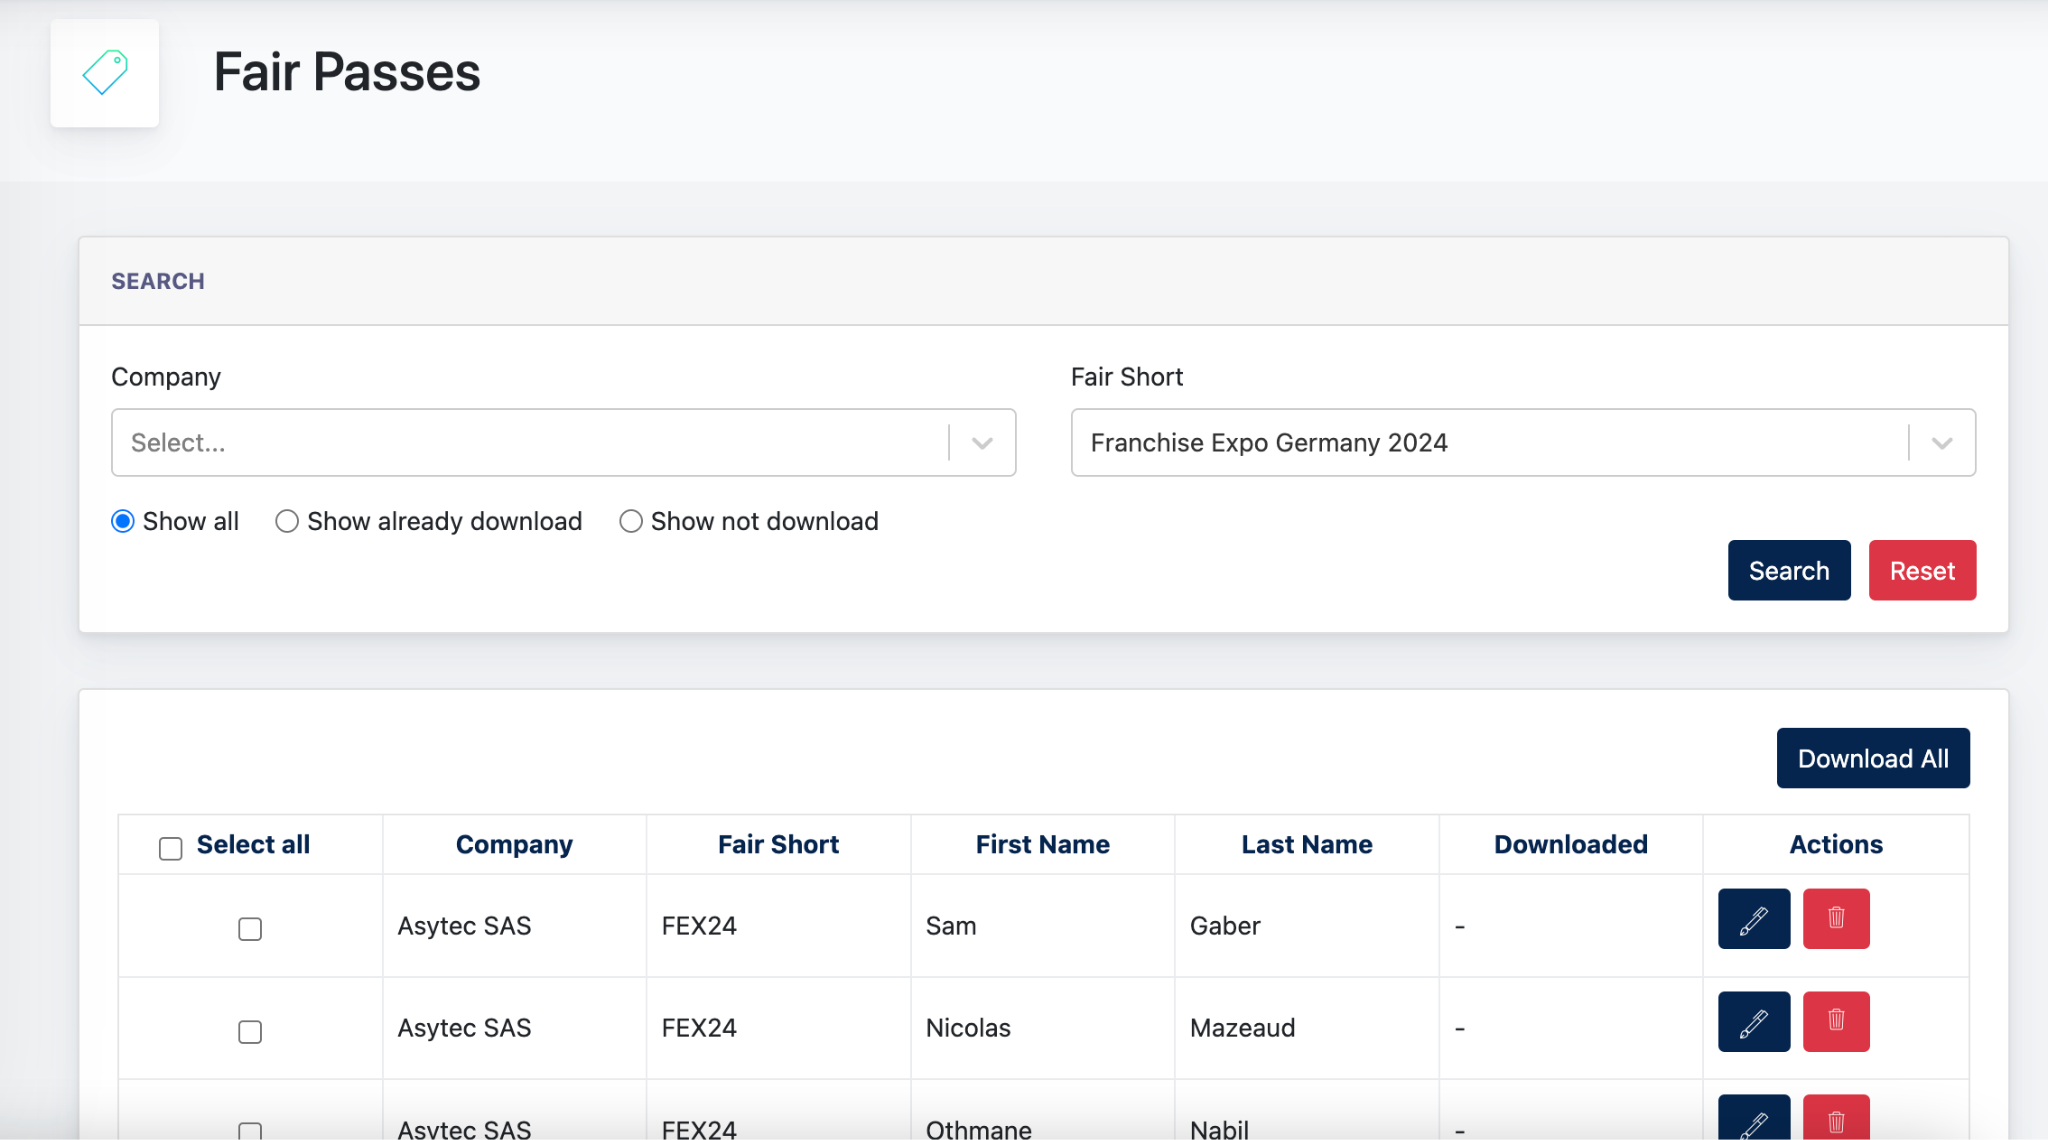
10.0 Fair Passes
This is where Admin can download the Fair passes data input by users via the Participants Portal. Admin also have the authority to edit the data of the fair passes, which will then sync to the Participants Portal.
Below is a screenshot of the Fair passes form on Participants Portal.