Admin Panel : Setting Up Members Area Content
1. Manage Different Roles
1.1 Create New Role
In the Admin Panel, Admin may create new roles manually via Members Area > Members :

Click on "Create" button and the following modal will appear :
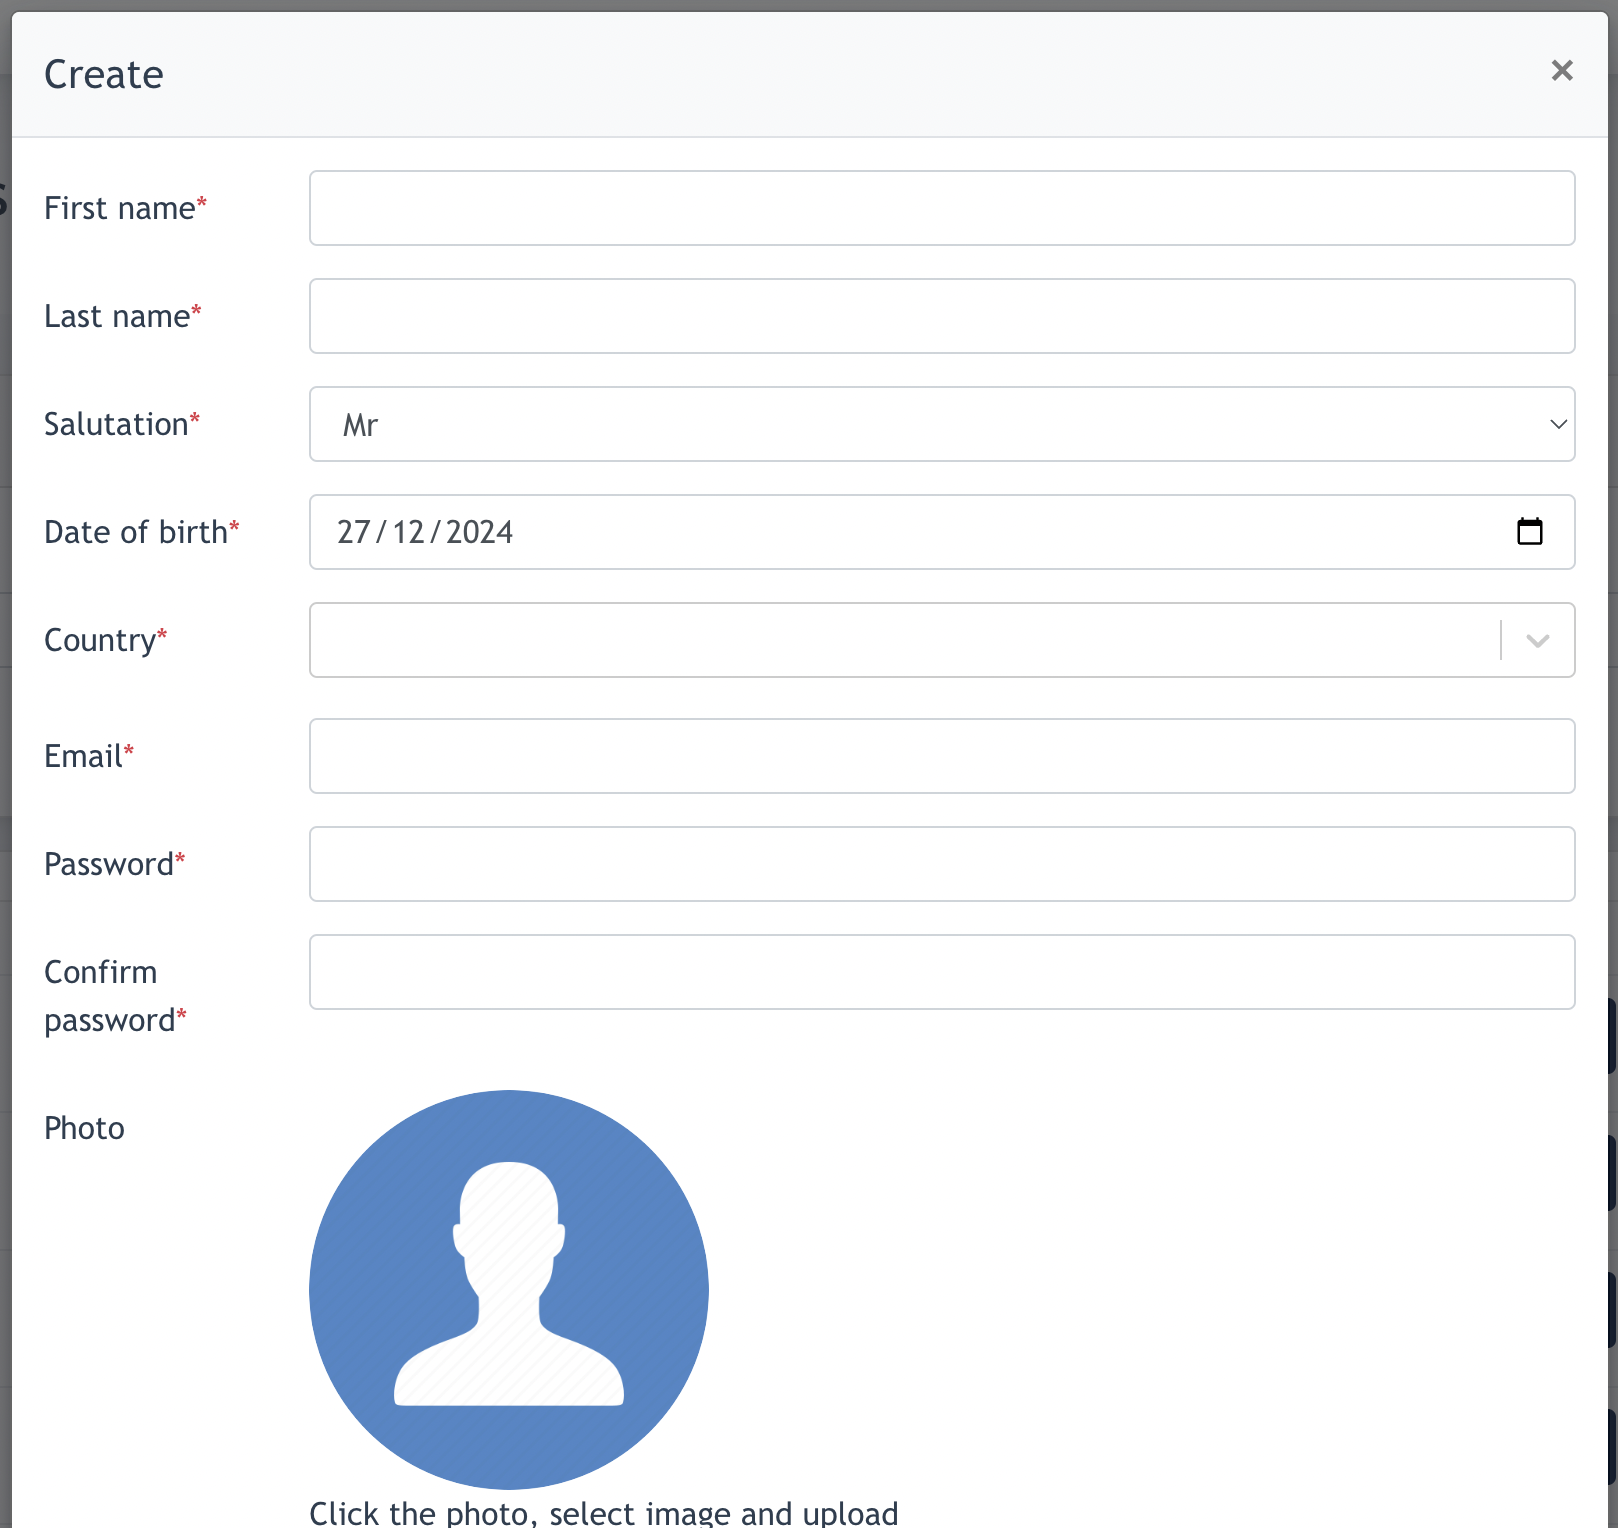
Admin to fill in all required fields above.
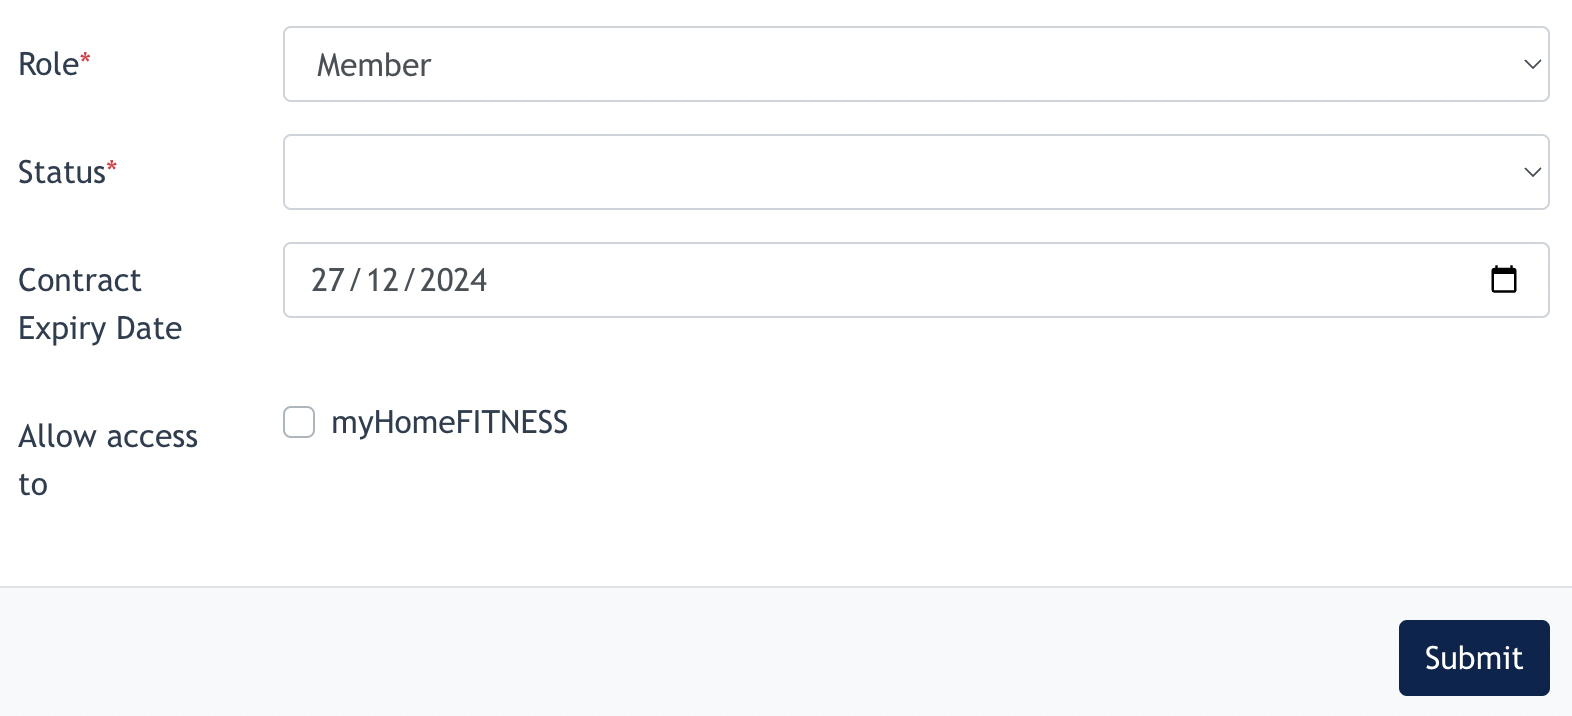
- Admin may select which role to create during the creation process. There are 4 roles : Members, Trial Members, Program Participants, Expert to be choose from.
- Select Status : Active/Inactive
- Contract Expiry Date: May fill in a date (if there is) or leave it blank ( no expiry date)
- Allow Access to "My Home Fitness" : when this checkbox is ticked, this member will have a "myHomeFitness" link in their Member Area Portal. Remarks: My HomeFitness is a 3rd party site.
- Click Submit to create this role.
All members / trial members / program participants role created will be displayed on the Members Listing.
Only Expert has a different listing, which only showcase the Expert, it is available via Members Area > Expert page.
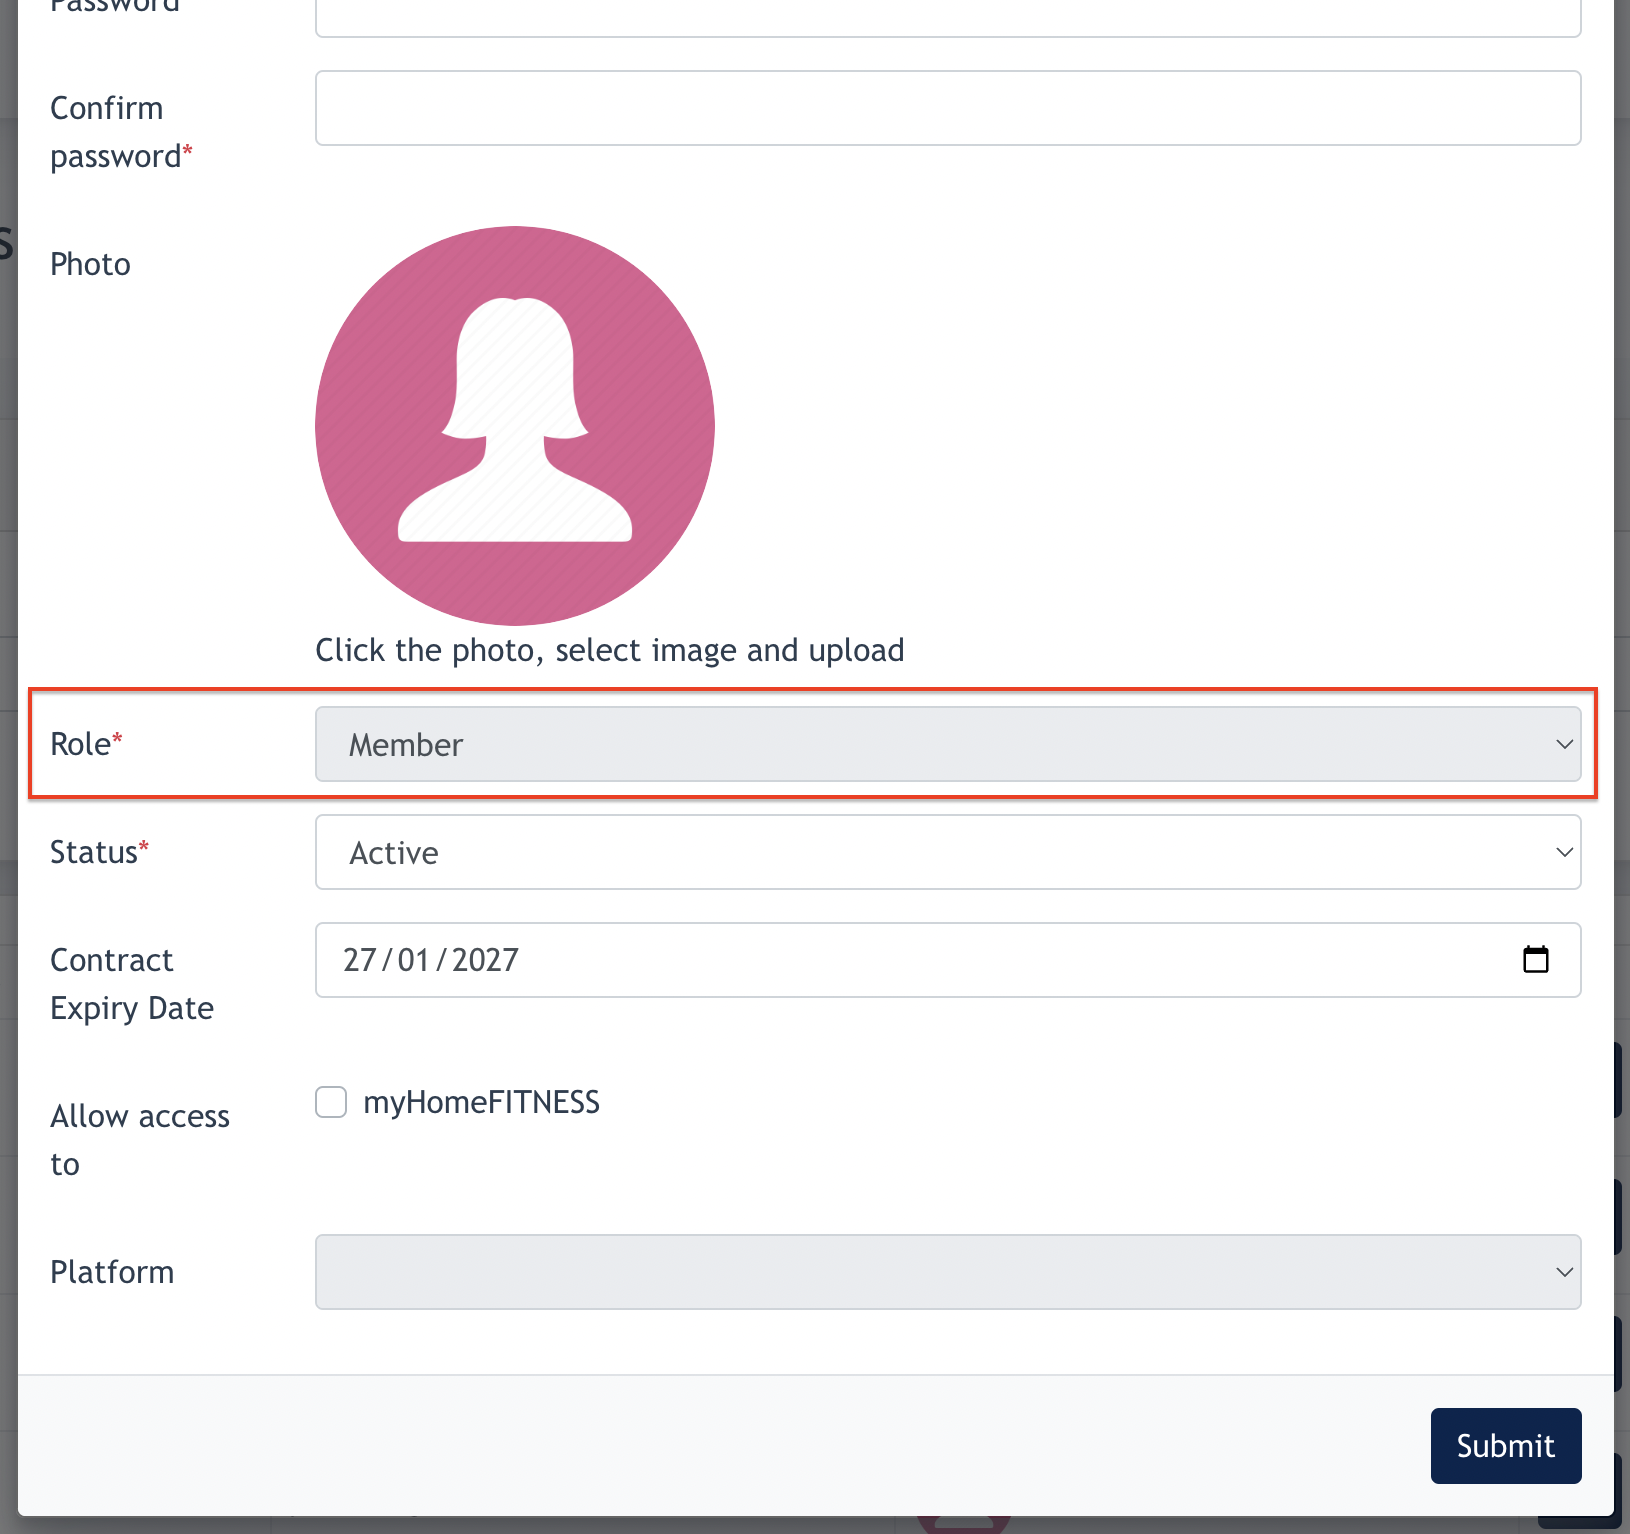
1.2 Edit Existing Role
Admin may click on the "Edit" button to edit any data of the role, except changing the role.
Screenshot shows that Role is not changeable after it is created.
2. Programme Creation & Configuration
MemberArea > Programmes is a series of online training offered to joiners within a specific duration. Training content can be in Text or video format, all can be uploaded by Admin.
Programme page is accessible via the Member Area Portal.
2.1 Create Programmes

Click on "Create" button:
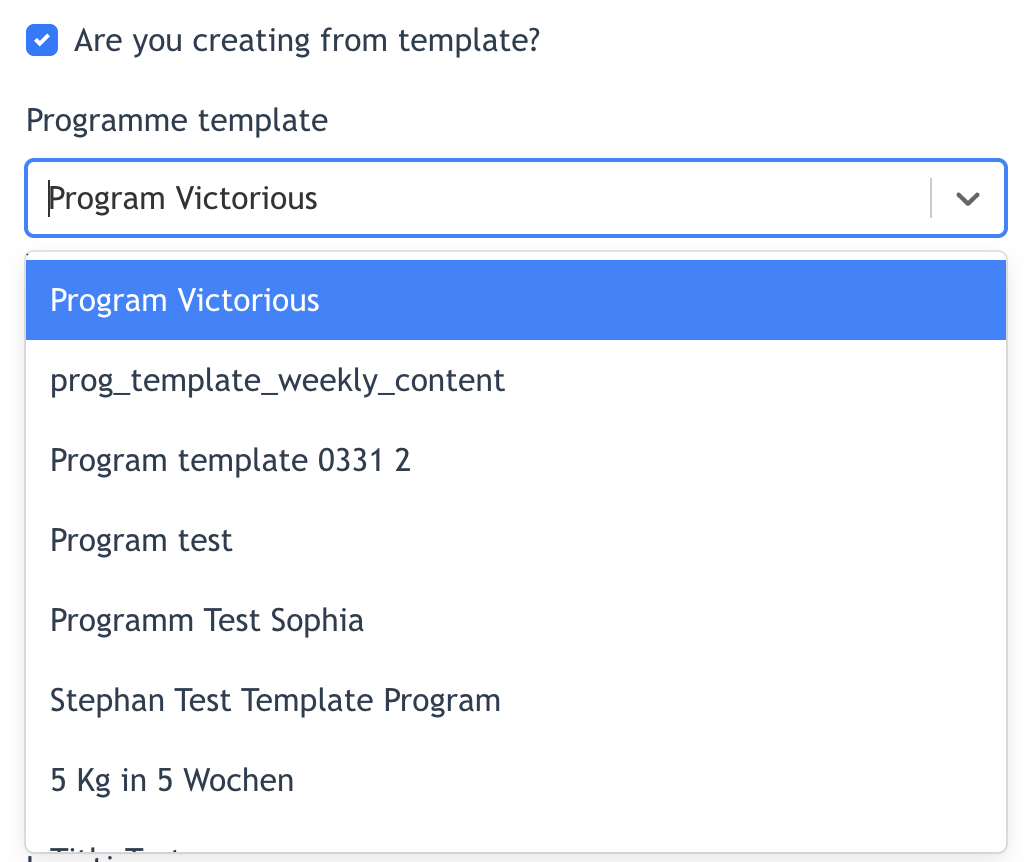
Admin may create from template by checking on "Are you creating from template?"
If this is checked, there are a list of ready-made programme template to choose from :
OR, Admin may create a Programme from scratch by filling in all the required fields :
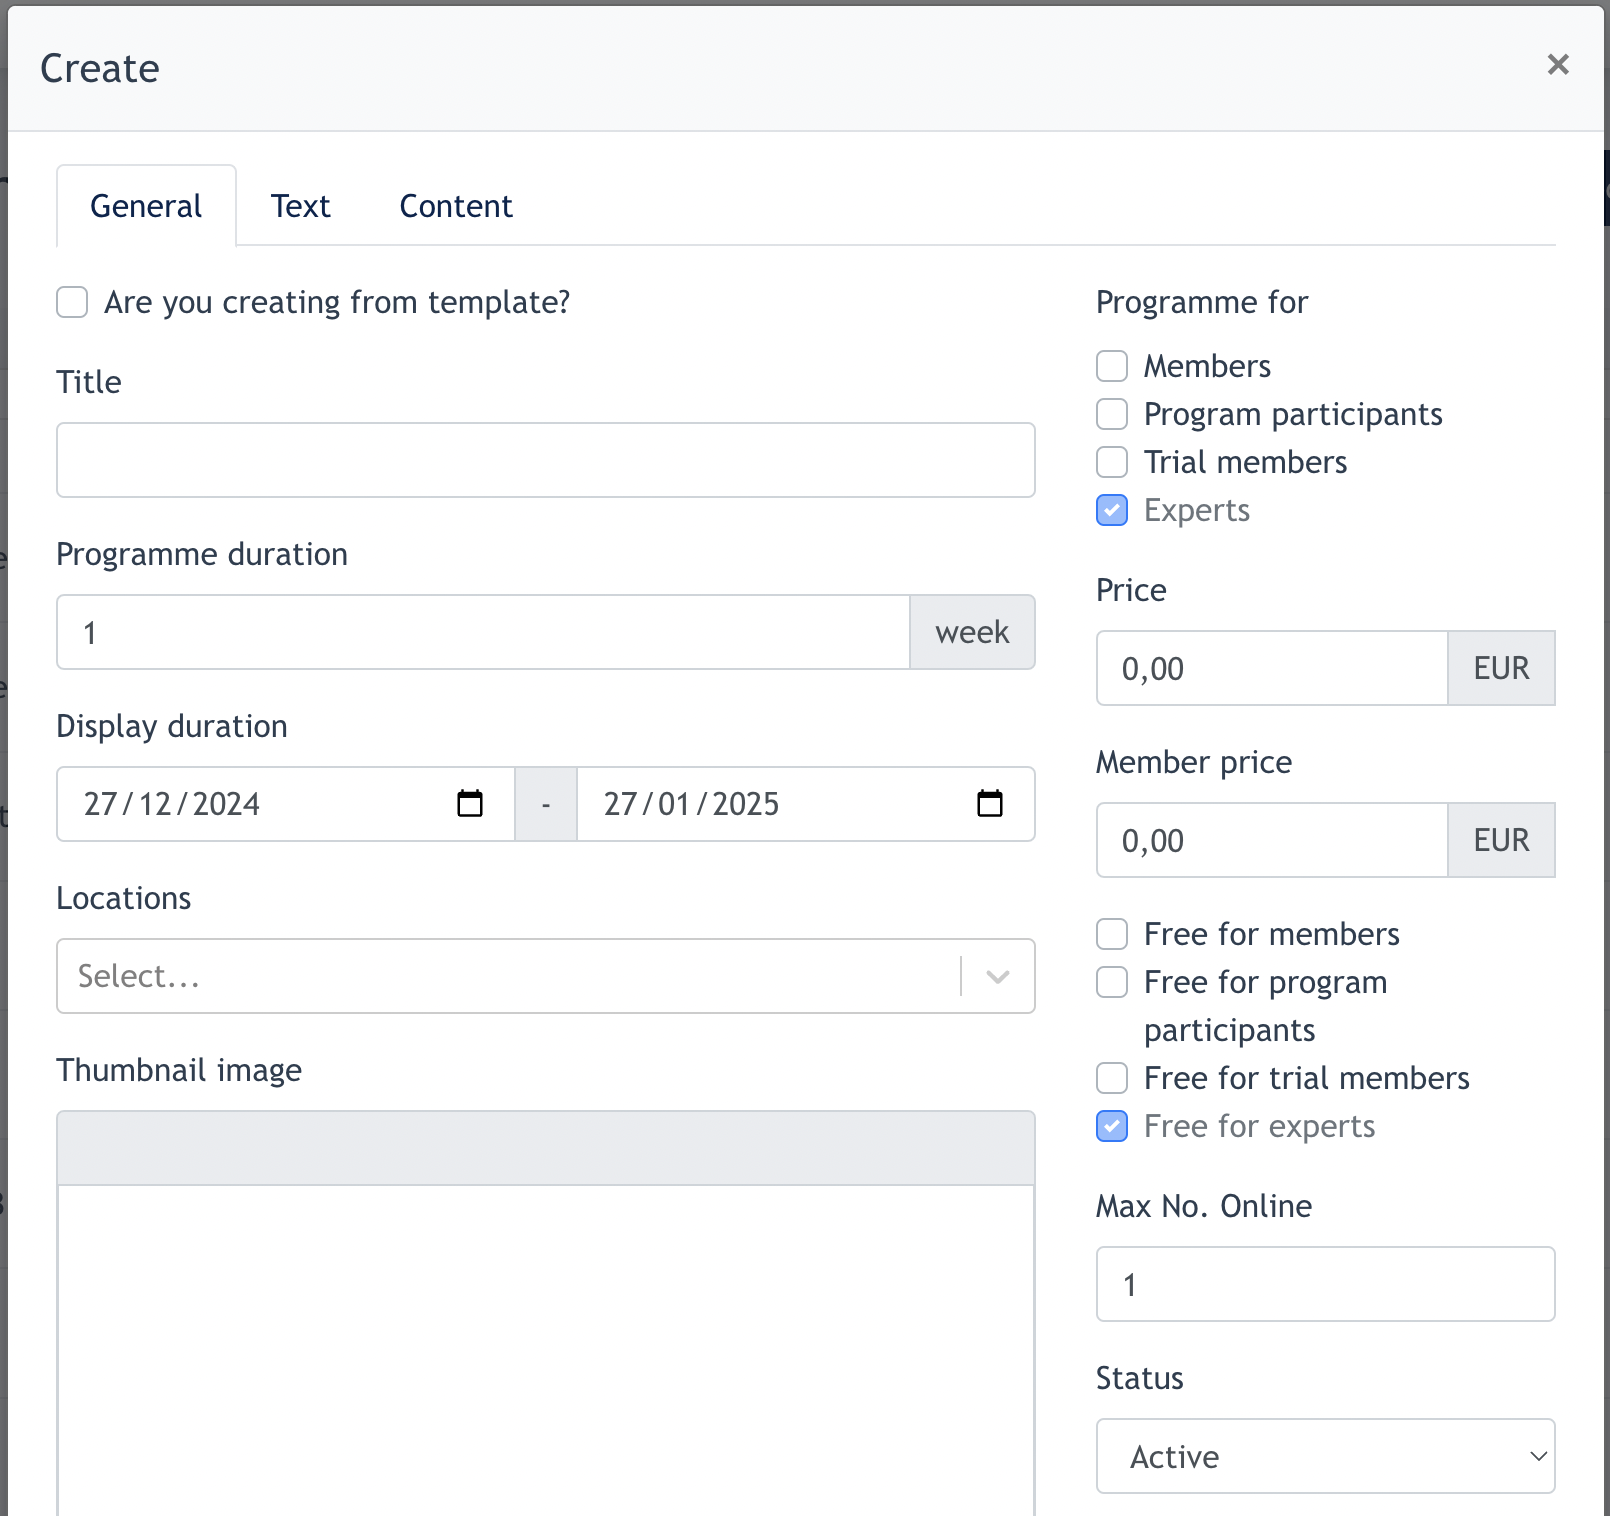
In the form:
- Title : Program title
- Program Duration : the length of program ( how many weeks the program will run)
- Display duration : the duration this programme will display on MemberArea
- Location : Location needs to be selected during payment
- Thumbnail Image : Preview Image appears on Programme overview page
- Banner Image : Large image appears on Programme info page
- Programme for : Here to configure which role this programme is available/visible for ( Member, Program participants, Trial Members). Programme is available for Expert at all times.
- Price/Member Price : Price is for Non-Member, Member Price is for those who has joined Member Area portal.
- Free for : Here to configure if this programme is free for Member, Program Participants or Trial Members. All programs are by default free for experts.
- Max. No. Online: Here is to configure max no. of participants that can join the program.
- Status: Active/Inactive
Once the above info is all configured, Users can submit this form and a program is created and appear on the Program listing page.
2.2 Programme Configuration
After a programme is created, Admin needs to further configure Programme details.
Click on the [ Edit ] button to open up the modal :
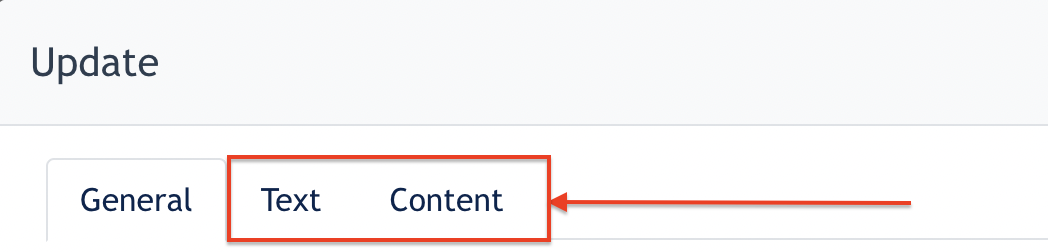
Admin may click on the [ Text ] and [ Content ] tab for further configuration :
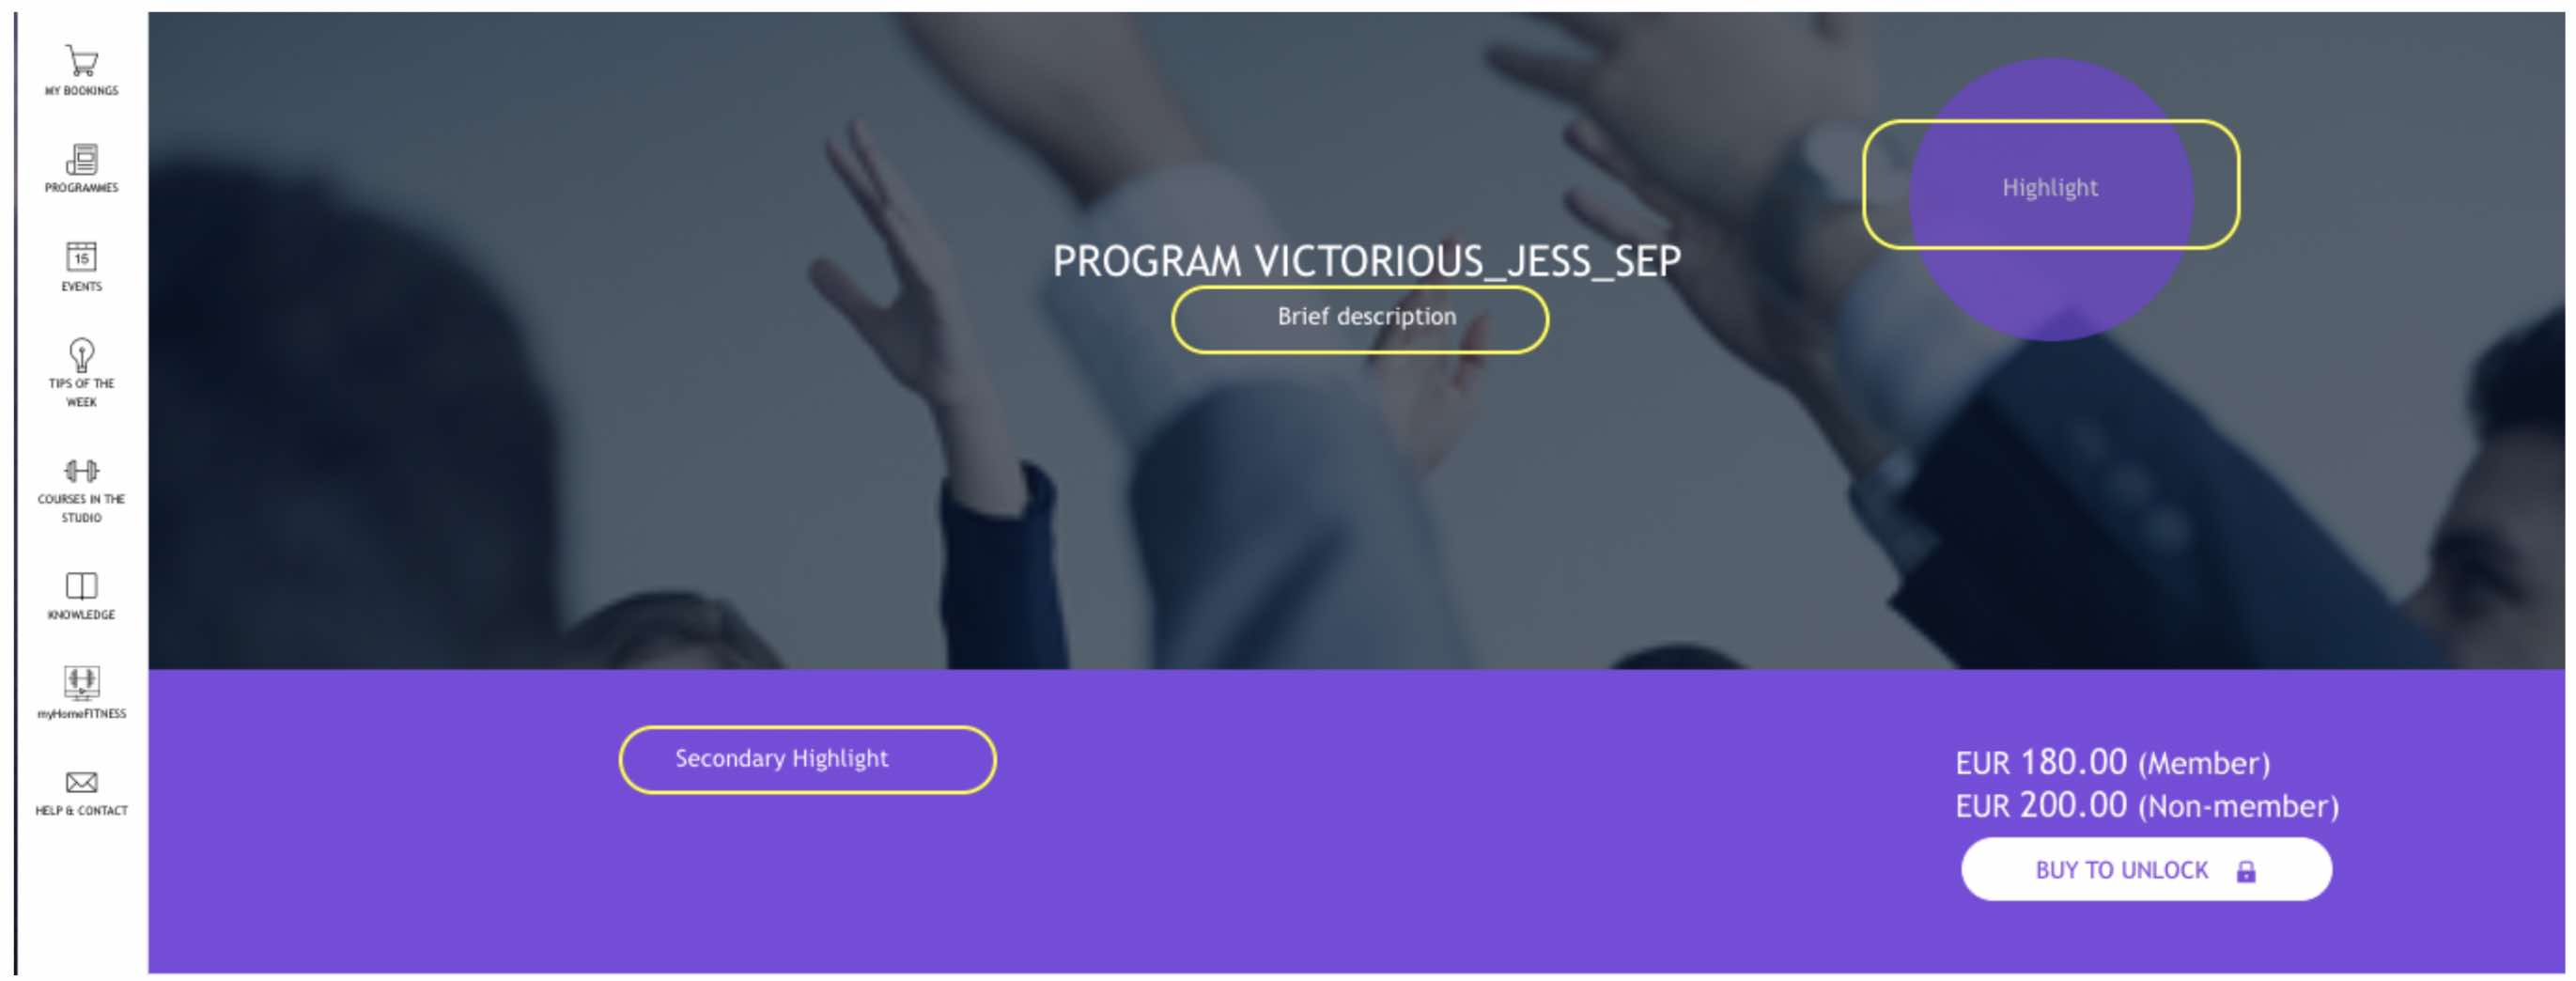
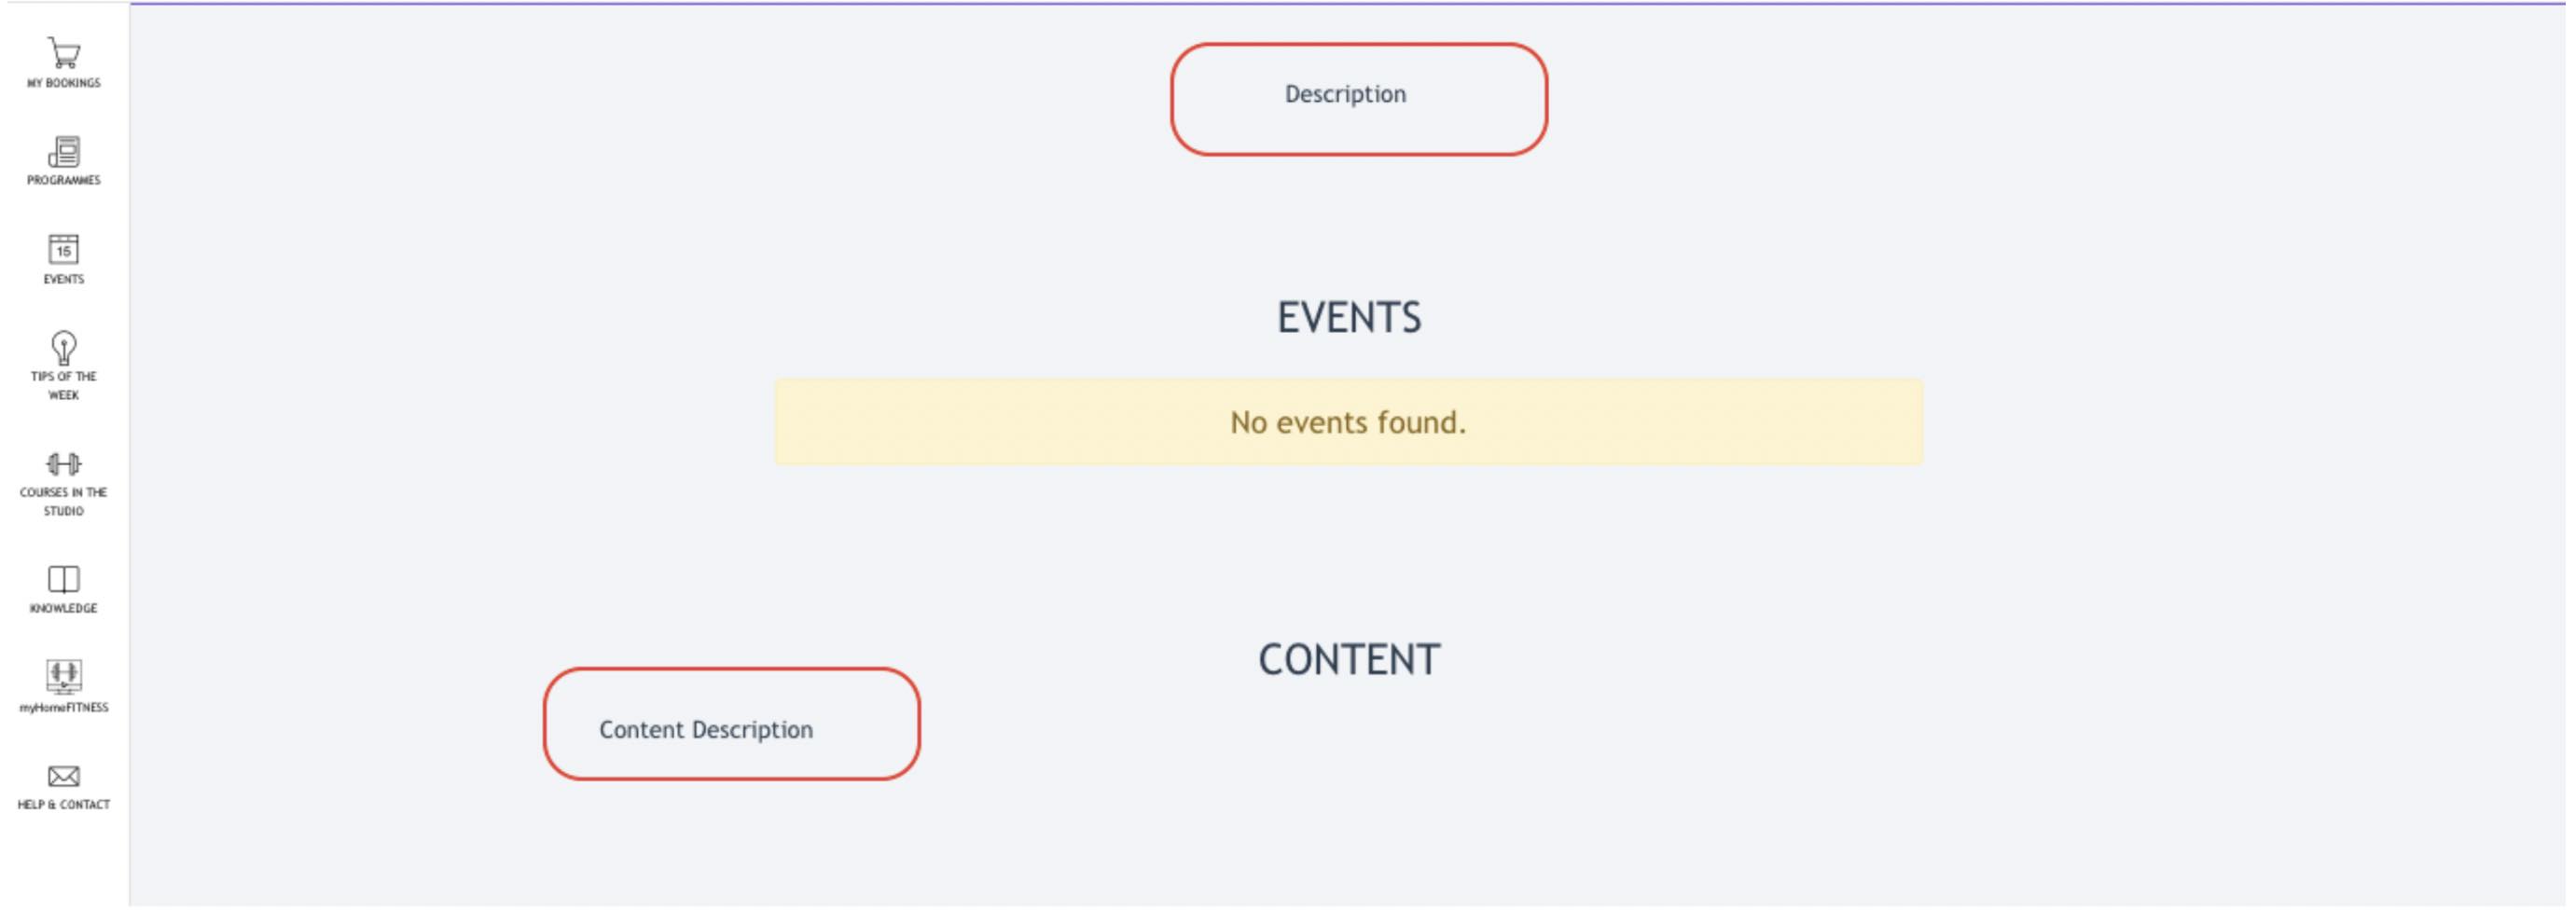
[ Text ] Tab
The form consists of :
- Brief Description
- Description
- Highlight
- Secondary Highlight
- Content Description
Every input on each field will be shown on the MemberArea > Program Info page.
Below screenshots show different locations of above content appearing on the Program info page.
[ Content ] Tab
If a Program Duration is 4 weeks. Under the Content tab, Admin may upload files or Add video for the weekly. The files and videos are additional content of the programmes, and it is only available for joiners of the programme.
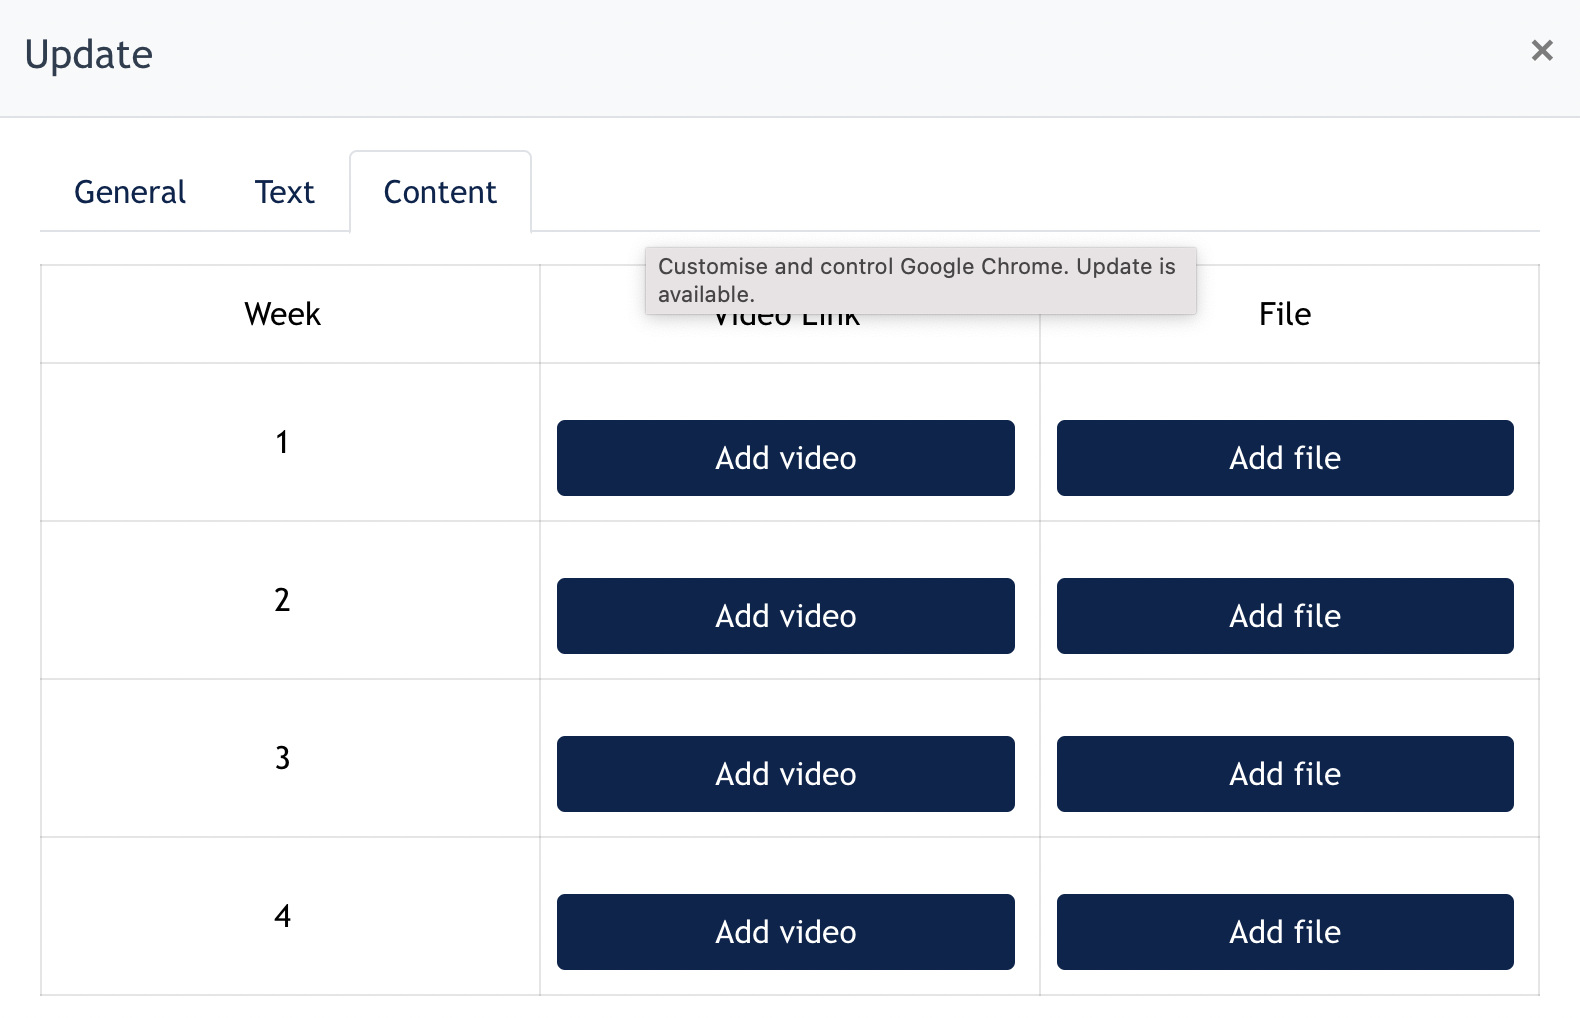
- Add Video : Click here to add a youtube/vimeo video link
- Add file: Click here to add a file to this programme.
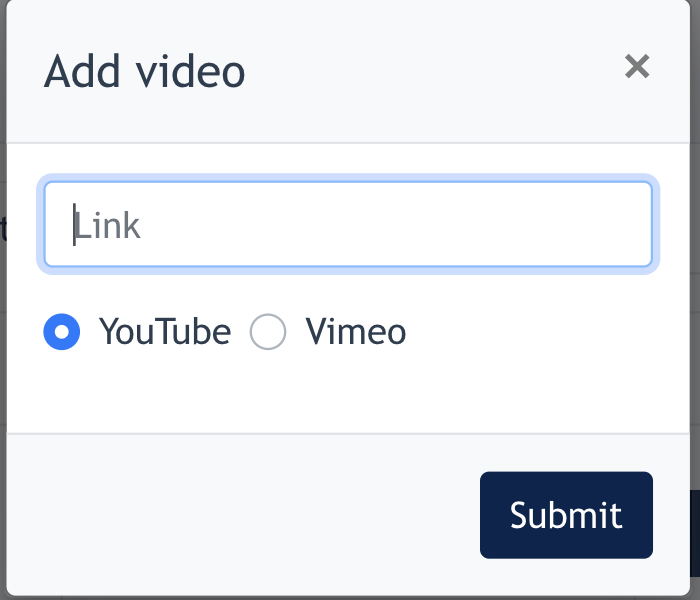
For the video, you only need to insert the last digits ending on the URL and click [Submit].

Logics of the Programme Content :
All the contents under Program are opened & viewable by joiners following this logic.
- Week 1 content will be opened up once the joiner click on programme [Start Now] button
- Week 2 content will be opened up once users enter the next Monday. Week 3 will be opened up once users enter another Monday...and so on.
- Week starts from Monday to Sunday
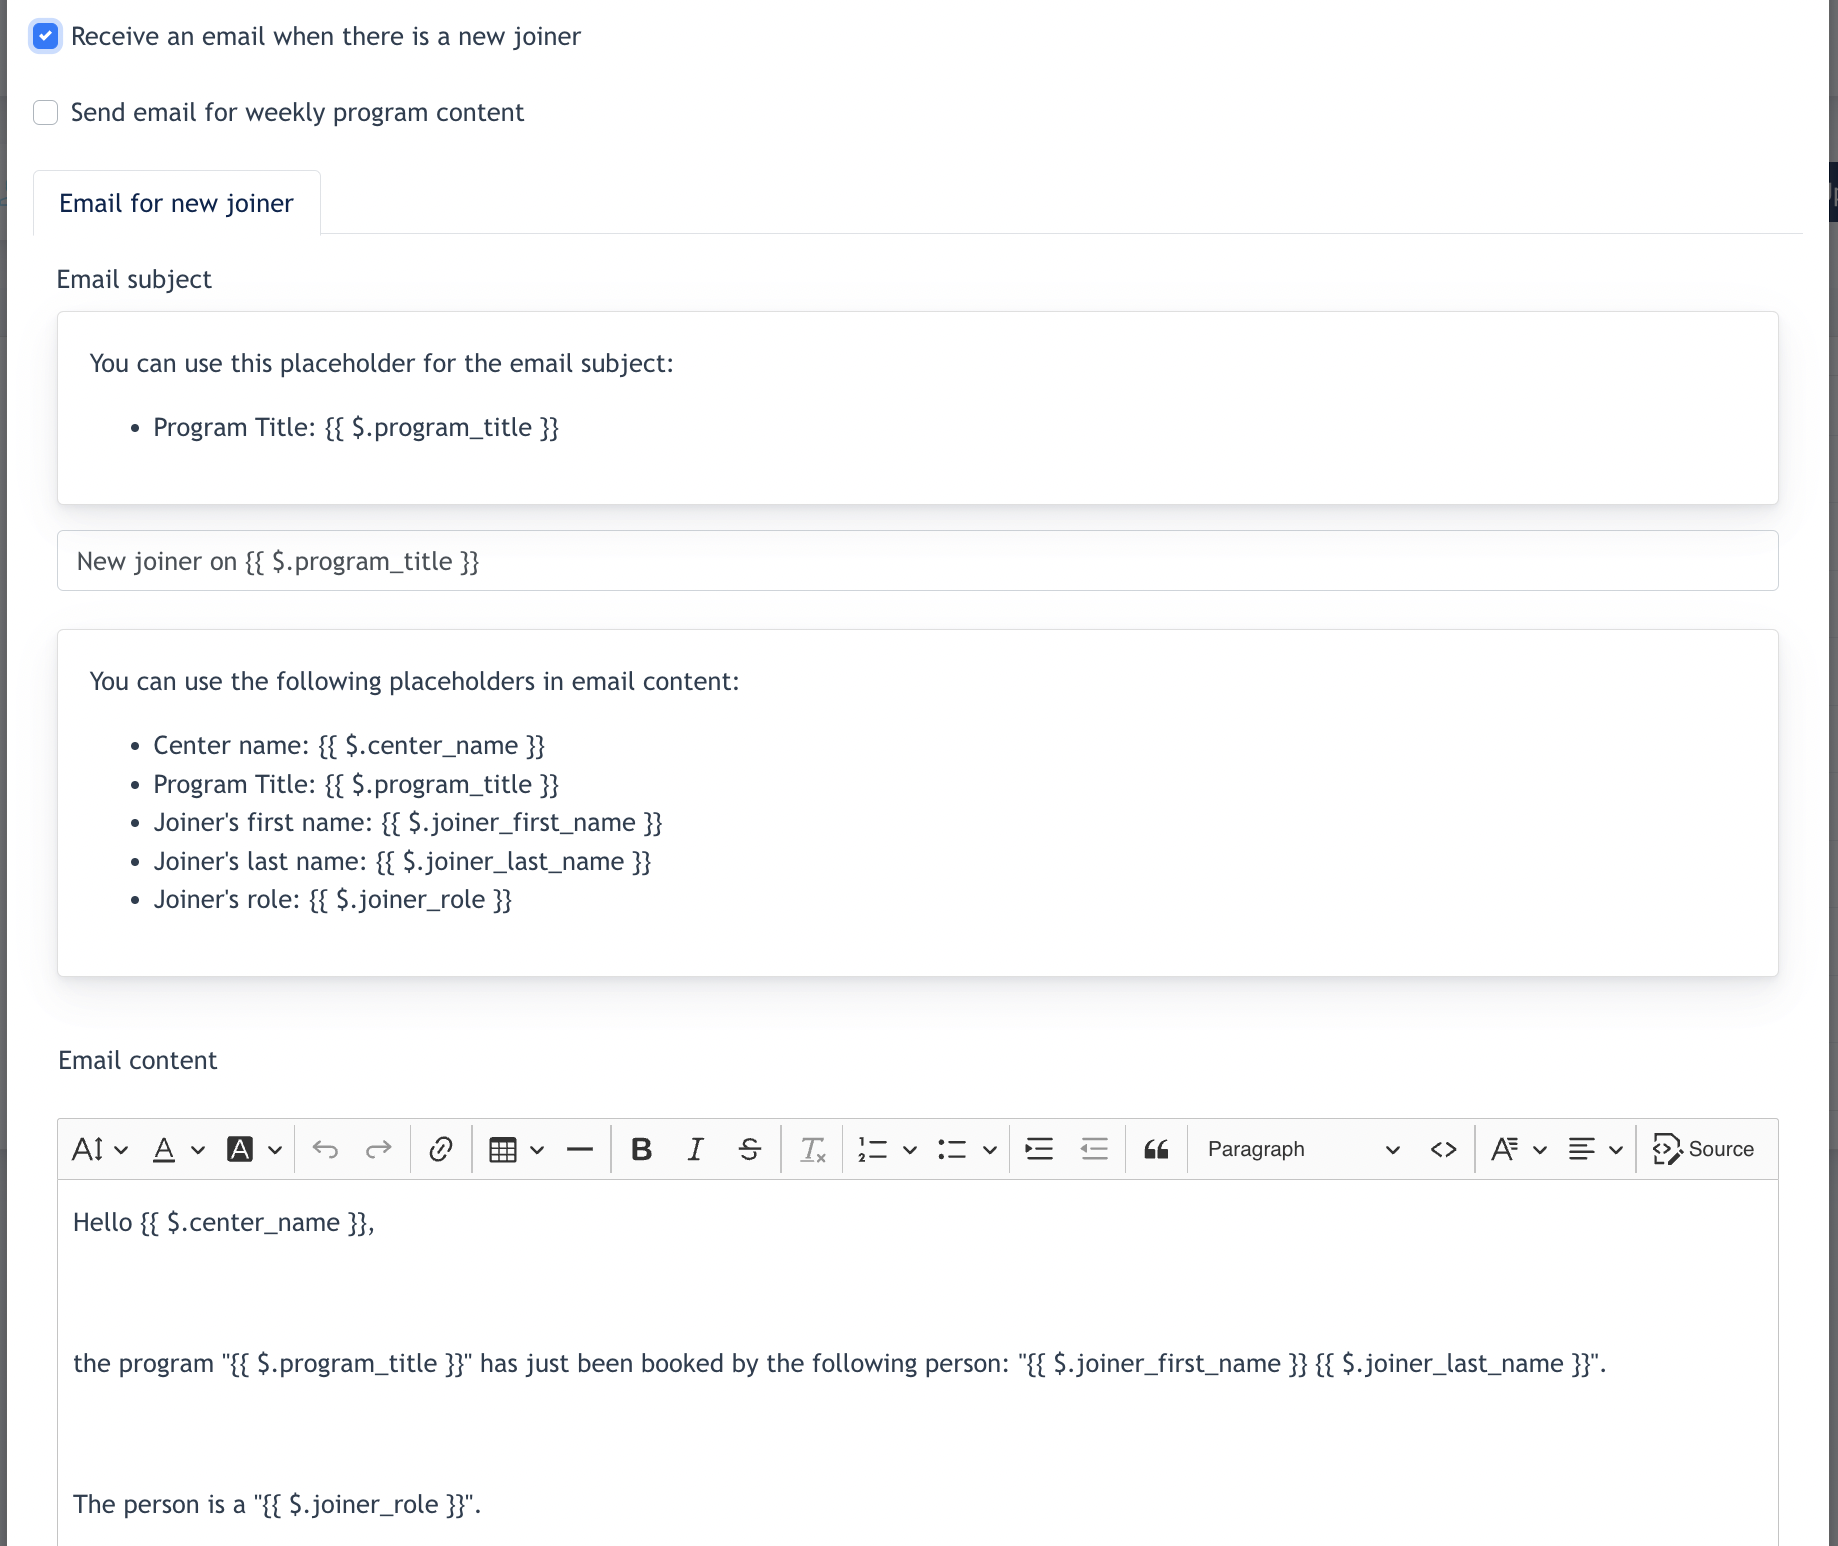
2.3 Email Setting Configuration
Under program page, Email Setting is meant for the following function.
- User will receive email when there is a new joiner of program
- Joiner will receive email when the program they join has weekly content published.
A. Receive an email when there is new joiner of program
This feature allows Center Admin to configure if they will receive an email when a joiner joins the programme.
Click on "Update Email Setting" button:
- Check "Receive an email when there is a new joiner". The modal will be expanded:
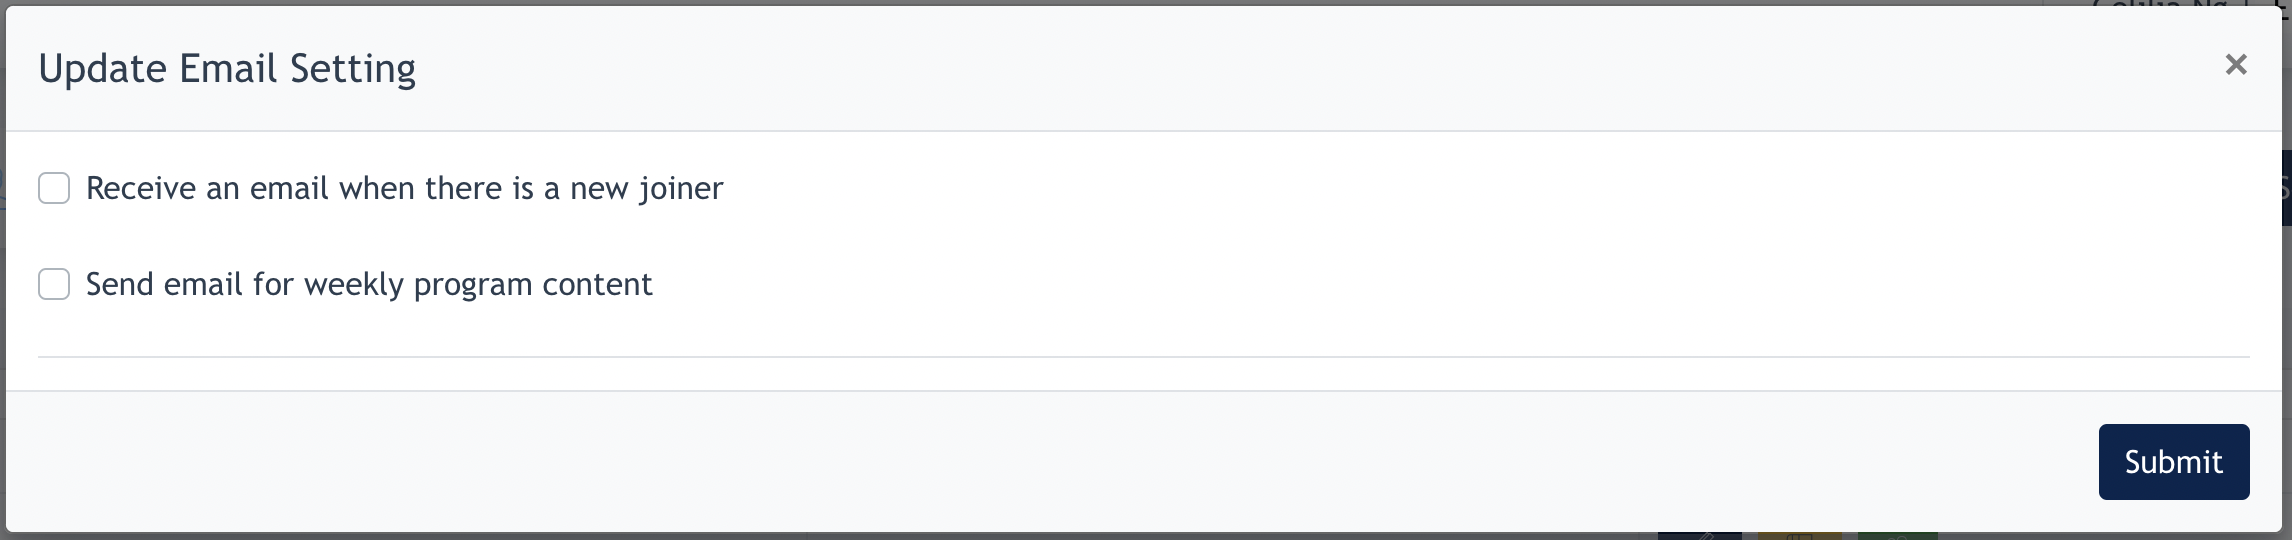
- Admin can configure the "Subject" and the "Content" via here.
- There are several placeholders available for the Content creation, for example, if we want the Program Title appear on the Email Subject, we can create a Subject like below :
- New joiner on {{ $.program_title }}
- In the email received by joiners, it will turn out like : New joiner on Programme Prosperity ( Programme Prosperity is the name of programme joined )
- In the email received by joiners, it will turn out like : New joiner on Programme Prosperity ( Programme Prosperity is the name of programme joined )
- New joiner on {{ $.program_title }}
- After Subject is created, Admin may curate the content of the email.
- Click "Submit" and this email is saved.
- Remarks : when there is a user joins a program, he/she will receive this email from Center.
Below is the default email content for a Center :
Subject : New joiner on {{ $.program_title }}
Content :
Hello {{ $.center_name }},
the program "{{ $.program_title }}" has just been booked by the following person: "{{ $.joiner_first_name }} {{ $.joiner_last_name }}".
The person is a "{{ $.joiner_role }}".
B. Send email for weekly program content
Tick the Checkbox for "Send email for weekly program content". The form modal will be opened :
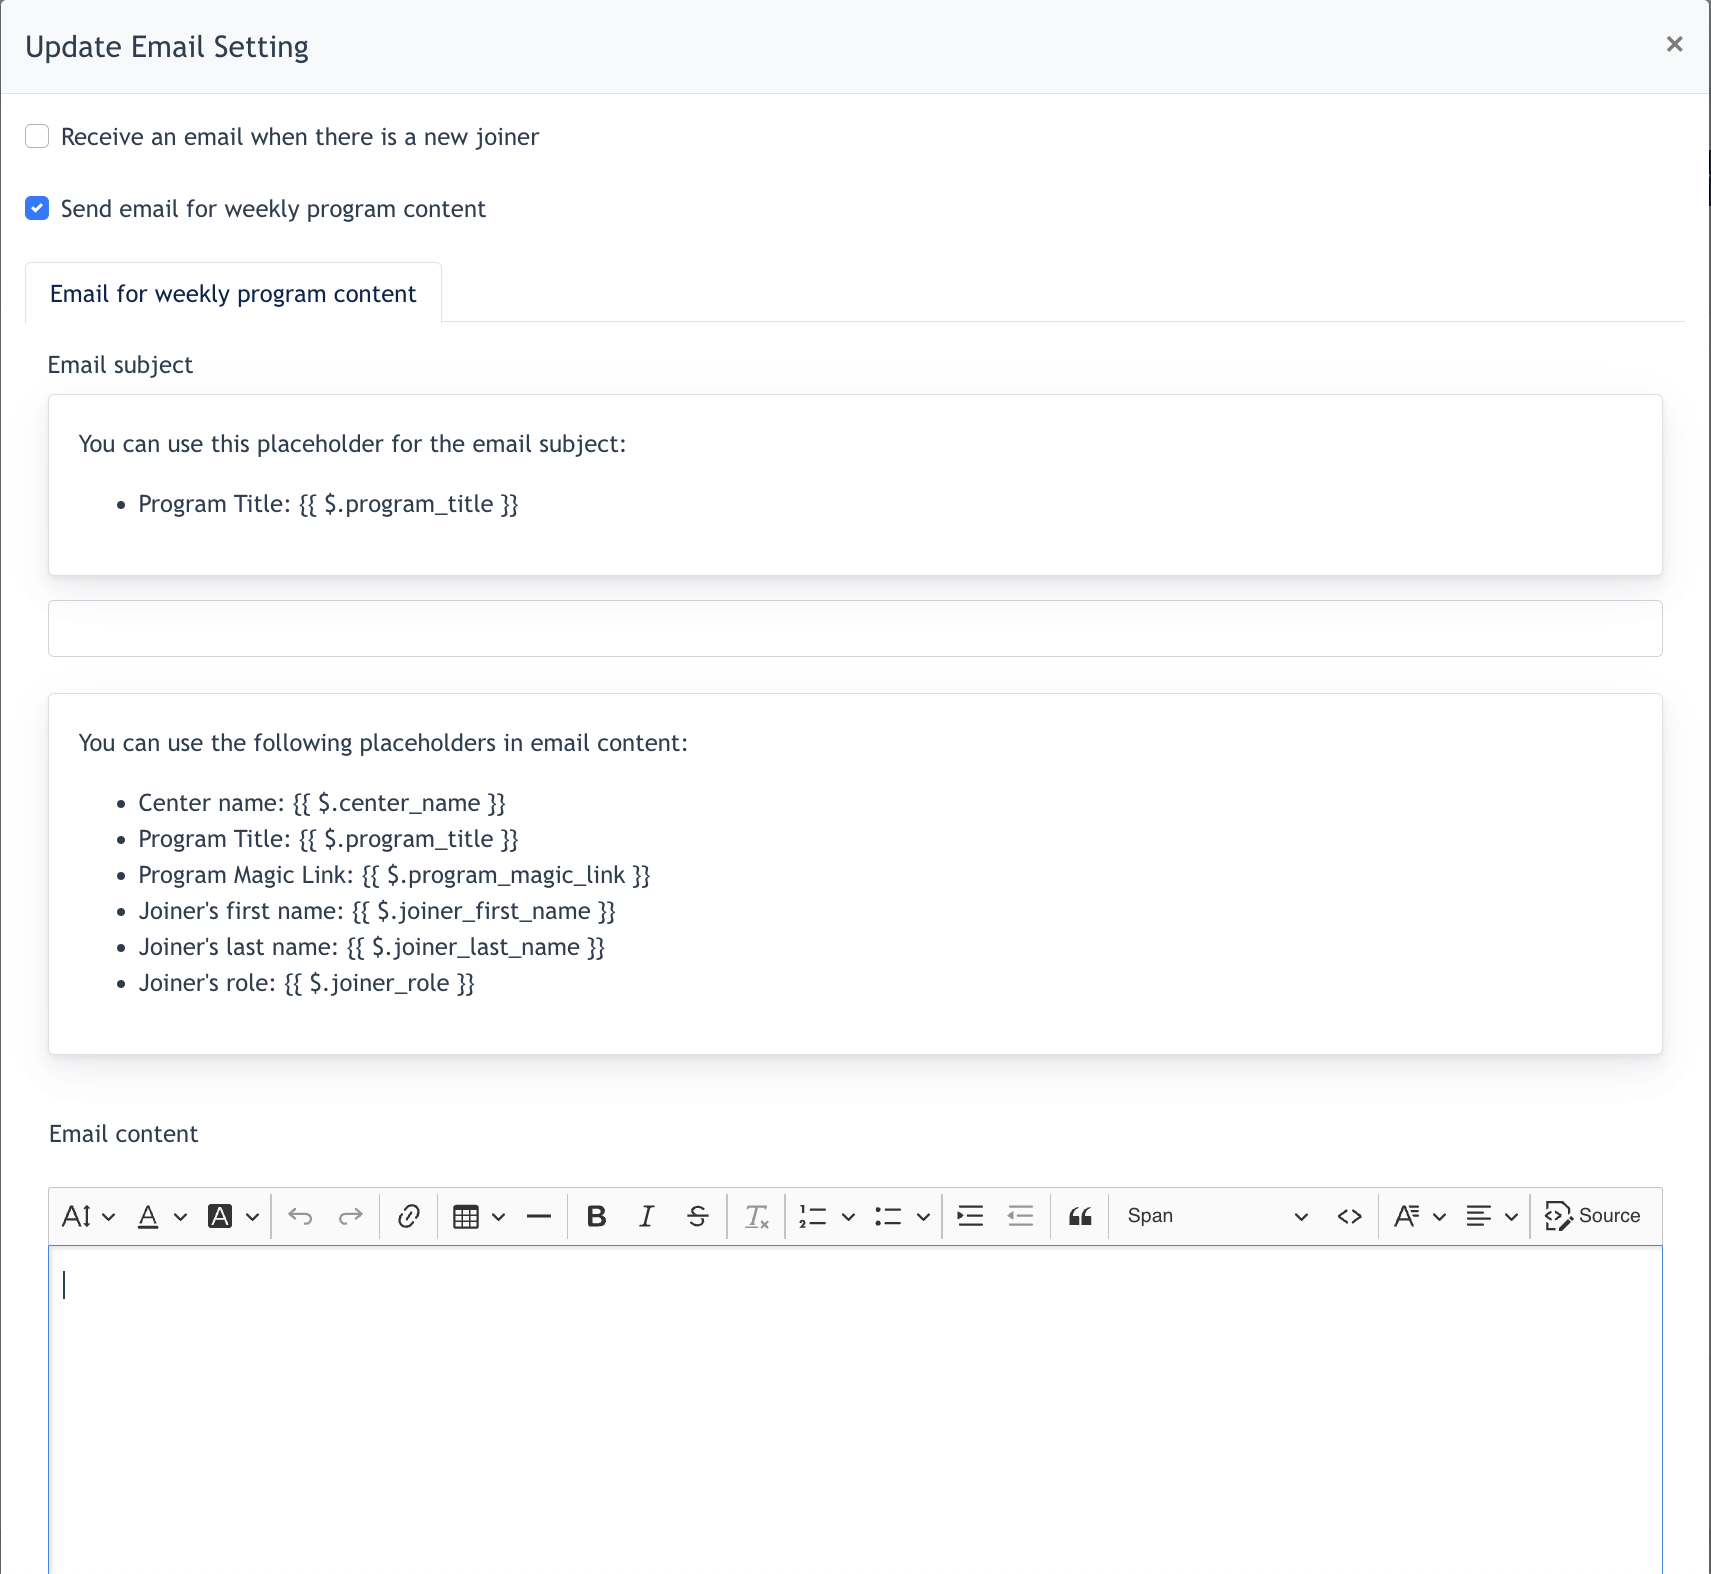
- Admin can configure the "Subject" and the "Content" via here.
- There are several placeholders available for the Content creation, for example, if we want the Program Title appear on the Email Subject, we can create a Subject like below :
- "Thank you for joining {{ $.program_title }}". In the email received by joiners, it will turn out like below :
- Thank you for joining Reduce your Waistline in 1 Month ! --> "Reduce your Waistline in 1 Month !" is the program the user signed up
- Click "Submit" and this email is saved.
- Remarks : when there is a user joins any program with Weekly Content, he/she will receive this email from Center on a weekly basis.
Below is the default email template in our system :
Subject : New content on {{ $.program_title }}Content :
Hello {{$.first_name}},
A new program content has been made available in the Hybrid Portal: {{$.program_title}} The following link will take you directly to the program: {{magic link}}
Your {{$.center_name}}
Remarks : Magic link allows the joiner to click on the program content without needing to login to MemberArea. Magic link expires after 4 weeks.