Admin Panel : Setting Up Members Area Portal
1. Manage Different Roles
1.1 Create New Role
In the Admin Panel, Admin may create new roles manually via Members Area > Members :

Click on "Create" button and the following modal will appear :
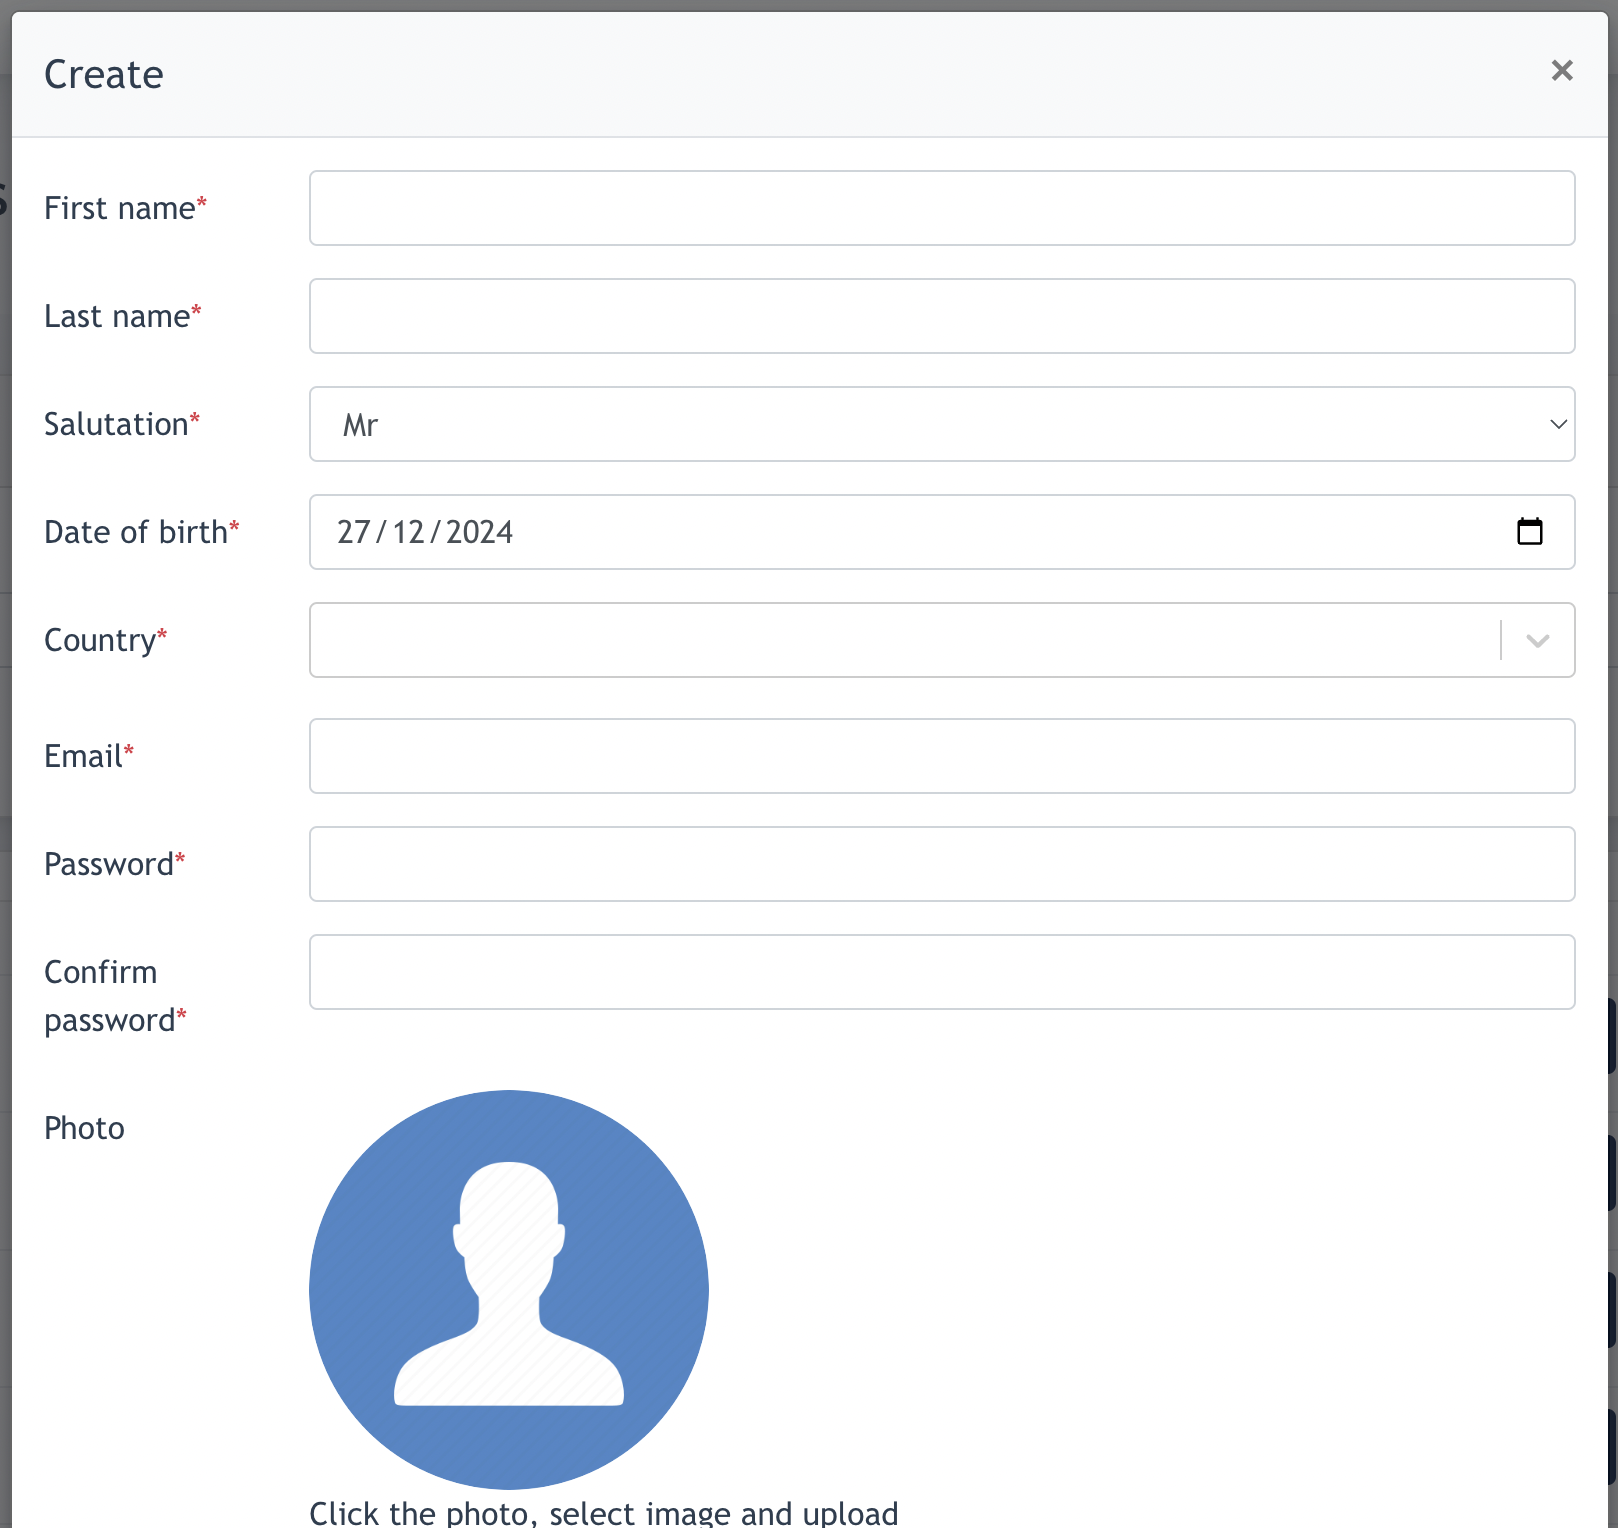
Admin to fill in all required fields above.
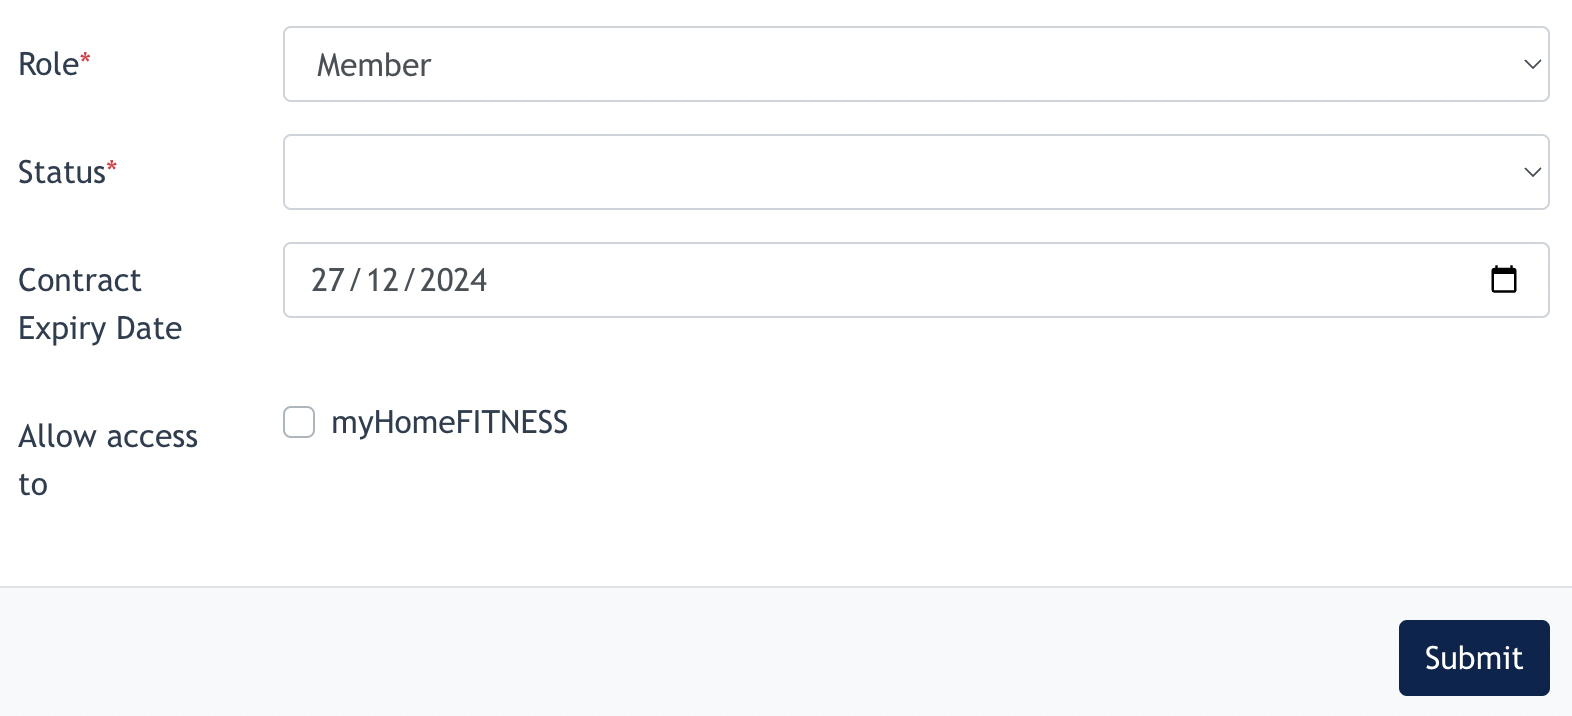
- Admin may select which role to create during the creation process. There are 4 roles : Members, Trial Members, Program Participants, Expert to be choose from.
- Select Status : Active/Inactive
- Contract Expiry Date: May fill in a date (if there is) or leave it blank ( no expiry date)
- Allow Access to "My Home Fitness" : when this checkbox is ticked, this member will have a "myHomeFitness" link in their Member Area Portal. Remarks: My HomeFitness is a 3rd party site.
- Click [ Submit ] to create this role.
All members / trial members / program participants role created will be displayed on the Members Listing.
Only Expert has a different listing, which only showcase the Expert, it is available via Members Area > Expert page.
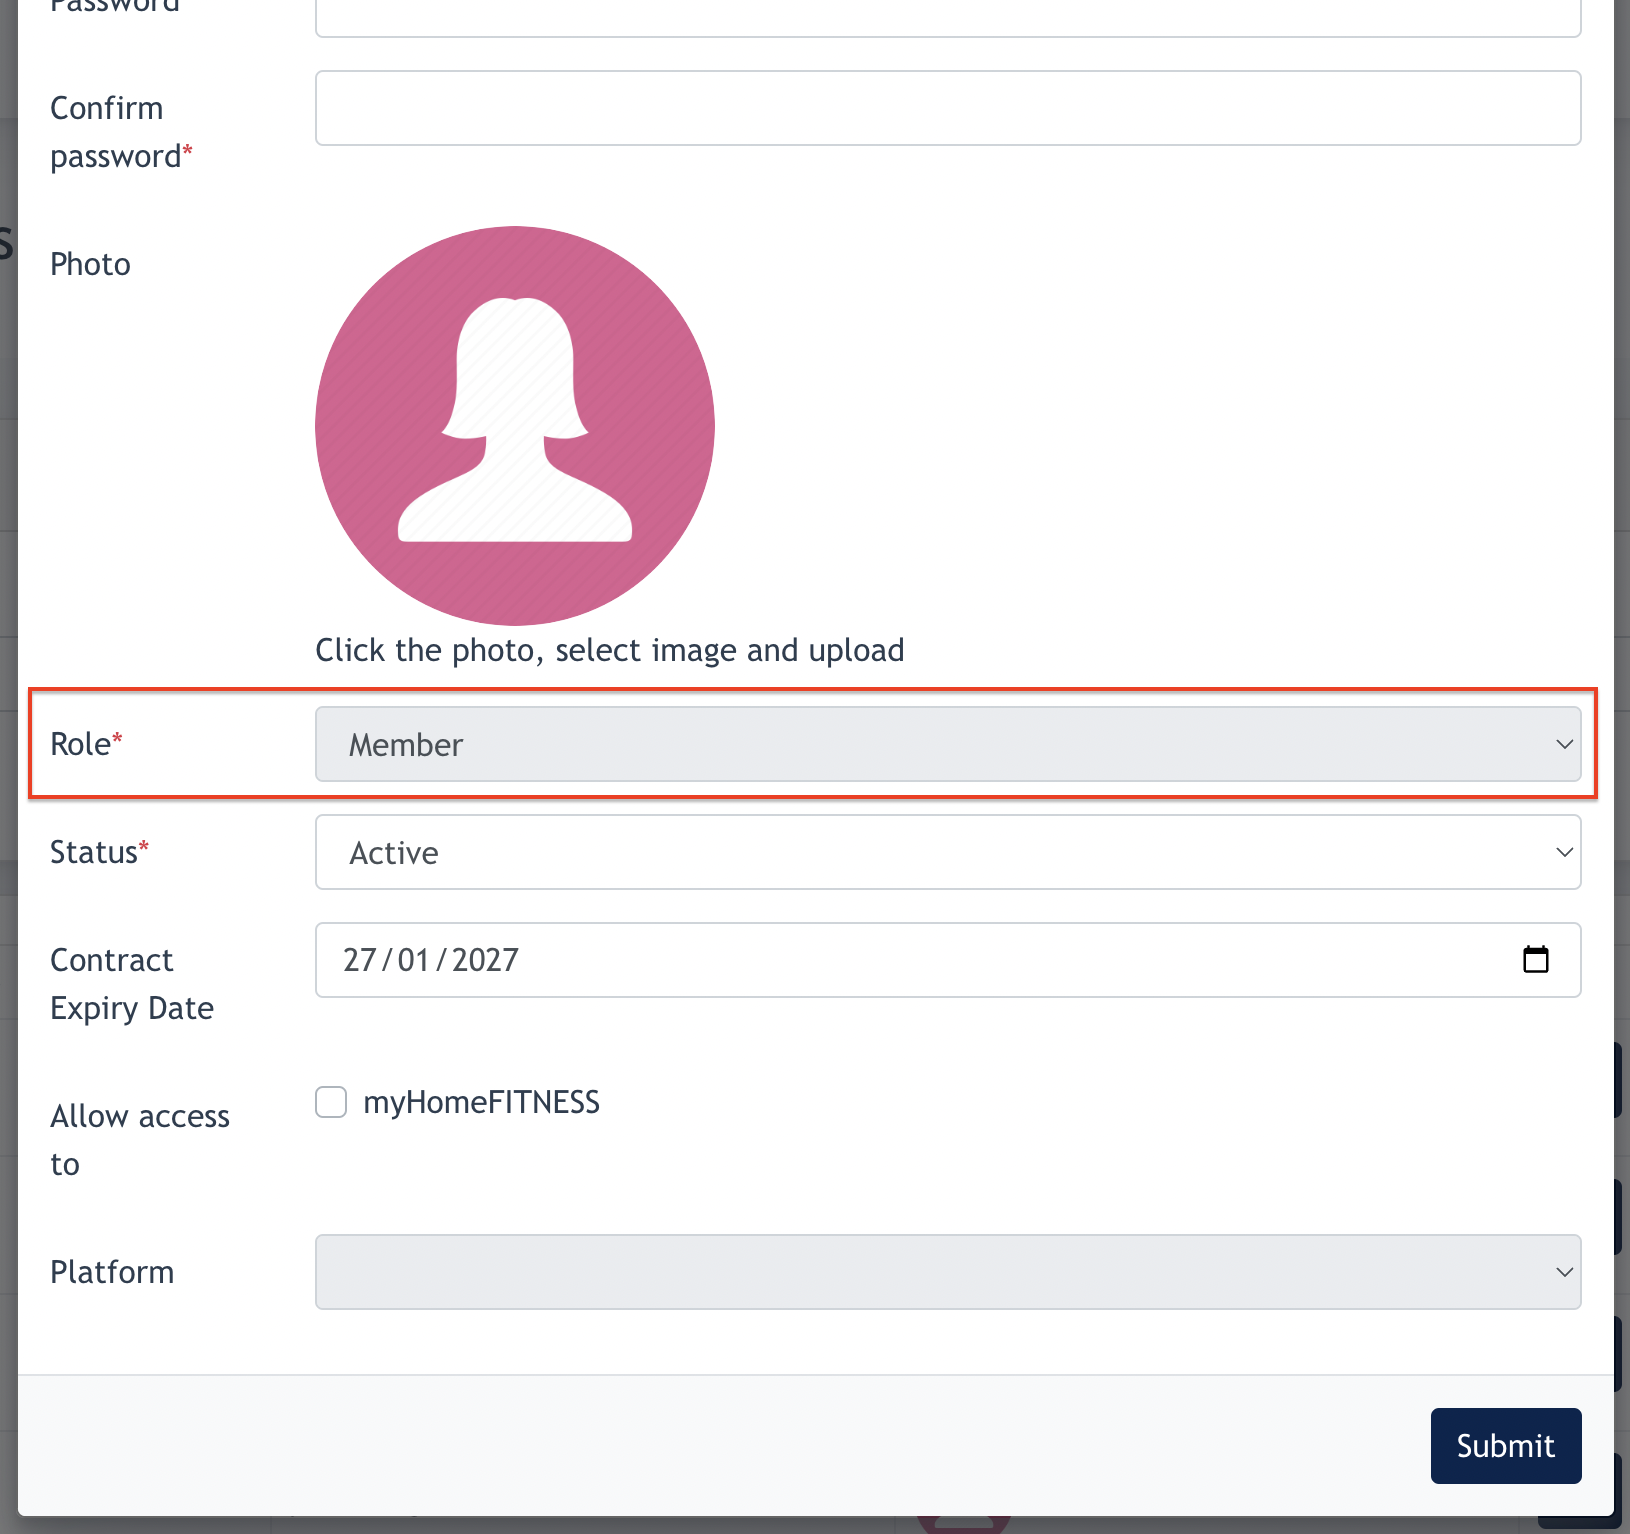
1.2 Edit Existing Role
Admin may click on the "Edit" button to edit any data of the role, except changing the role.
Screenshot shows that Role is not changeable after it is created.
2. Programme Creation & Configuration
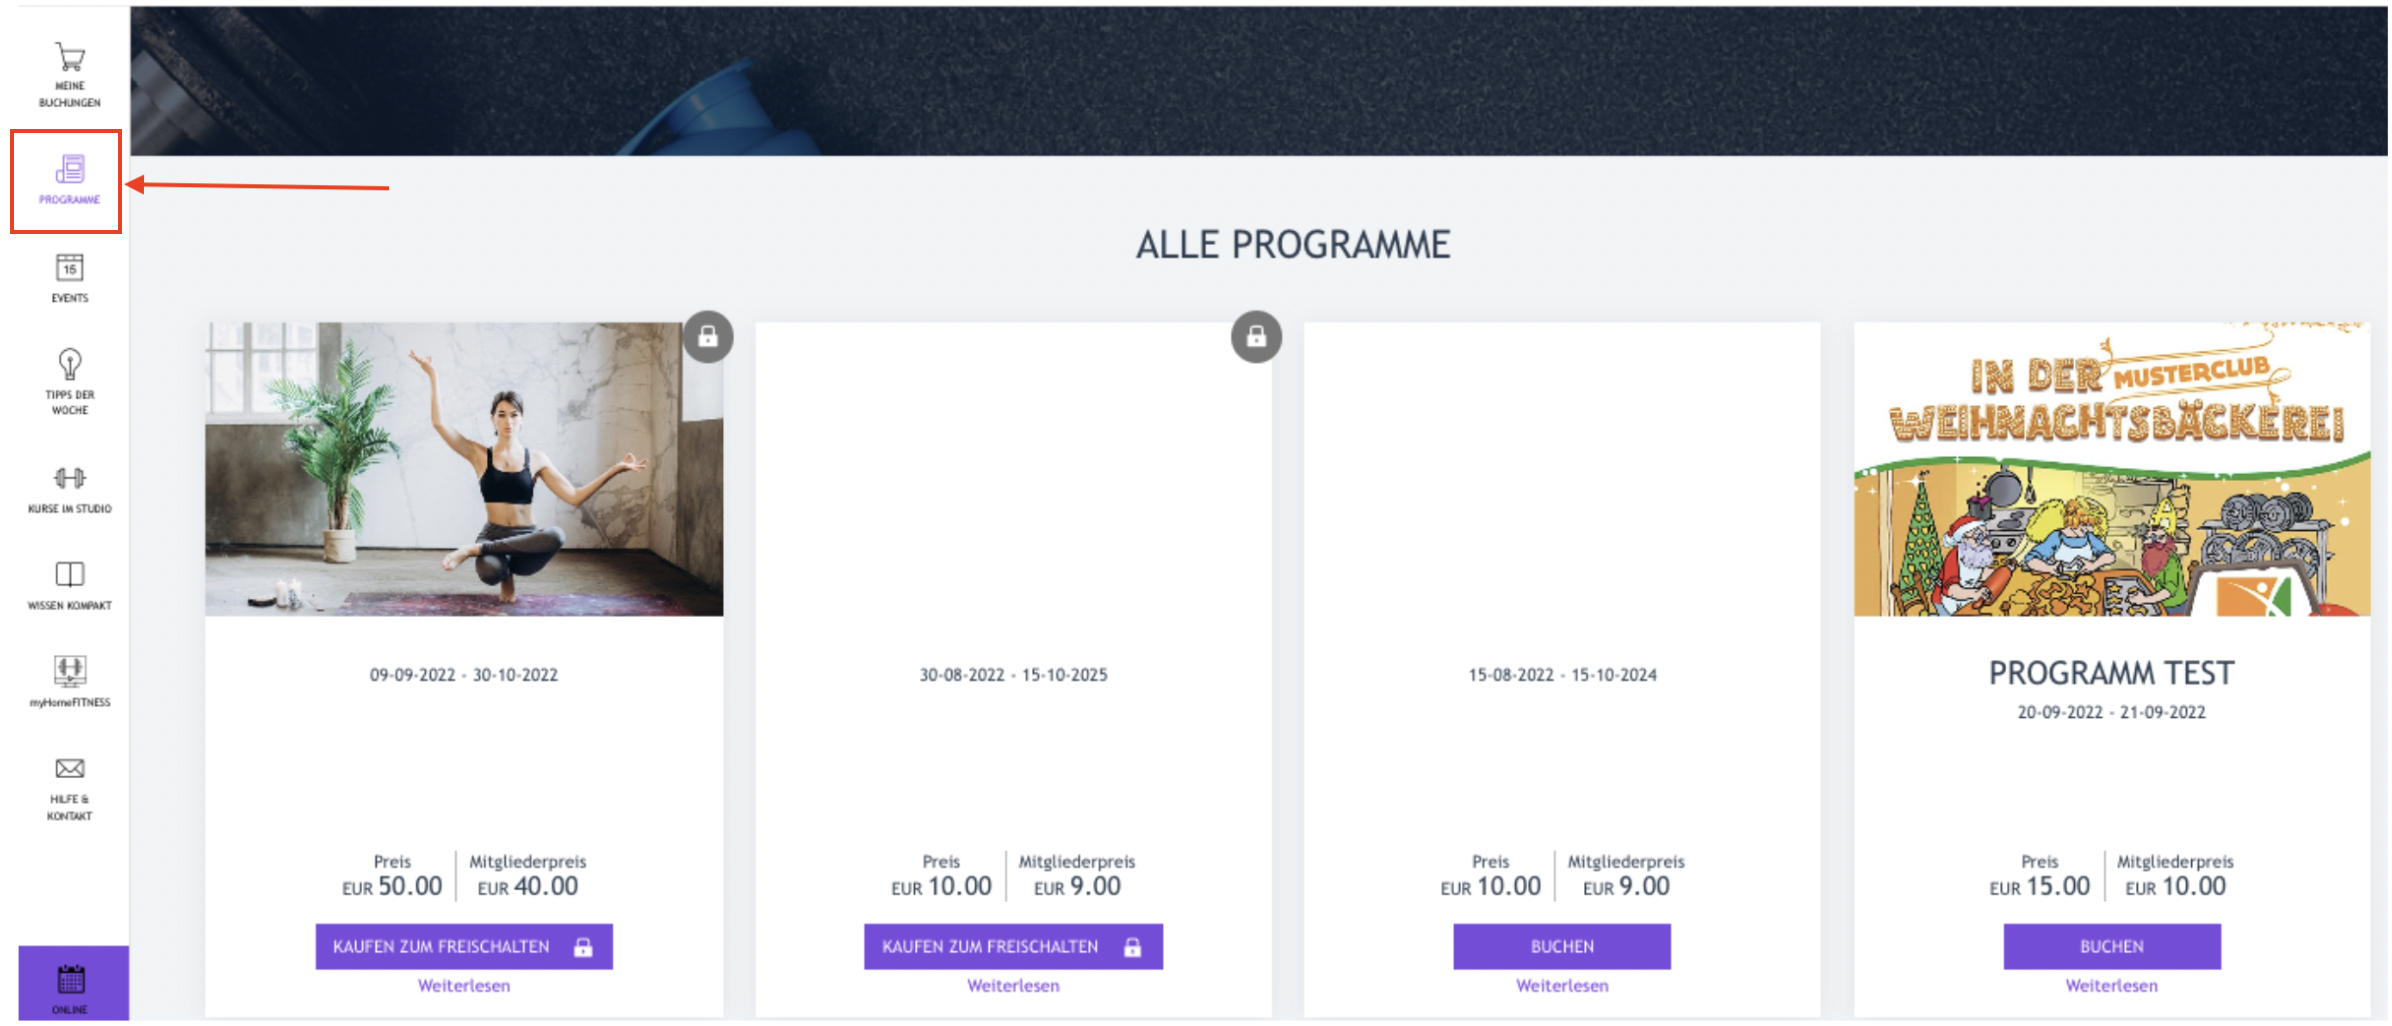
MemberArea > Programmes is a series of online training offered to joiners within a specific duration. Training content can be in Text or video format, all can be uploaded by Admin.
Programme page is accessible via the Member Area Portal.
Screenshot below showing program page with dummy contents.
2.1 Create Programmes

Click on "Create" button:
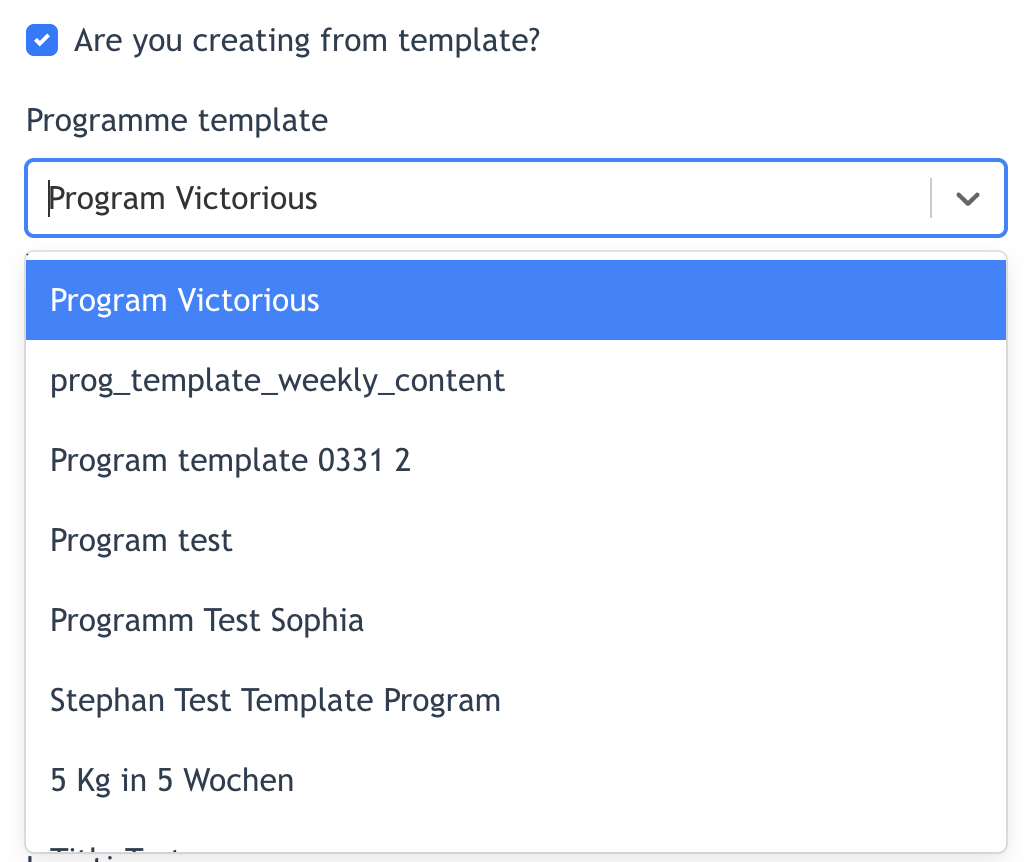
Admin may create from template by checking on "Are you creating from template?"
If this is checked, there are a list of ready-made programme template to choose from :
OR, Admin may create a Programme from scratch by filling in all the required fields :
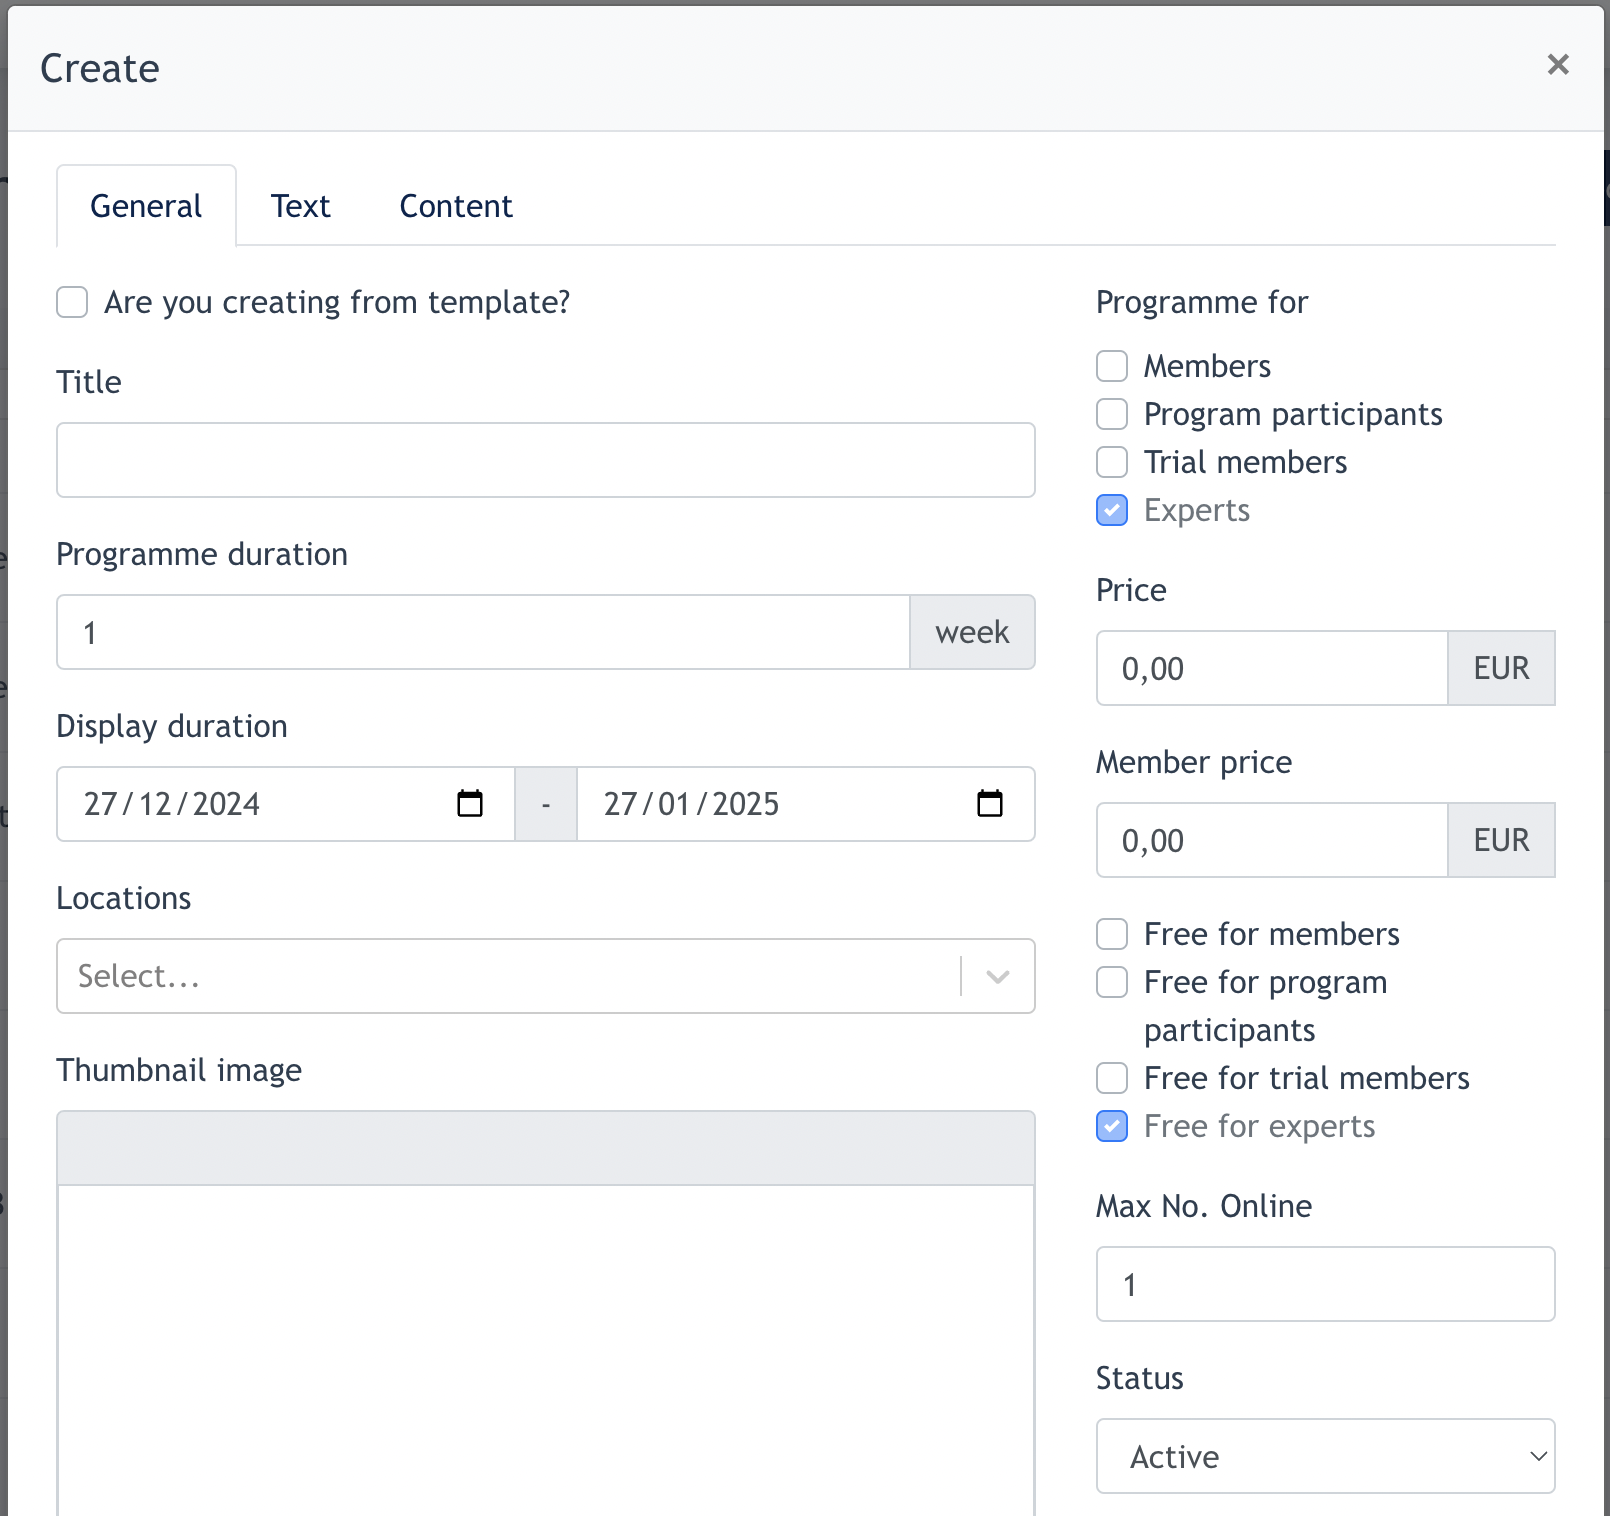
In the form:
- Title : Program title
- Program Duration : the length of program ( how many weeks the program will run)
- Display duration : the duration this programme will display on MemberArea
- Location : Location needs to be selected during payment
- Thumbnail Image : Preview Image appears on Programme overview page
- Banner Image : Large image appears on Programme info page
- Programme for : Here to configure which role this programme is available/visible for ( Member, Program participants, Trial Members). Programme is available for Expert at all times.
- Price/Member Price : Price is for Non-Member, Member Price is for those who has joined Member Area portal.
- Free for : Here to configure if this programme is free for Member, Program Participants or Trial Members. All programs are by default free for experts.
- Max. No. Online: Here is to configure max no. of participants that can join the program.
- Status: Active/Inactive
Once the above info is all configured, Users can submit this form and a program is created and appear on the Program listing page.
2.2 Programme Configuration
After a programme is created, Admin may further configure Programme details.
Click on the [ Edit ] button to open up the modal :
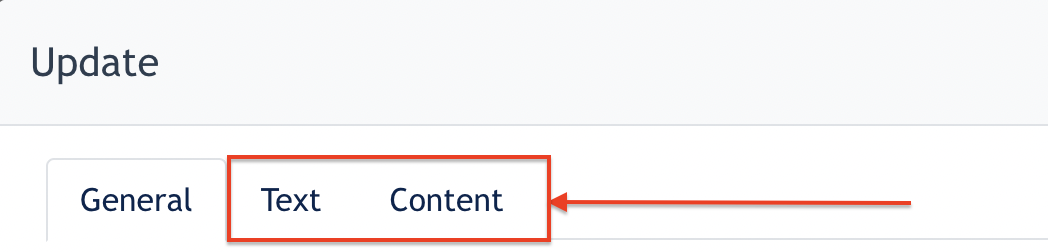
Admin may click on the [ Text ] and [ Content ] tab for further configuration :
[ Text ] Tab
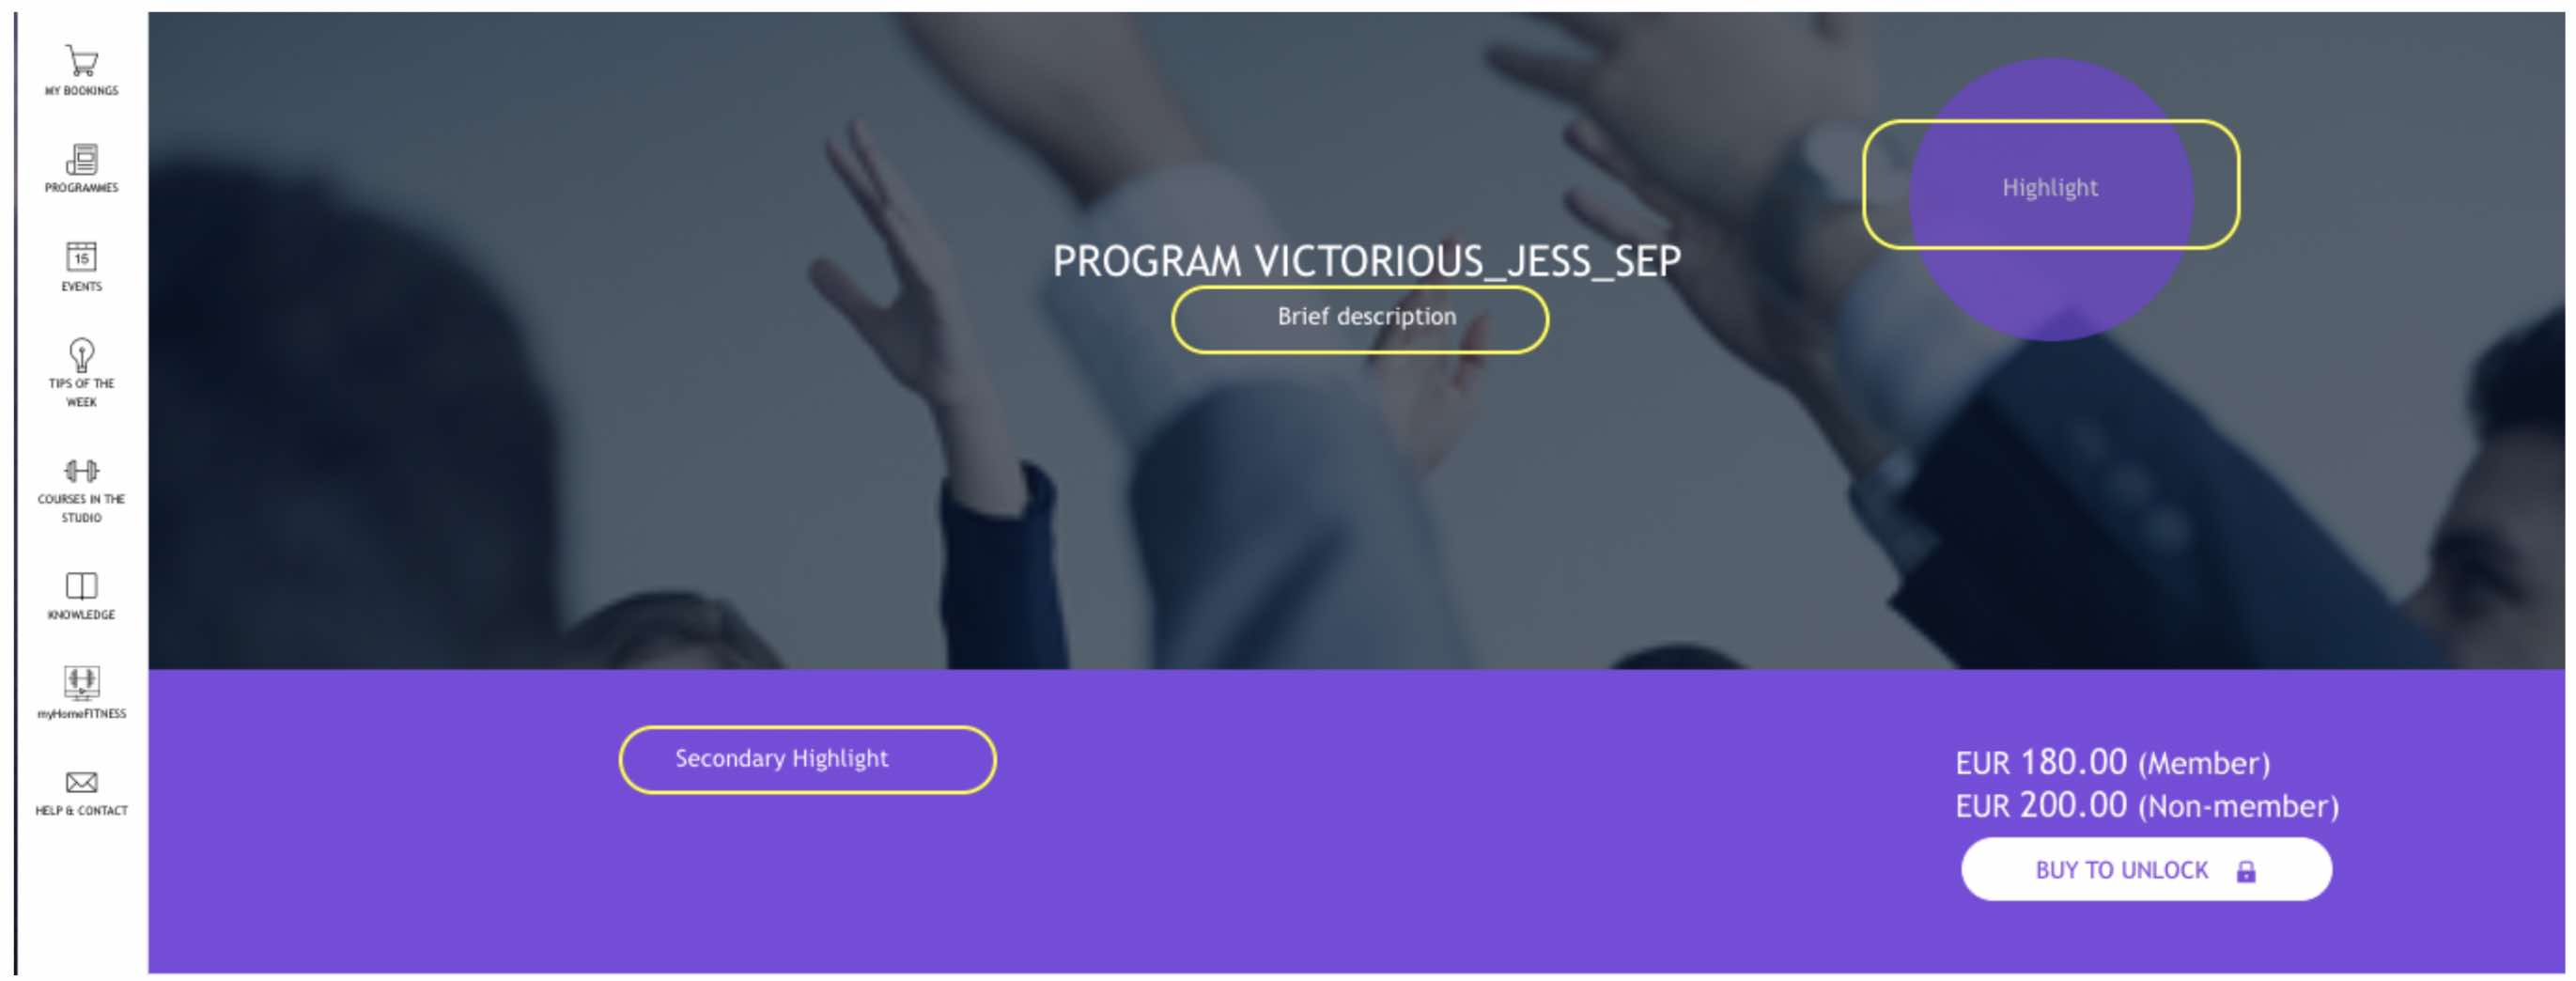
The form consists of :
- Brief Description
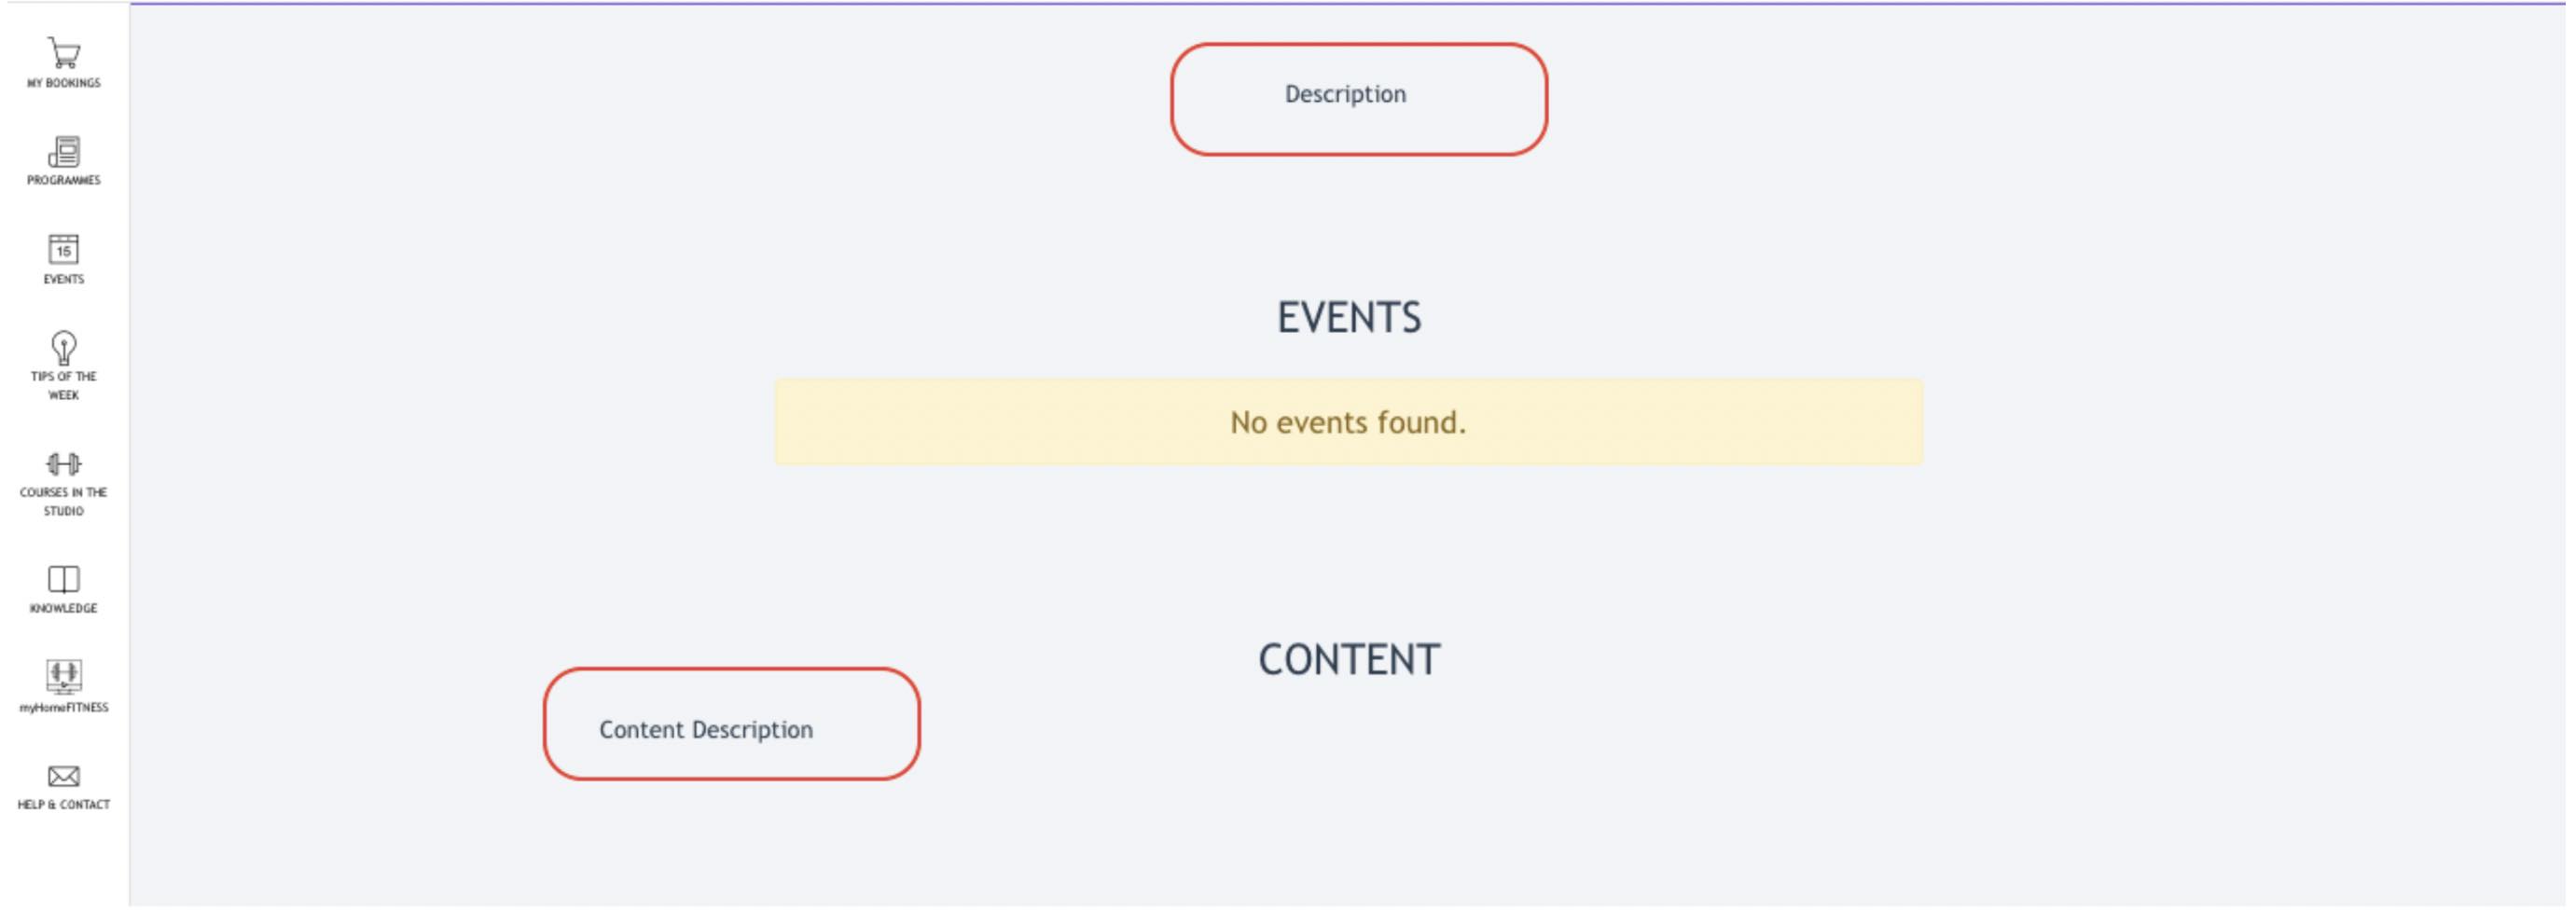
- Description
- Highlight
- Secondary Highlight
- Content Description
Every input on each field will be shown on the MemberArea > Program Info page.
Below screenshots show different locations of above content appearing on the Program info page.
[ Content ] Tab
If a Program Duration is 4 weeks. Under the Content tab, Admin may upload files or Add video for the weekly. The files and videos are additional content of the programmes, and it is only available for joiners of the programme.
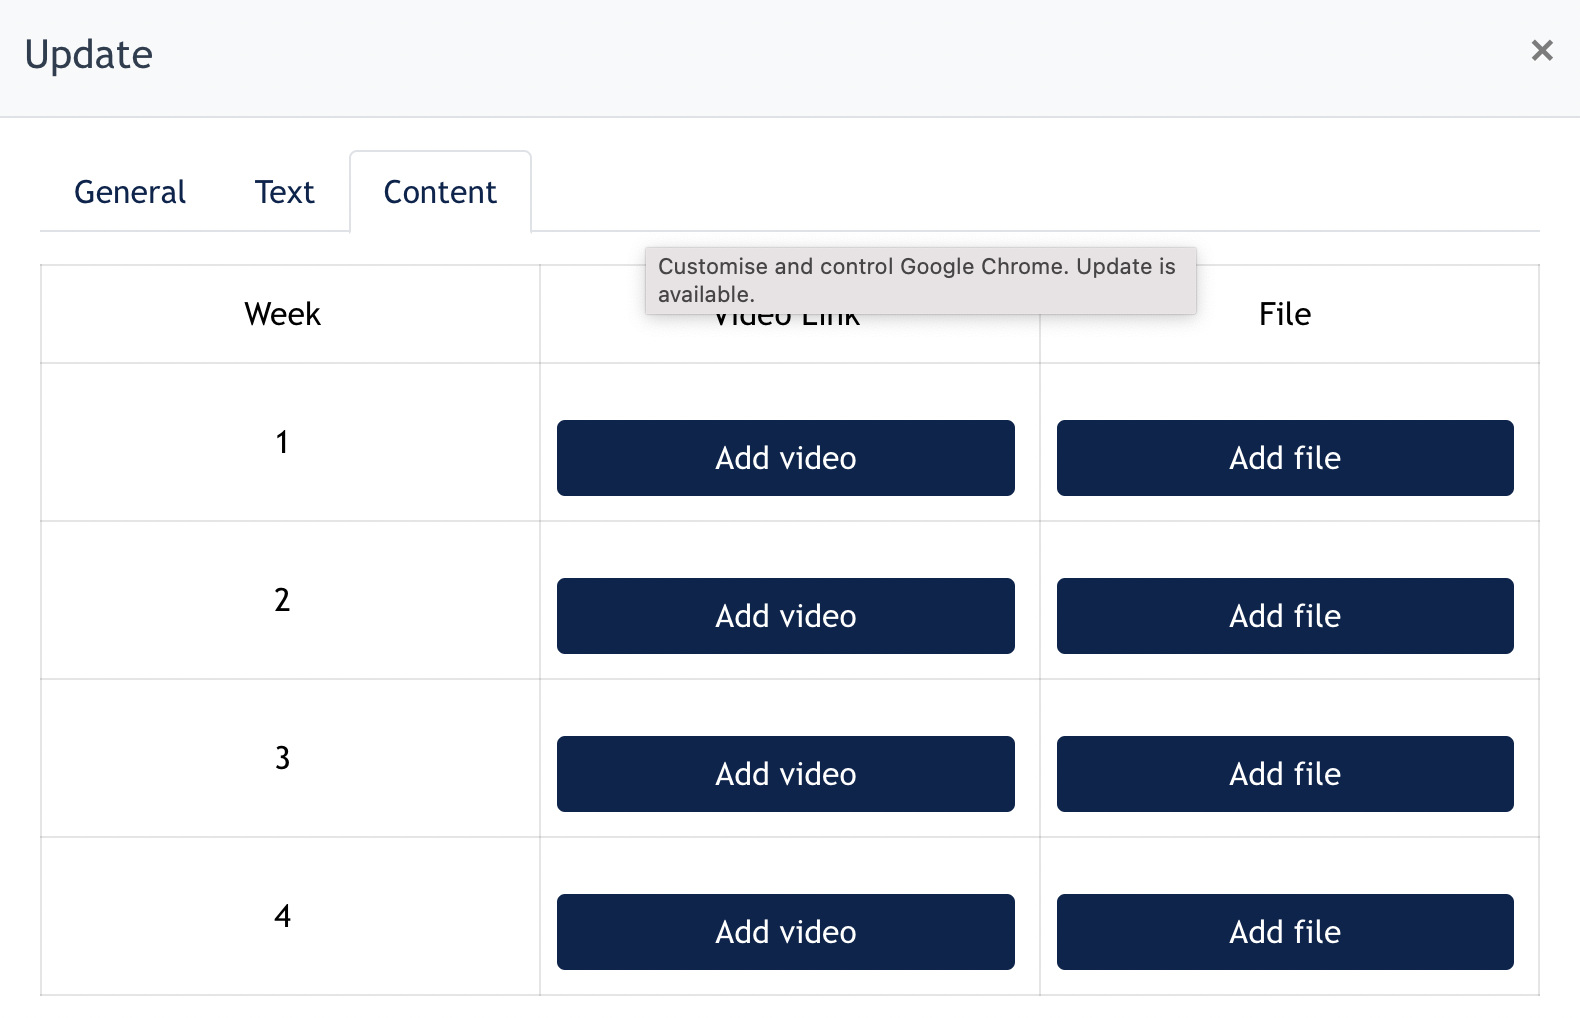
- Add Video : Click here to add a youtube/vimeo video link
- Add file: Click here to add a file to this programme.
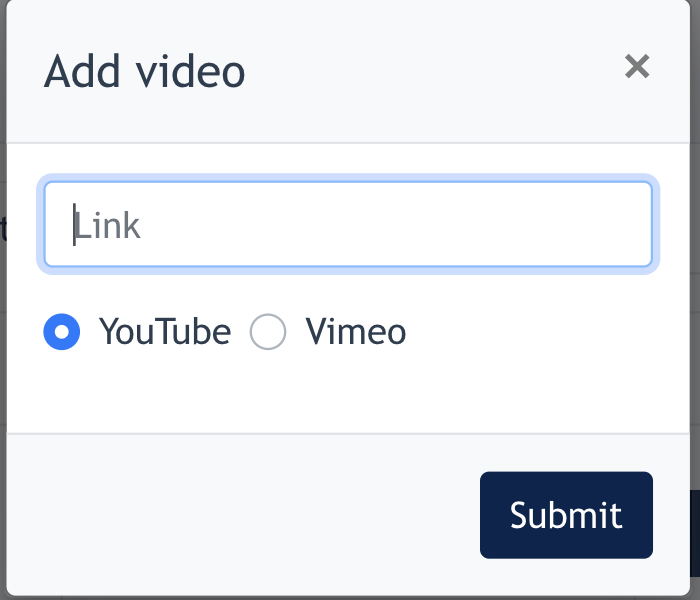
For the video, you only need to insert the last digits ending on the URL and click [Submit].

Logics of the Programme Content :
All the contents under Program are opened & viewable by joiners following this logic.
- Week 1 content will be opened up once the joiner click on programme [Start Now] button
- Week 2 content will be opened up once users enter the next Monday. Week 3 will be opened up once users enter another Monday...and so on.
- Week starts from Monday to Sunday
2.3 Email Setting Configuration
Under program page, Email Setting is meant for the following function.
- User will receive email when there is a new joiner of program
- Joiner will receive email when the program they join has weekly content published.
A. Receive an email when there is new joiner of program
This feature allows Center Admin to configure if they will receive an email when a joiner joins the programme.
Click on "Update Email Setting" button:
- Check "Receive an email when there is a new joiner". The modal will be expanded:
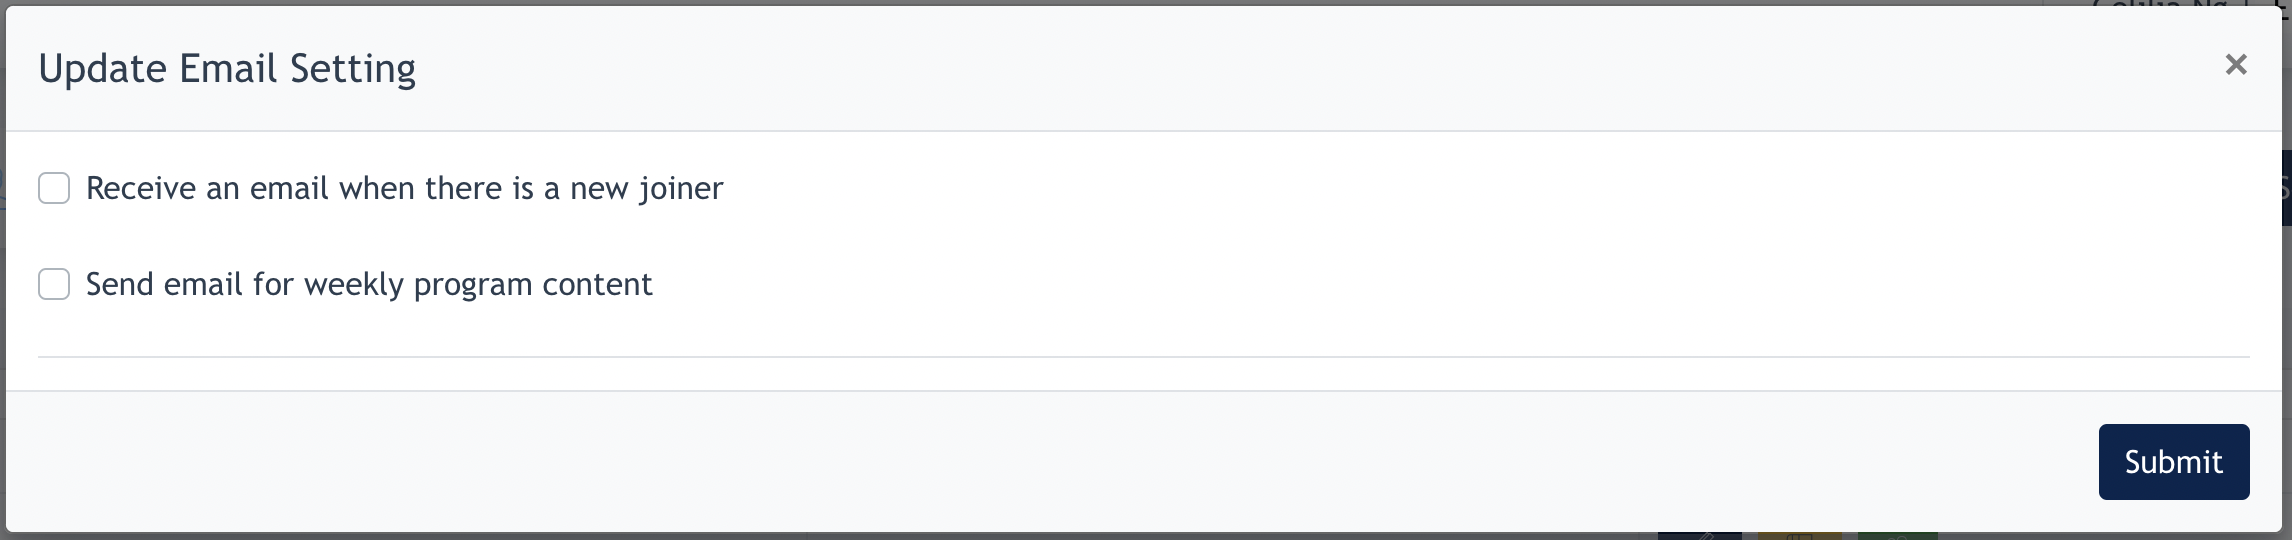
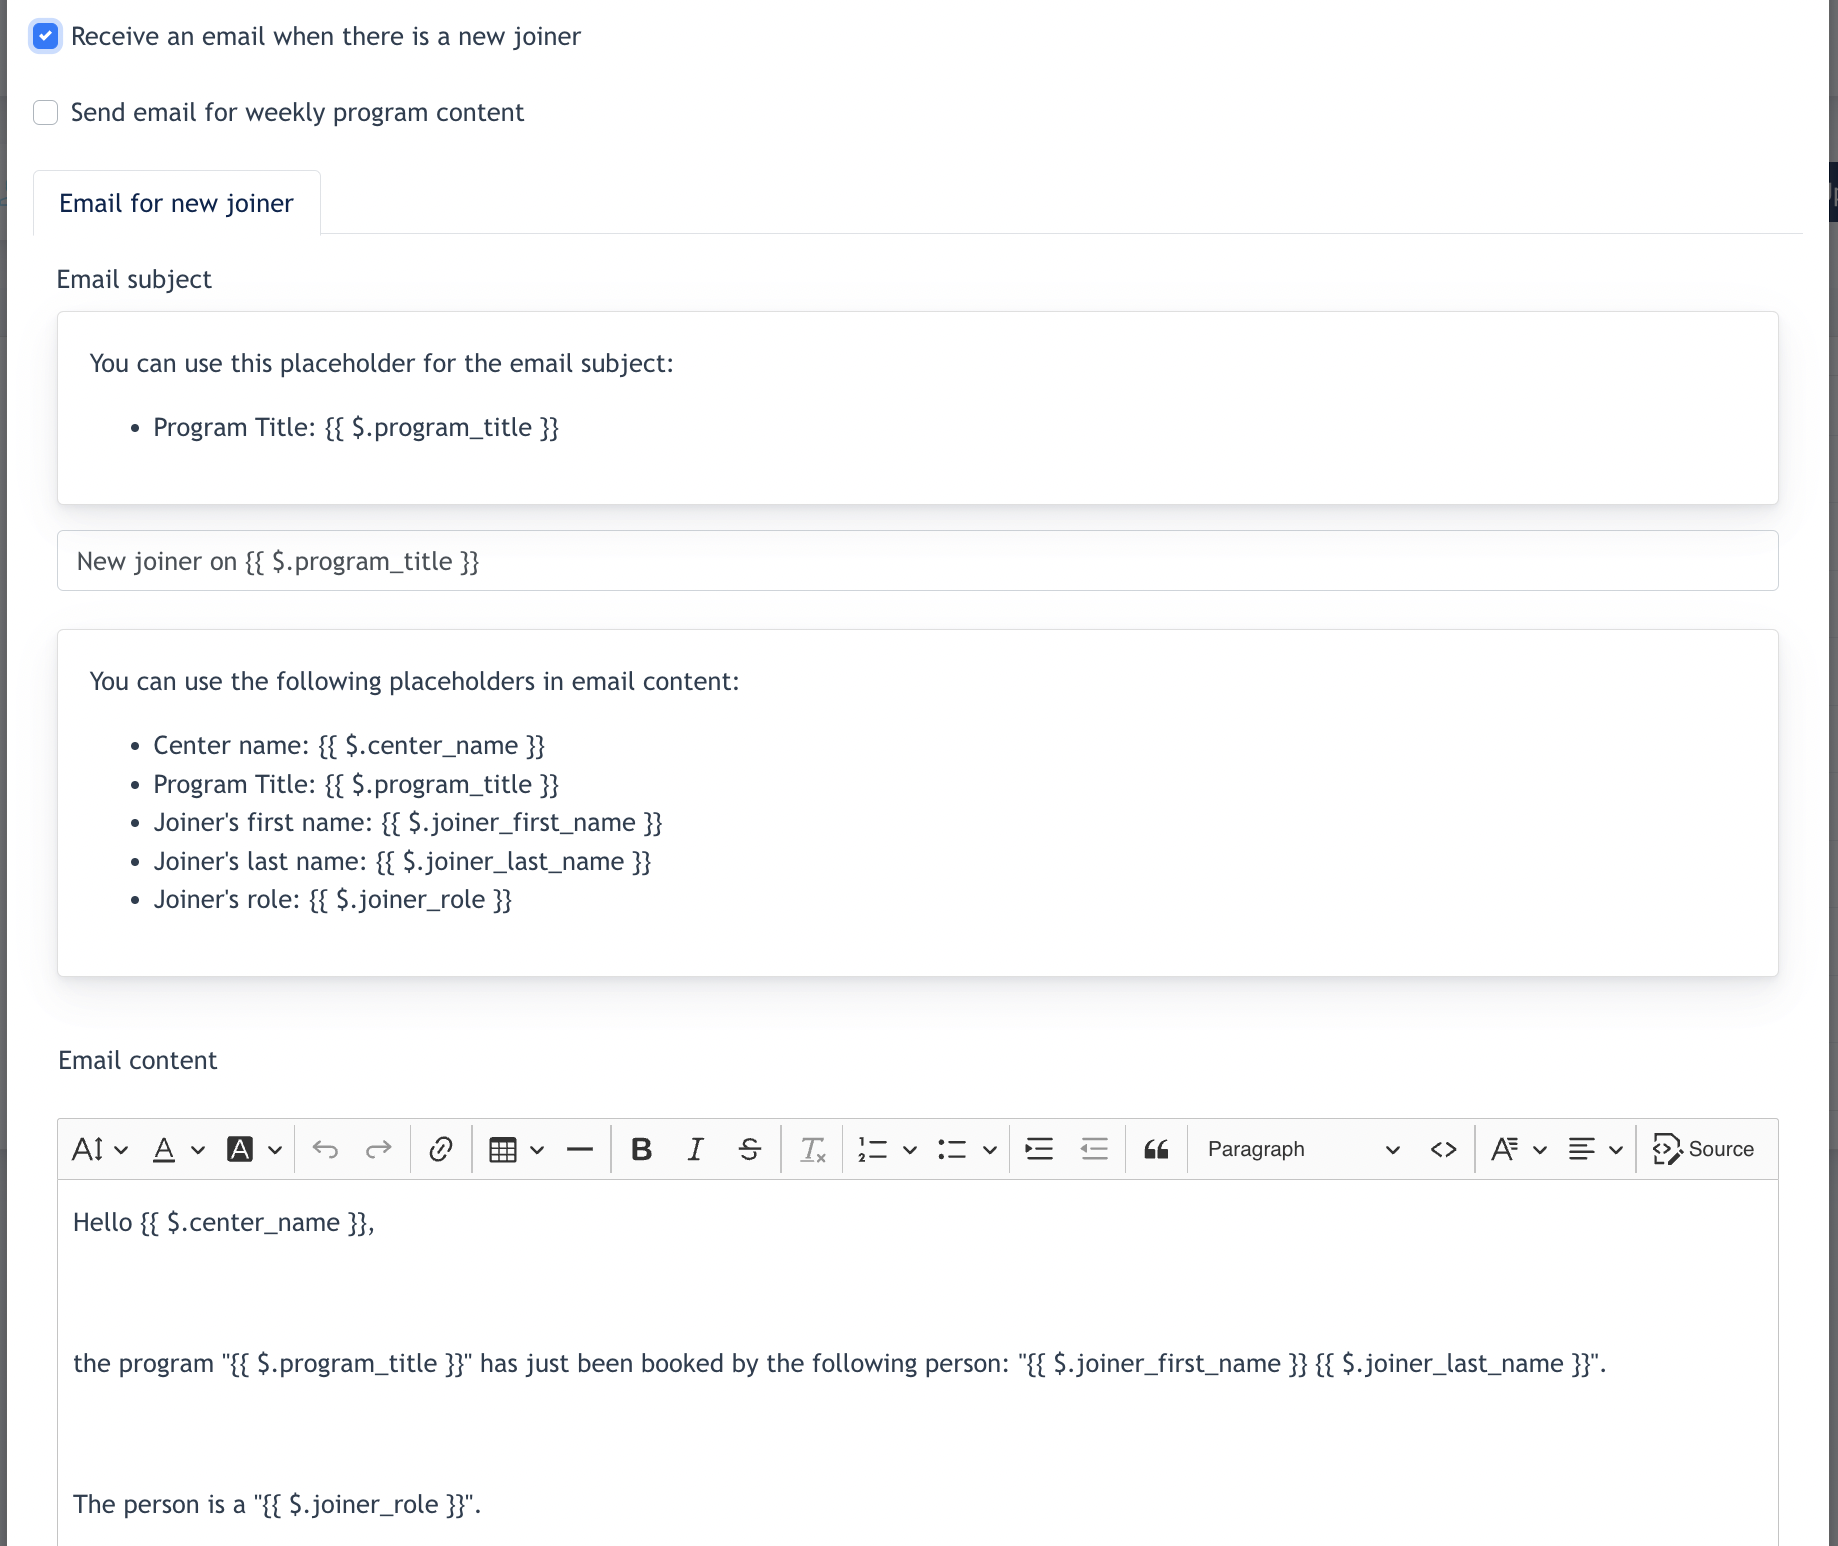
- Admin can configure the "Subject" and the "Content" via here.
- There are several placeholders available for the Content creation, for example, if we want the Program Title appear on the Email Subject, we can create a Subject like below :
- New joiner on {{ $.program_title }}
- In the email received by joiners, it will turn out like : New joiner on Programme Prosperity ( Programme Prosperity is the name of programme joined )
- In the email received by joiners, it will turn out like : New joiner on Programme Prosperity ( Programme Prosperity is the name of programme joined )
- New joiner on {{ $.program_title }}
- After Subject is created, Admin may curate the content of the email.
- Click "Submit" and this email is saved.
- Remarks : when there is a user joins a program, he/she will receive this email from Center.
Below is the default email content for a Center :
Subject : New joiner on {{ $.program_title }}
Content :
Hello {{ $.center_name }},
the program "{{ $.program_title }}" has just been booked by the following person: "{{ $.joiner_first_name }} {{ $.joiner_last_name }}".
The person is a "{{ $.joiner_role }}".
B. Send email for weekly program content
Tick the Checkbox for "Send email for weekly program content". The form modal will be opened :
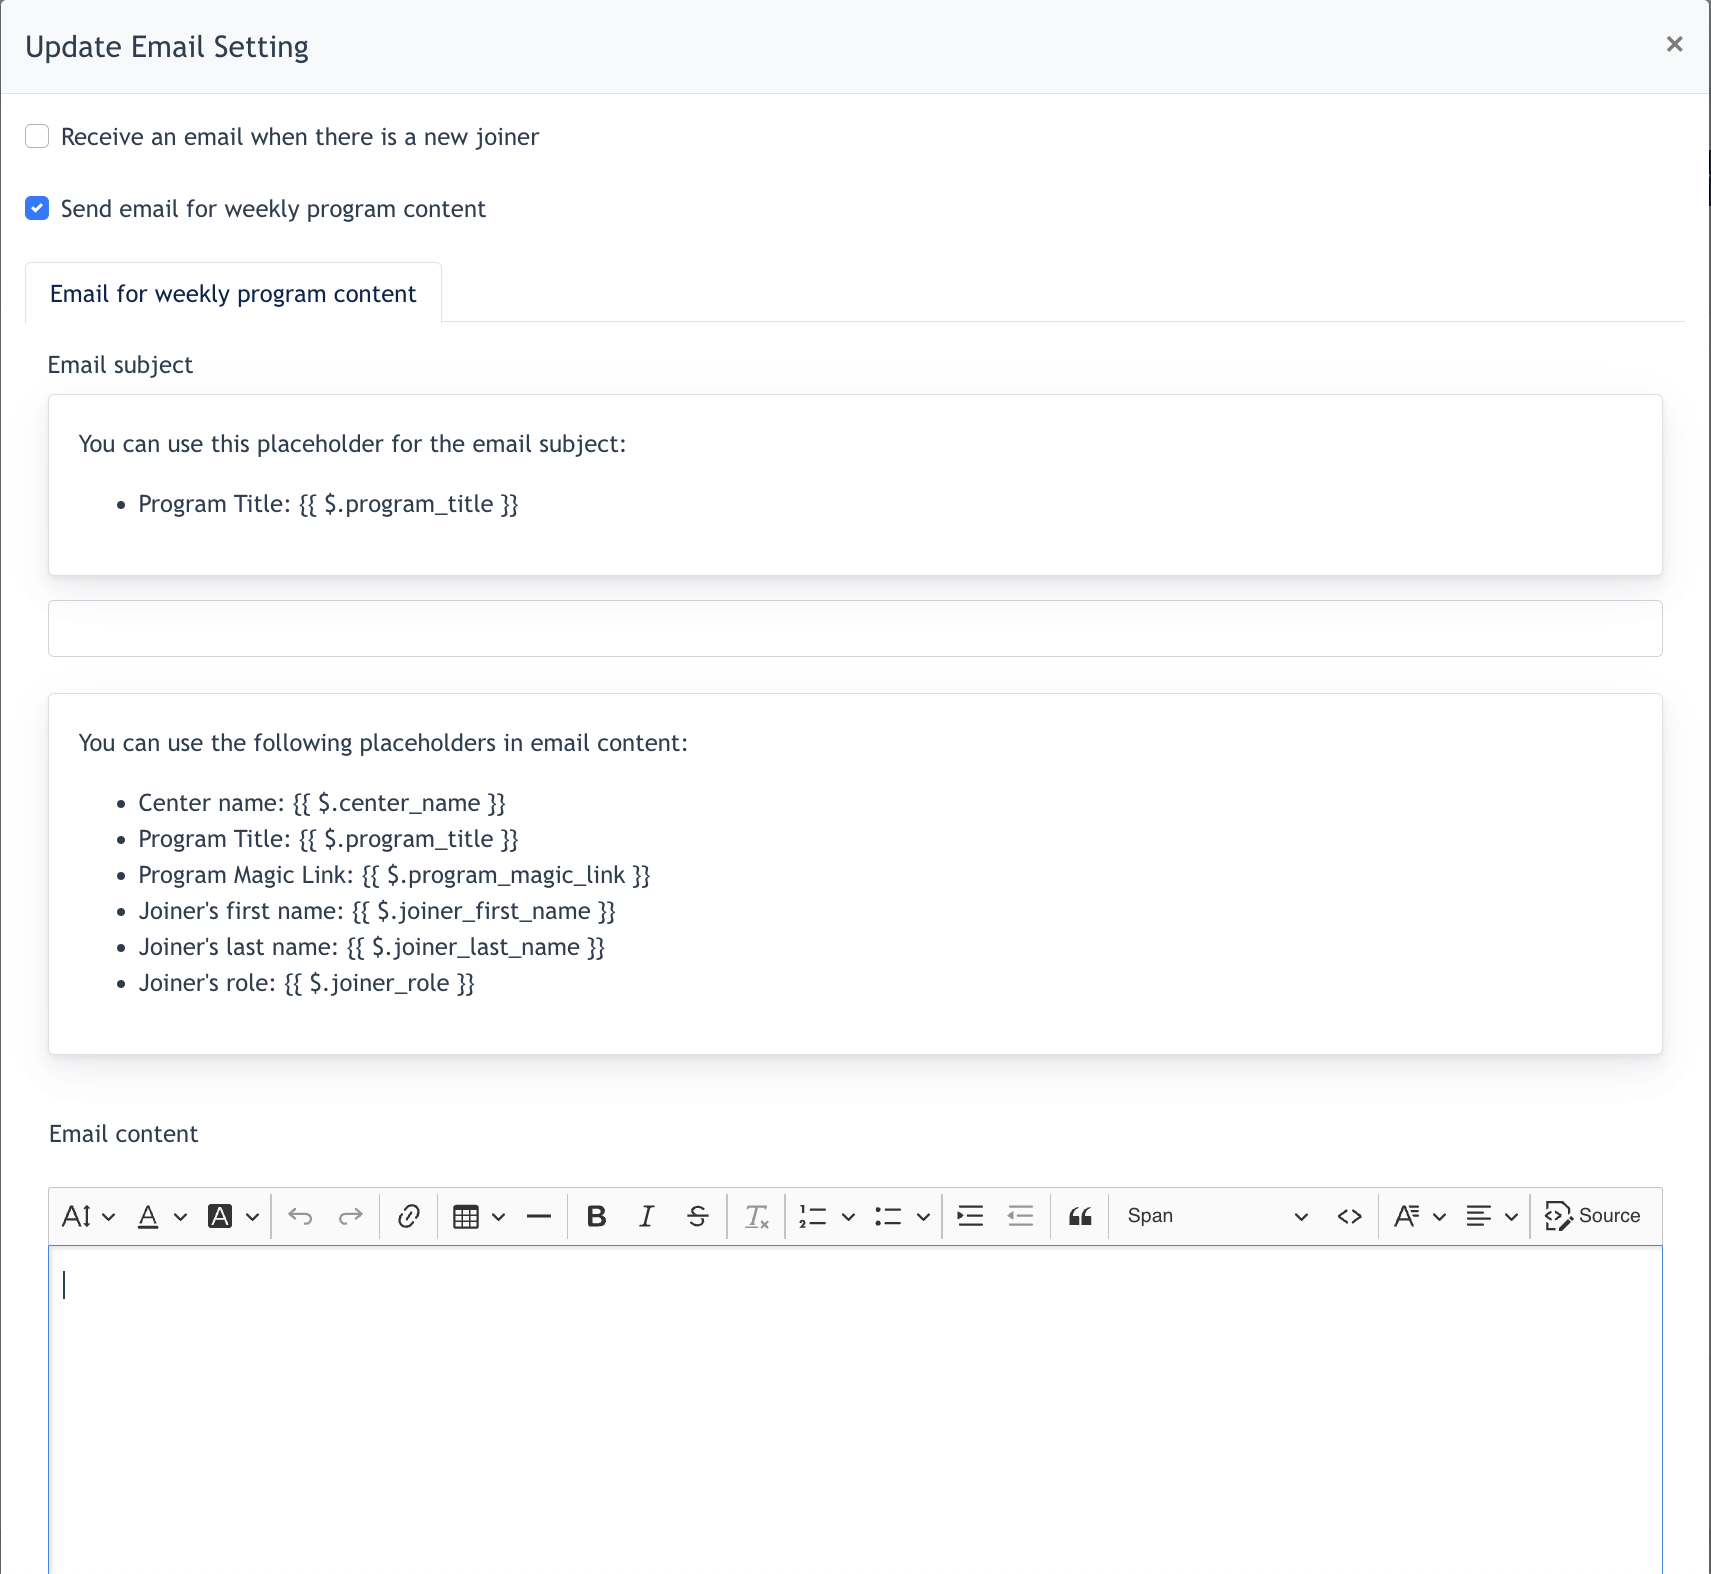
- Admin can configure the "Subject" and the "Content" via here.
- There are several placeholders available for the Content creation, for example, if we want the Program Title appear on the Email Subject, we can create a Subject like below :
- "Thank you for joining {{ $.program_title }}". In the email received by joiners, it will turn out like below :
- Thank you for joining Reduce your Waistline in 1 Month ! --> "Reduce your Waistline in 1 Month !" is the program the user signed up
- Click "Submit" and this email is saved.
- Remarks : when there is a user joins any program with Weekly Content, he/she will receive this email from Center on a weekly basis.
Below is the default email template in our system :
Subject : New content on {{ $.program_title }}Content :
Hello {{$.first_name}},
A new program content has been made available in the Hybrid Portal: {{$.program_title}} The following link will take you directly to the program: {{magic link}}
Your {{$.center_name}}
Remarks : Magic link allows the joiner to click on the program content without needing to login to MemberArea. Magic link expires after 4 weeks.
3. Settings Page
Under Member Area modules, [ Settings ] page allows Admin to configure some general and basic settings of the Members Area Portal.
3.1 General Tab

A. Join Member URL Configuration
This field is used to configure which Membership Package to link to [ Become a Member ] button for Trial Member Logins.
When a trial member clicks on the Magic link and landed on the Members Area Dashboard, under his profile, there will be a [ Become a Member ] button.
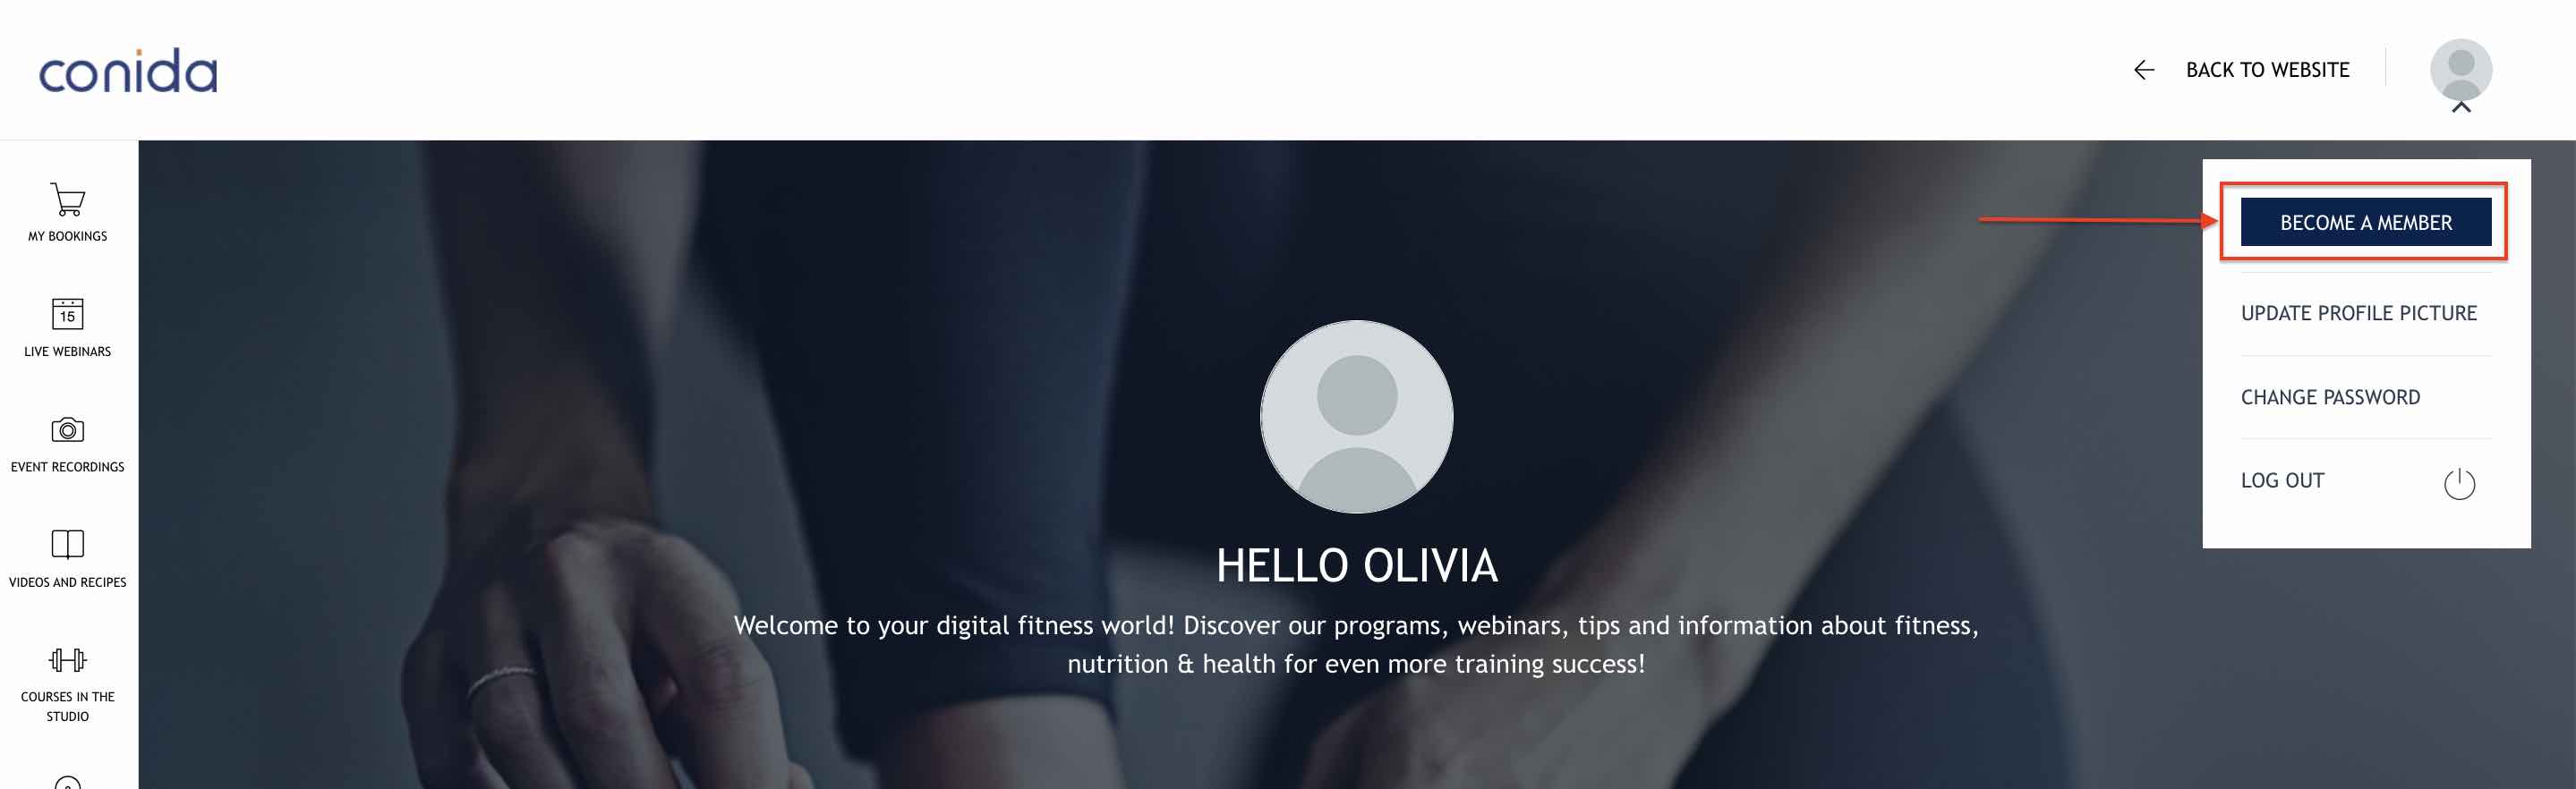
Admin selects a package via the dropdown listing and click [ Save ]. Configuration of the button is complete.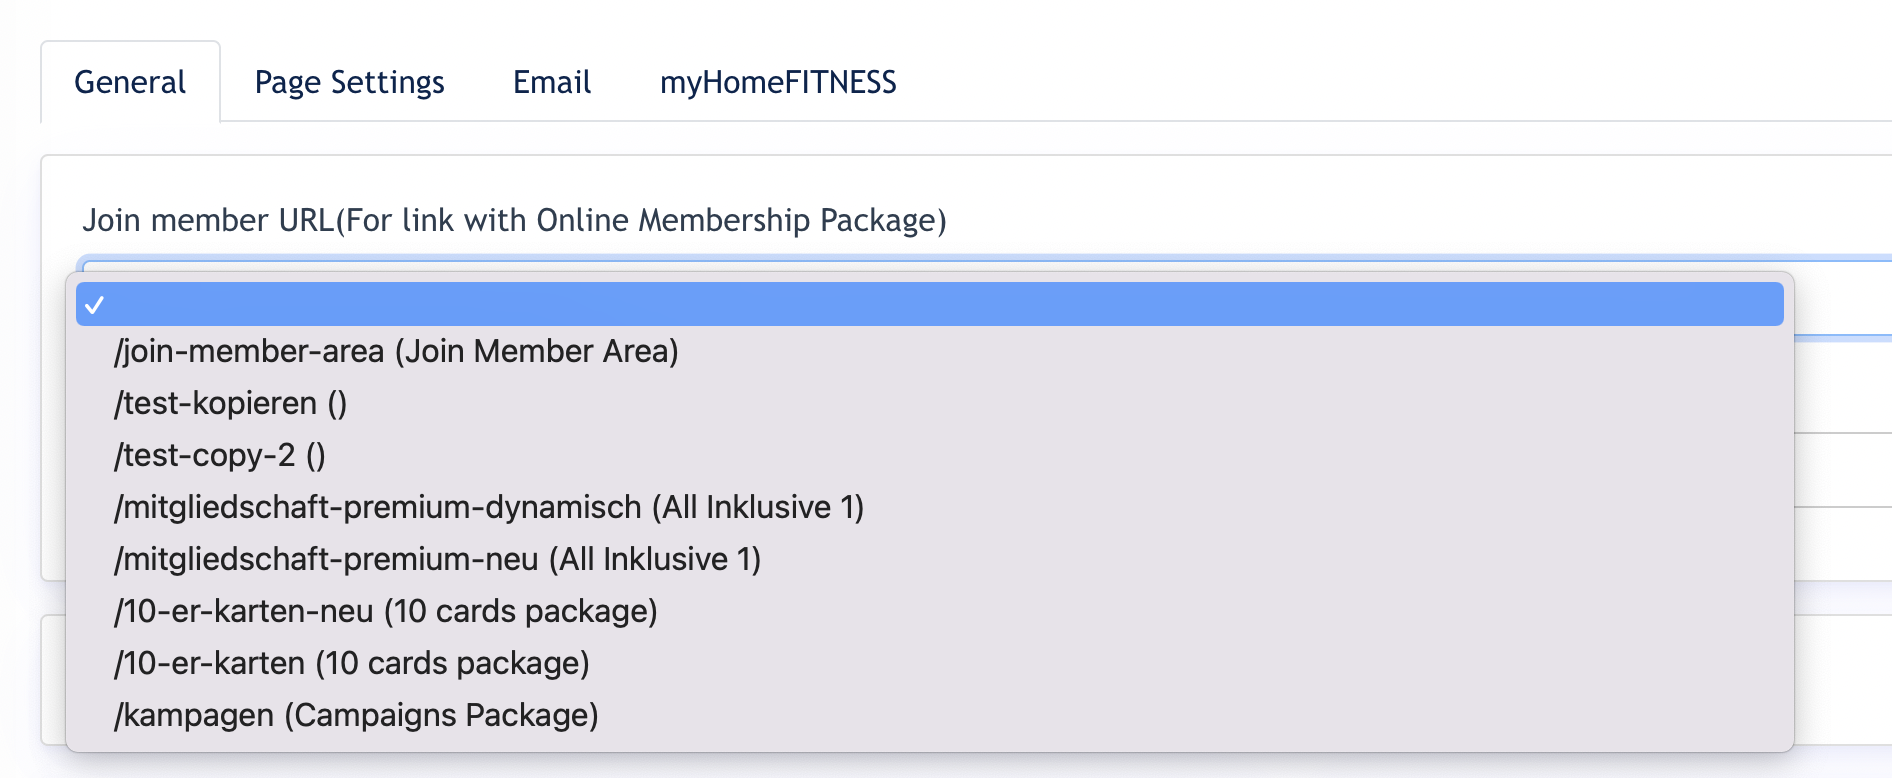
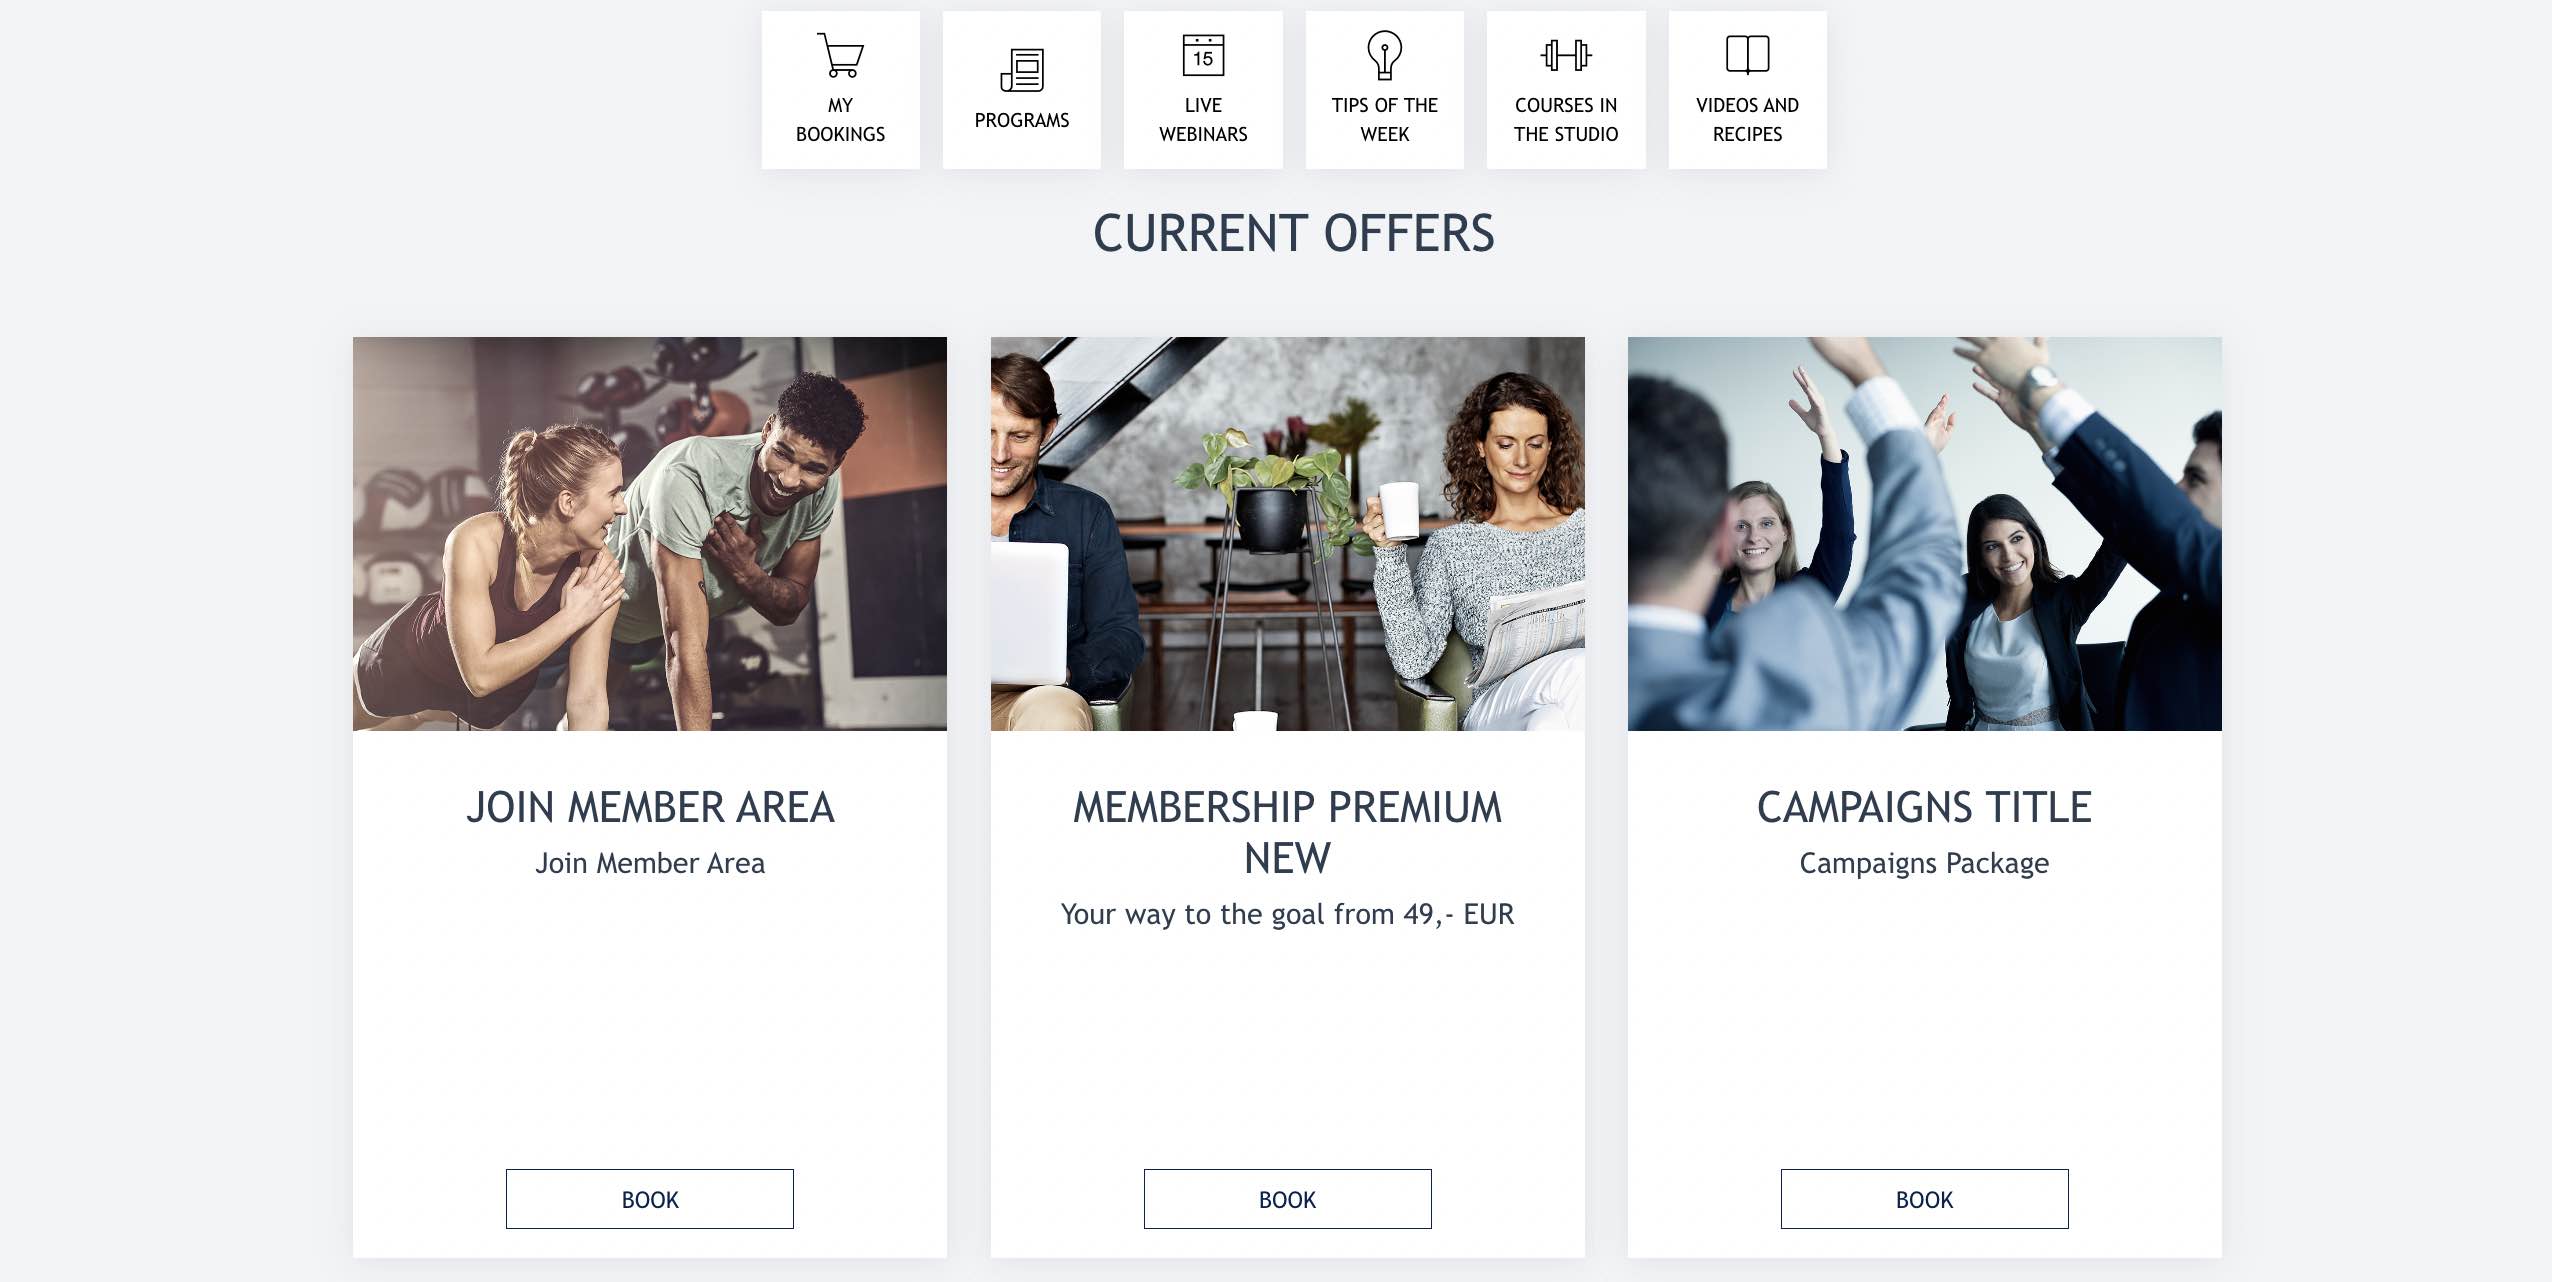
B. Special Offer Packages
Admin configure up to max 3 special offer packages to display on the MemberArea Dashboard.
This is a Cross-selling function available for the Center. Center may publishes up to 3 membership packages on the Member Area Dashboard, so that Online Members may also join physical courses available in the Center.
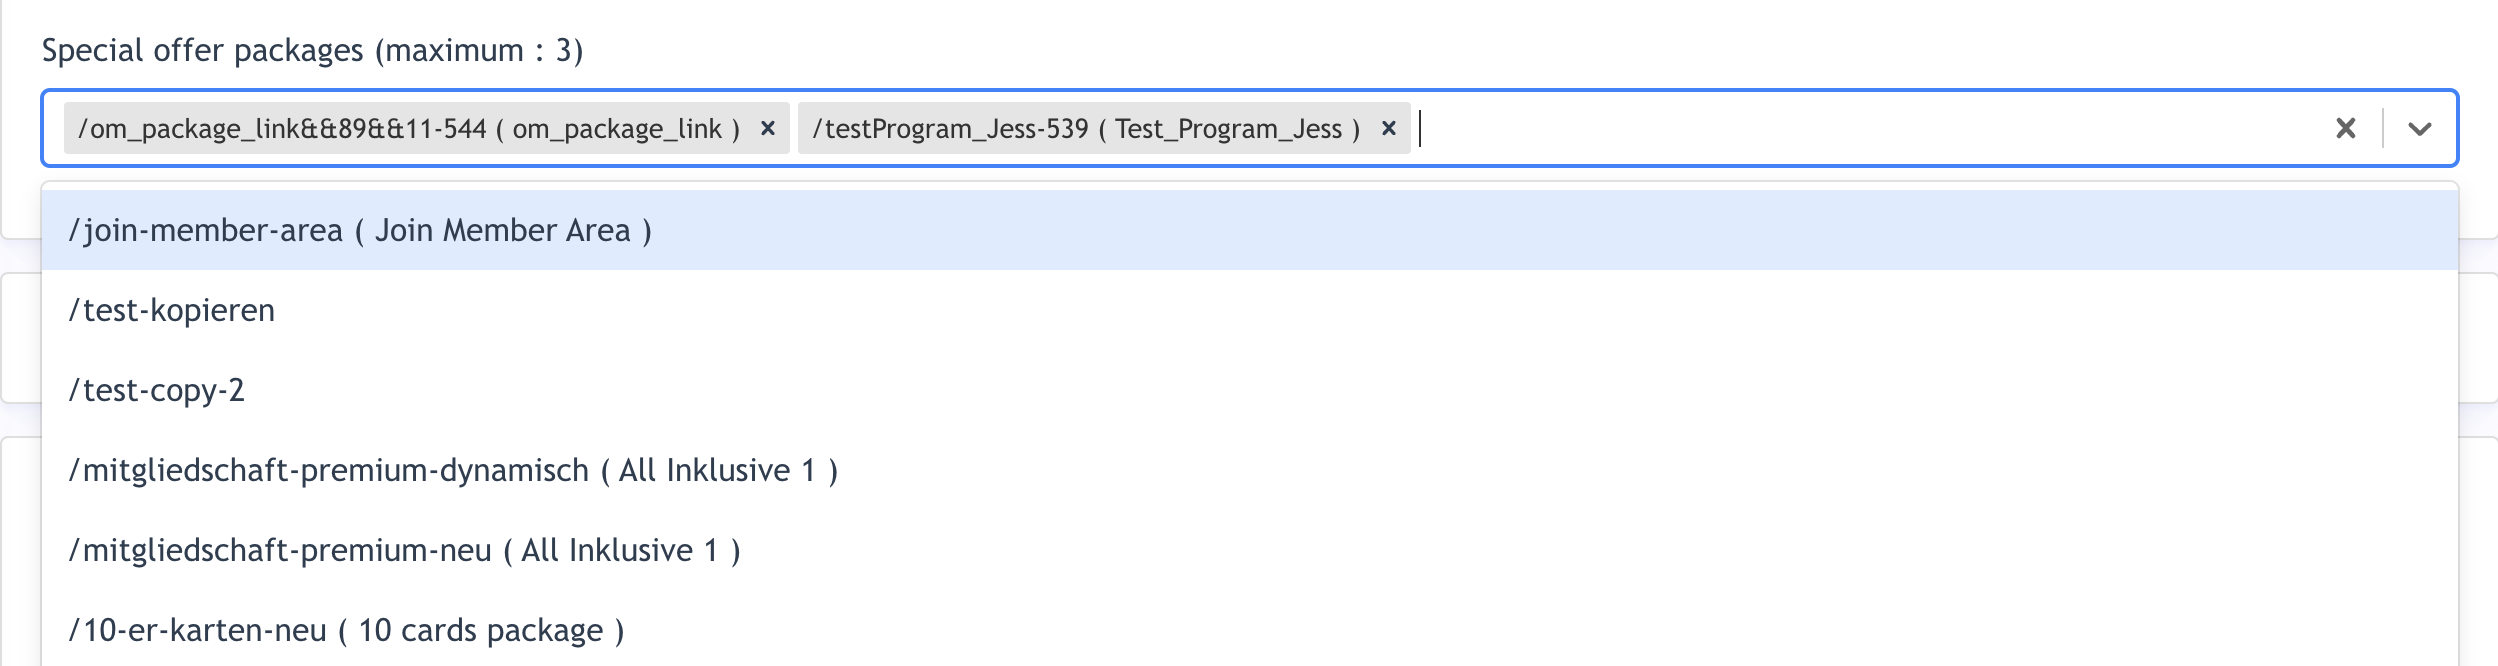
Admin just need to select Package name from the dropdown and click "Save"
An example of screenshot from Members Area portal :
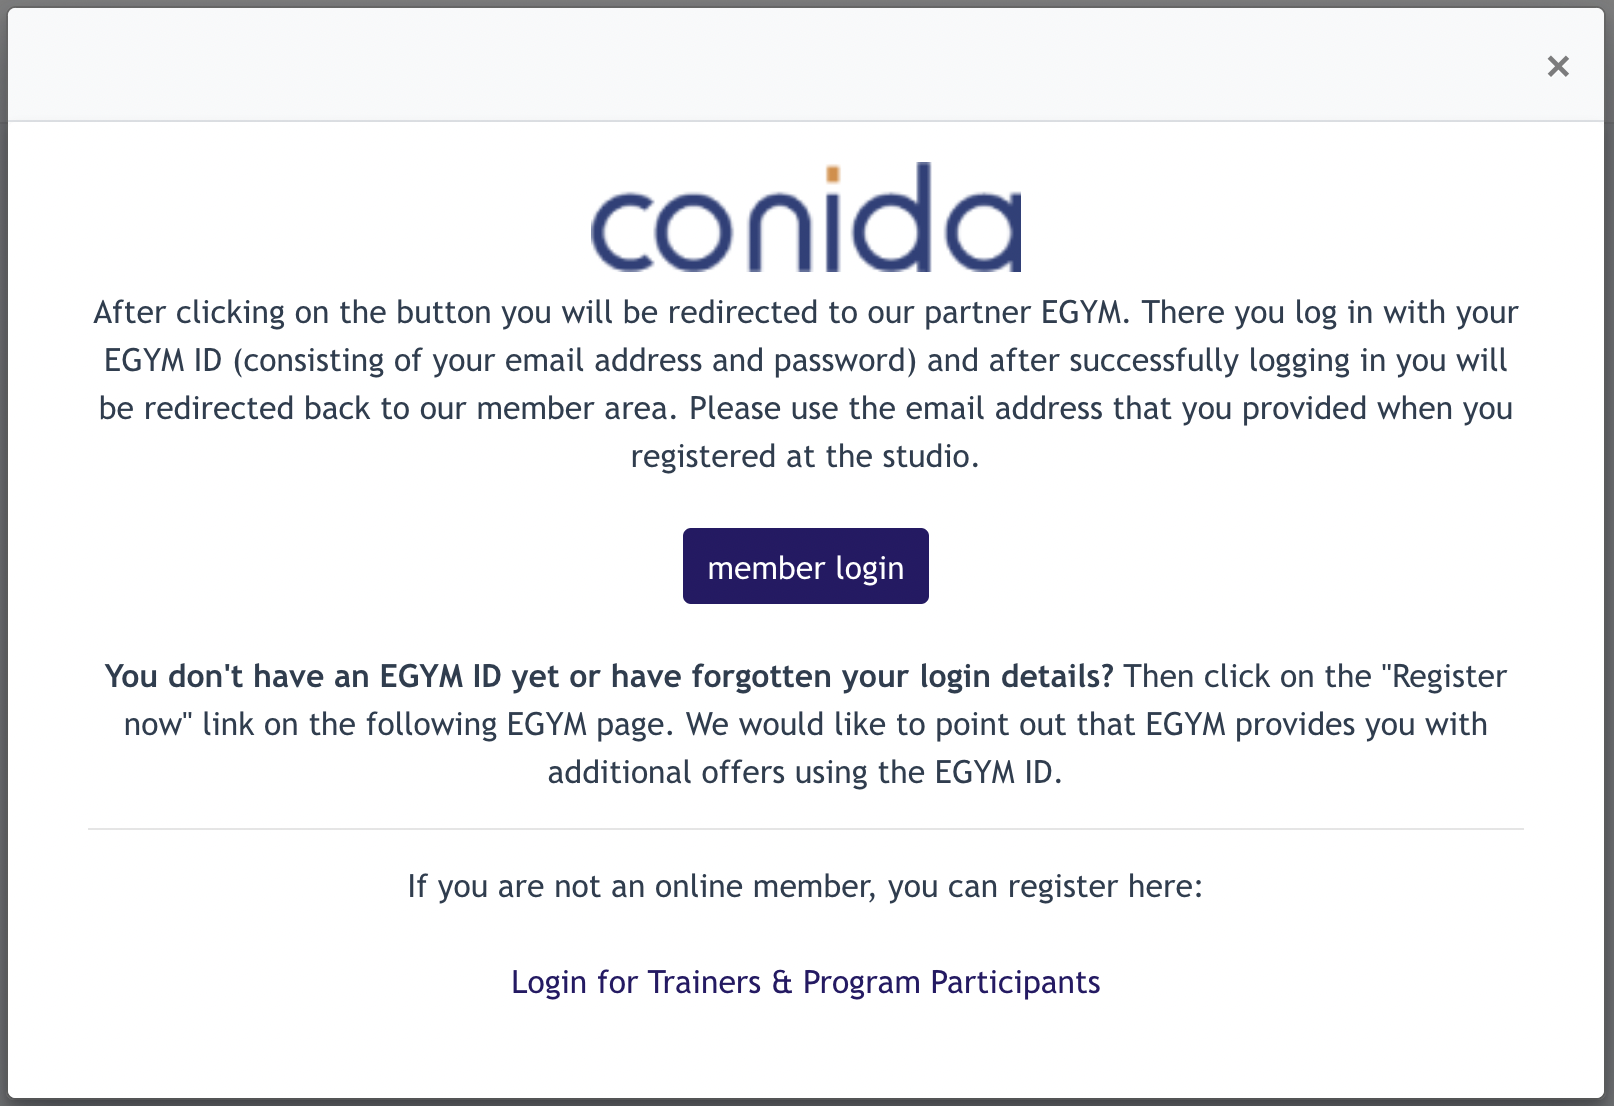
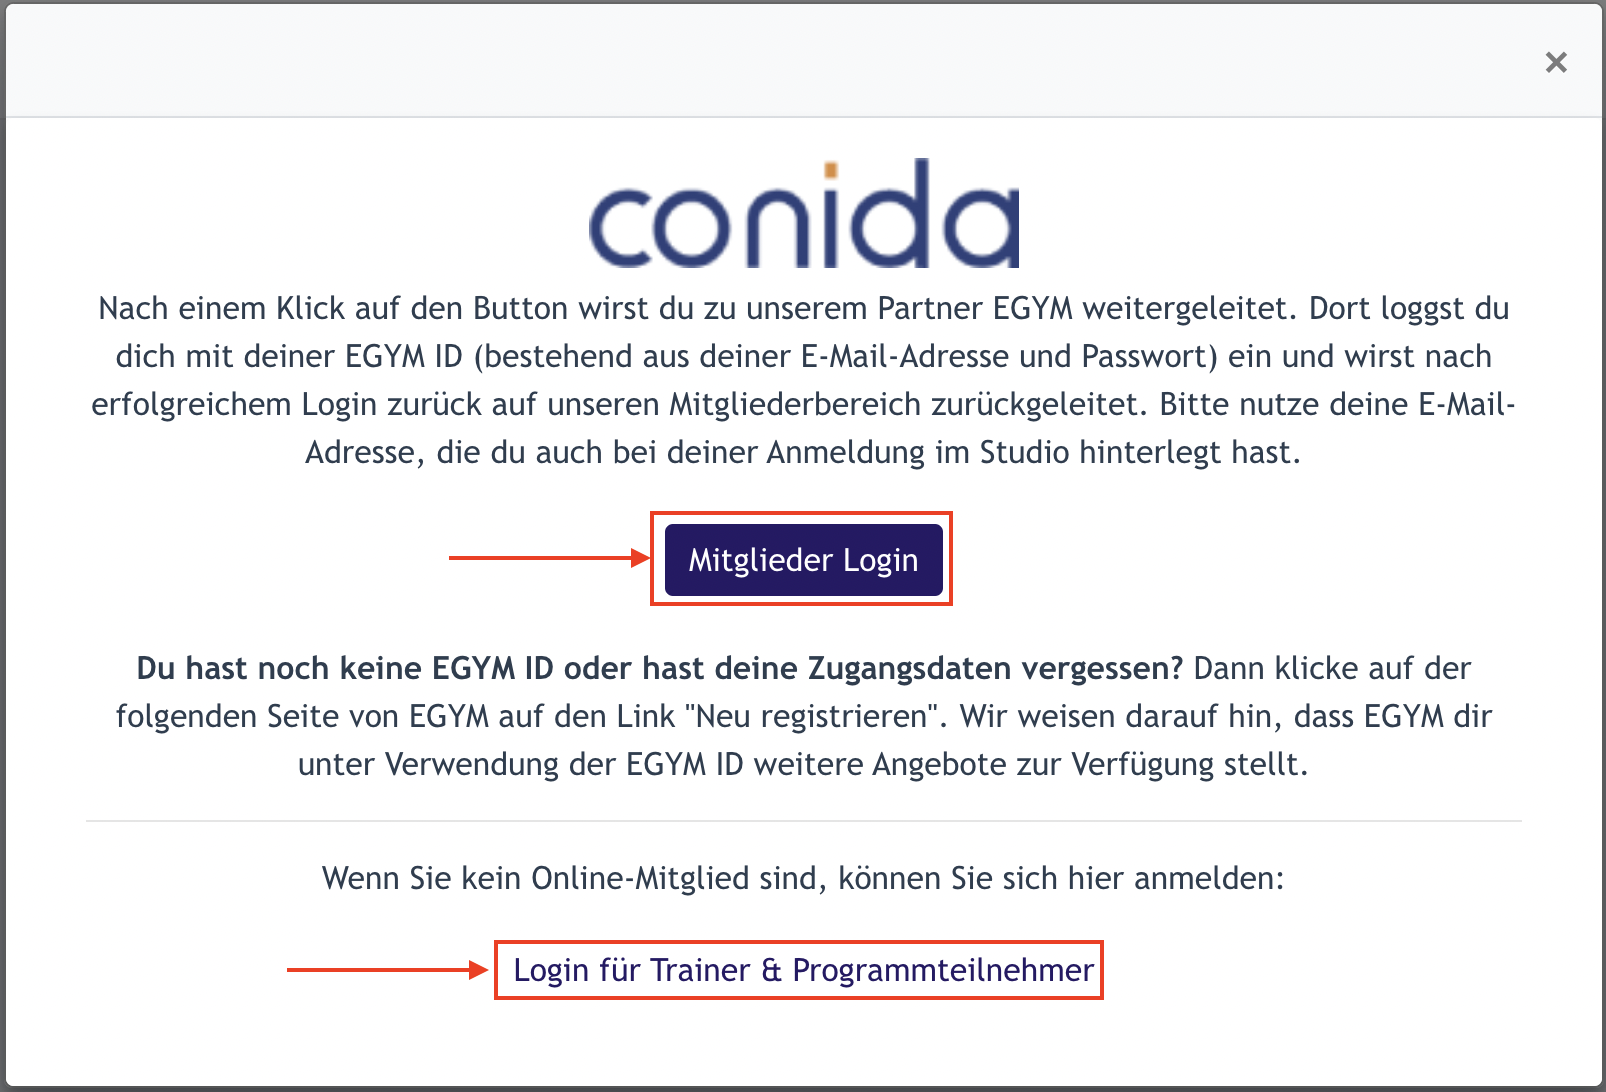
C. Egym Login

If Center is using eGYM, Admin may tick this checkbox, so that their Members who have eGYM login may login to the member area via eGYM login credential.
The Login Panel will look like below when above is checked :
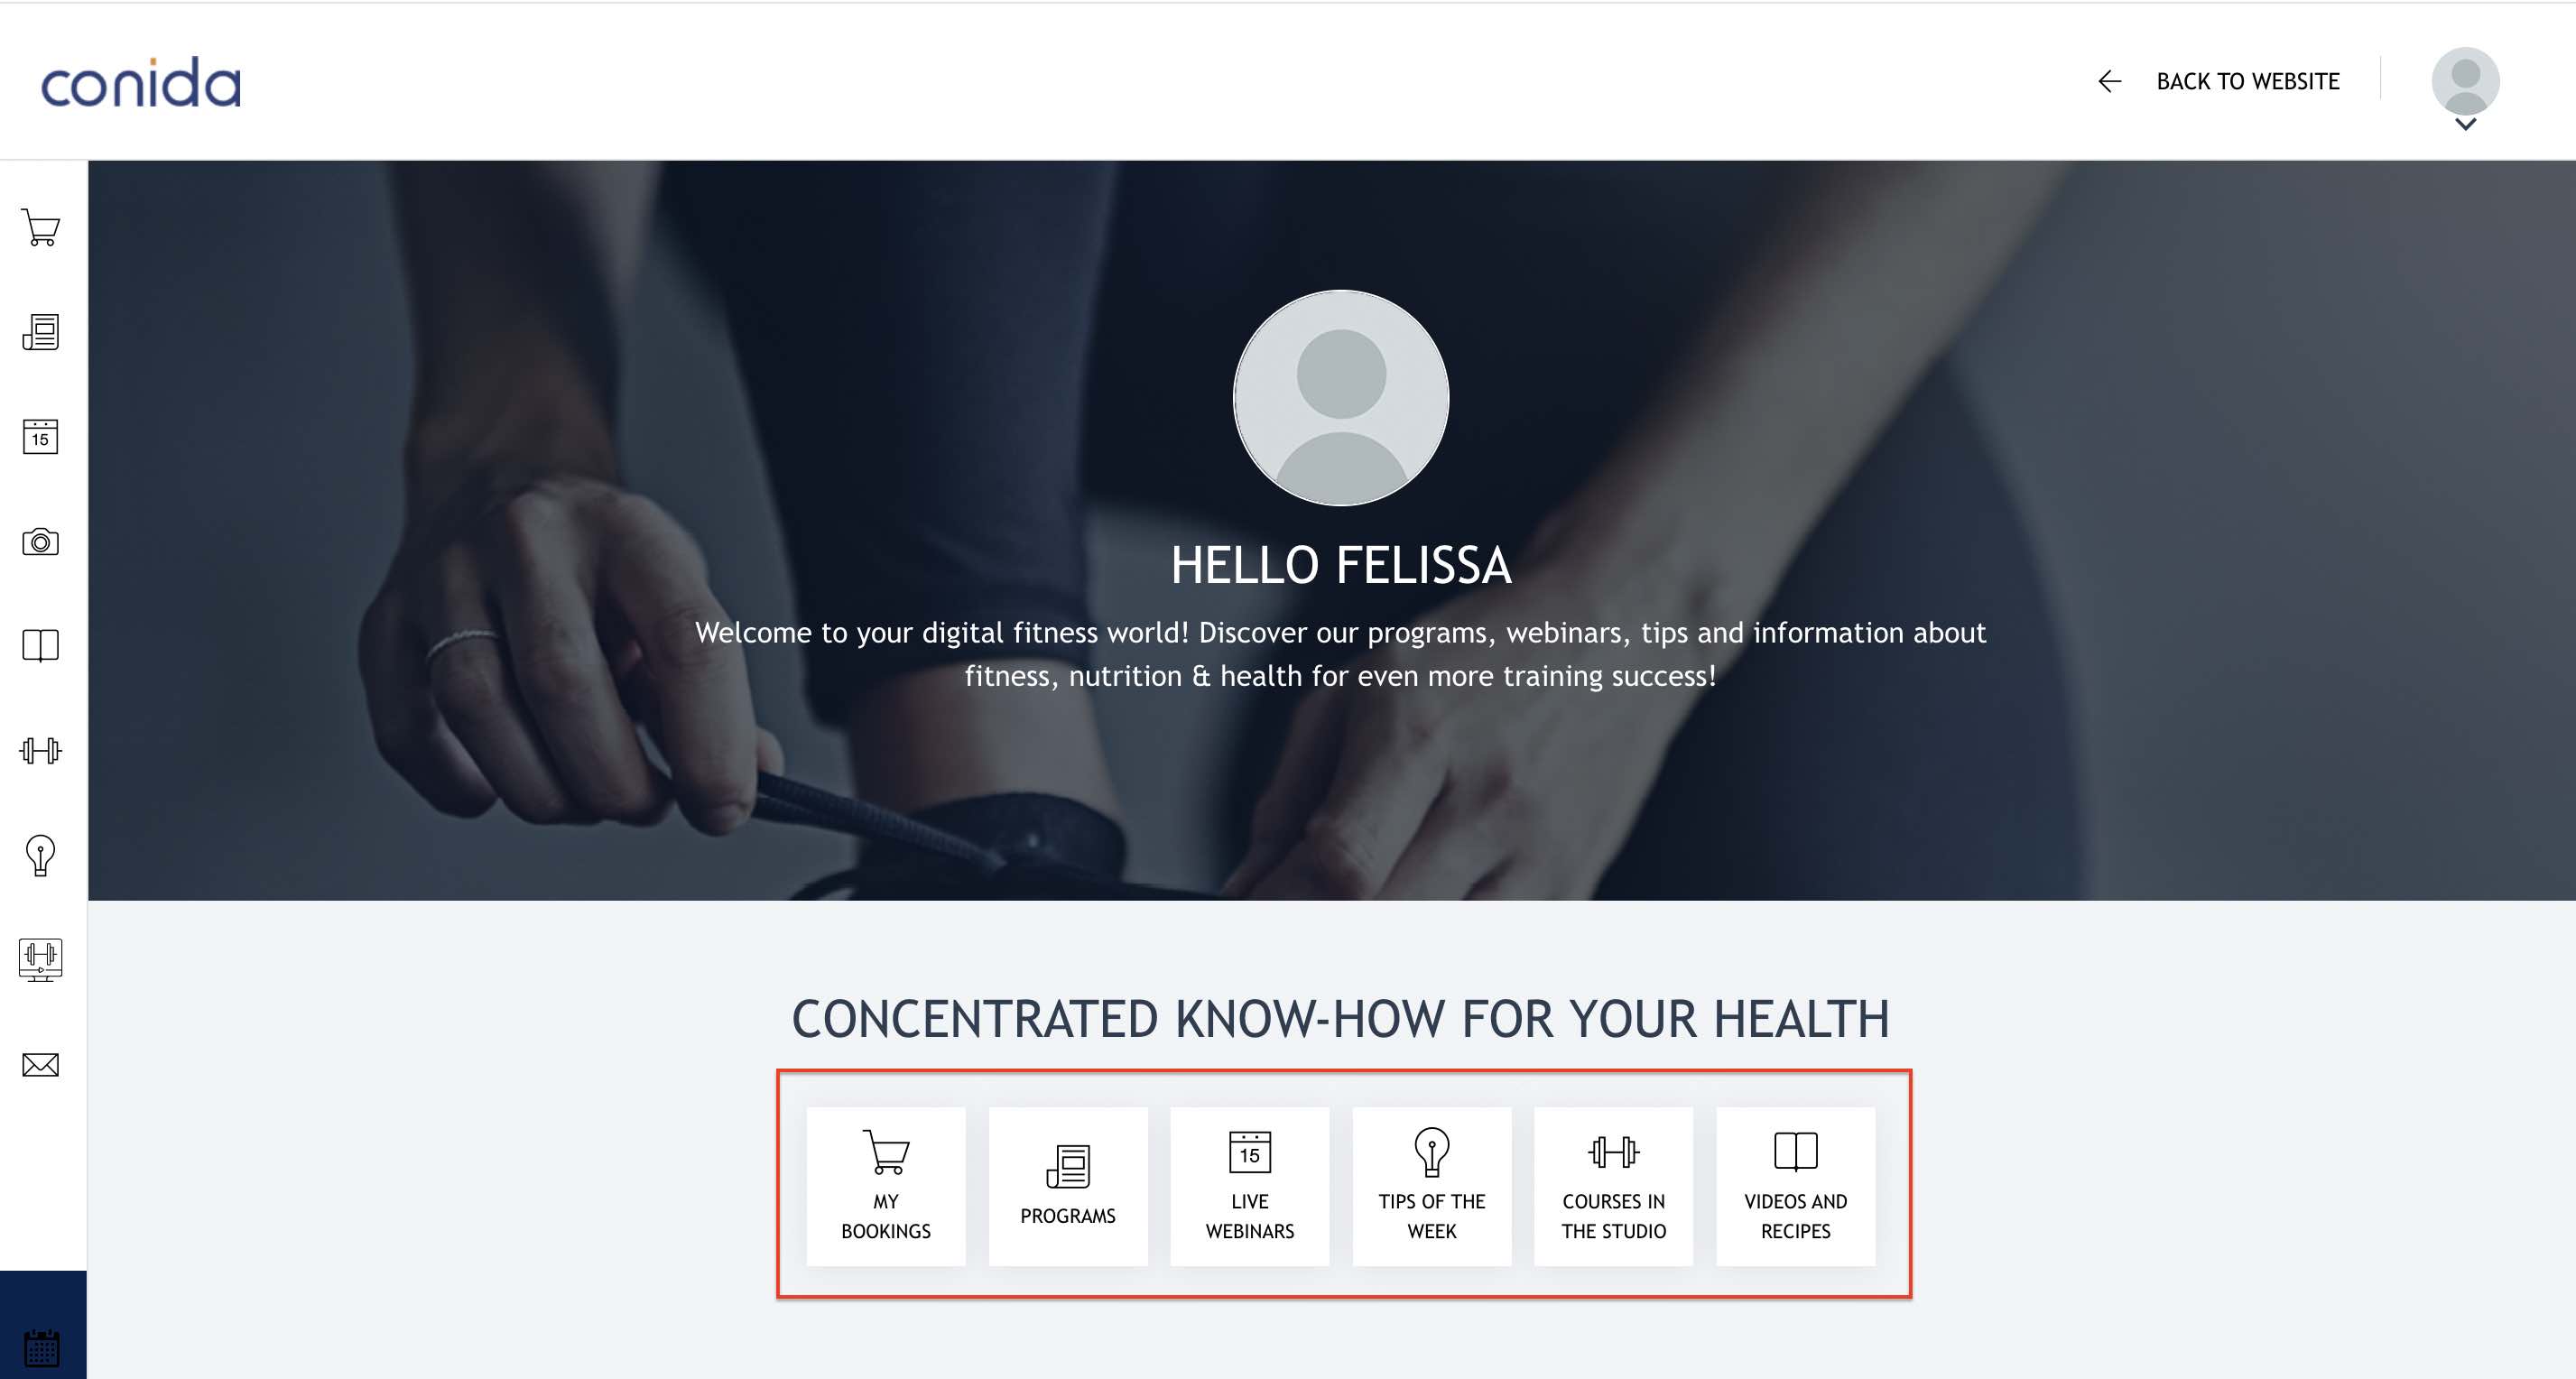
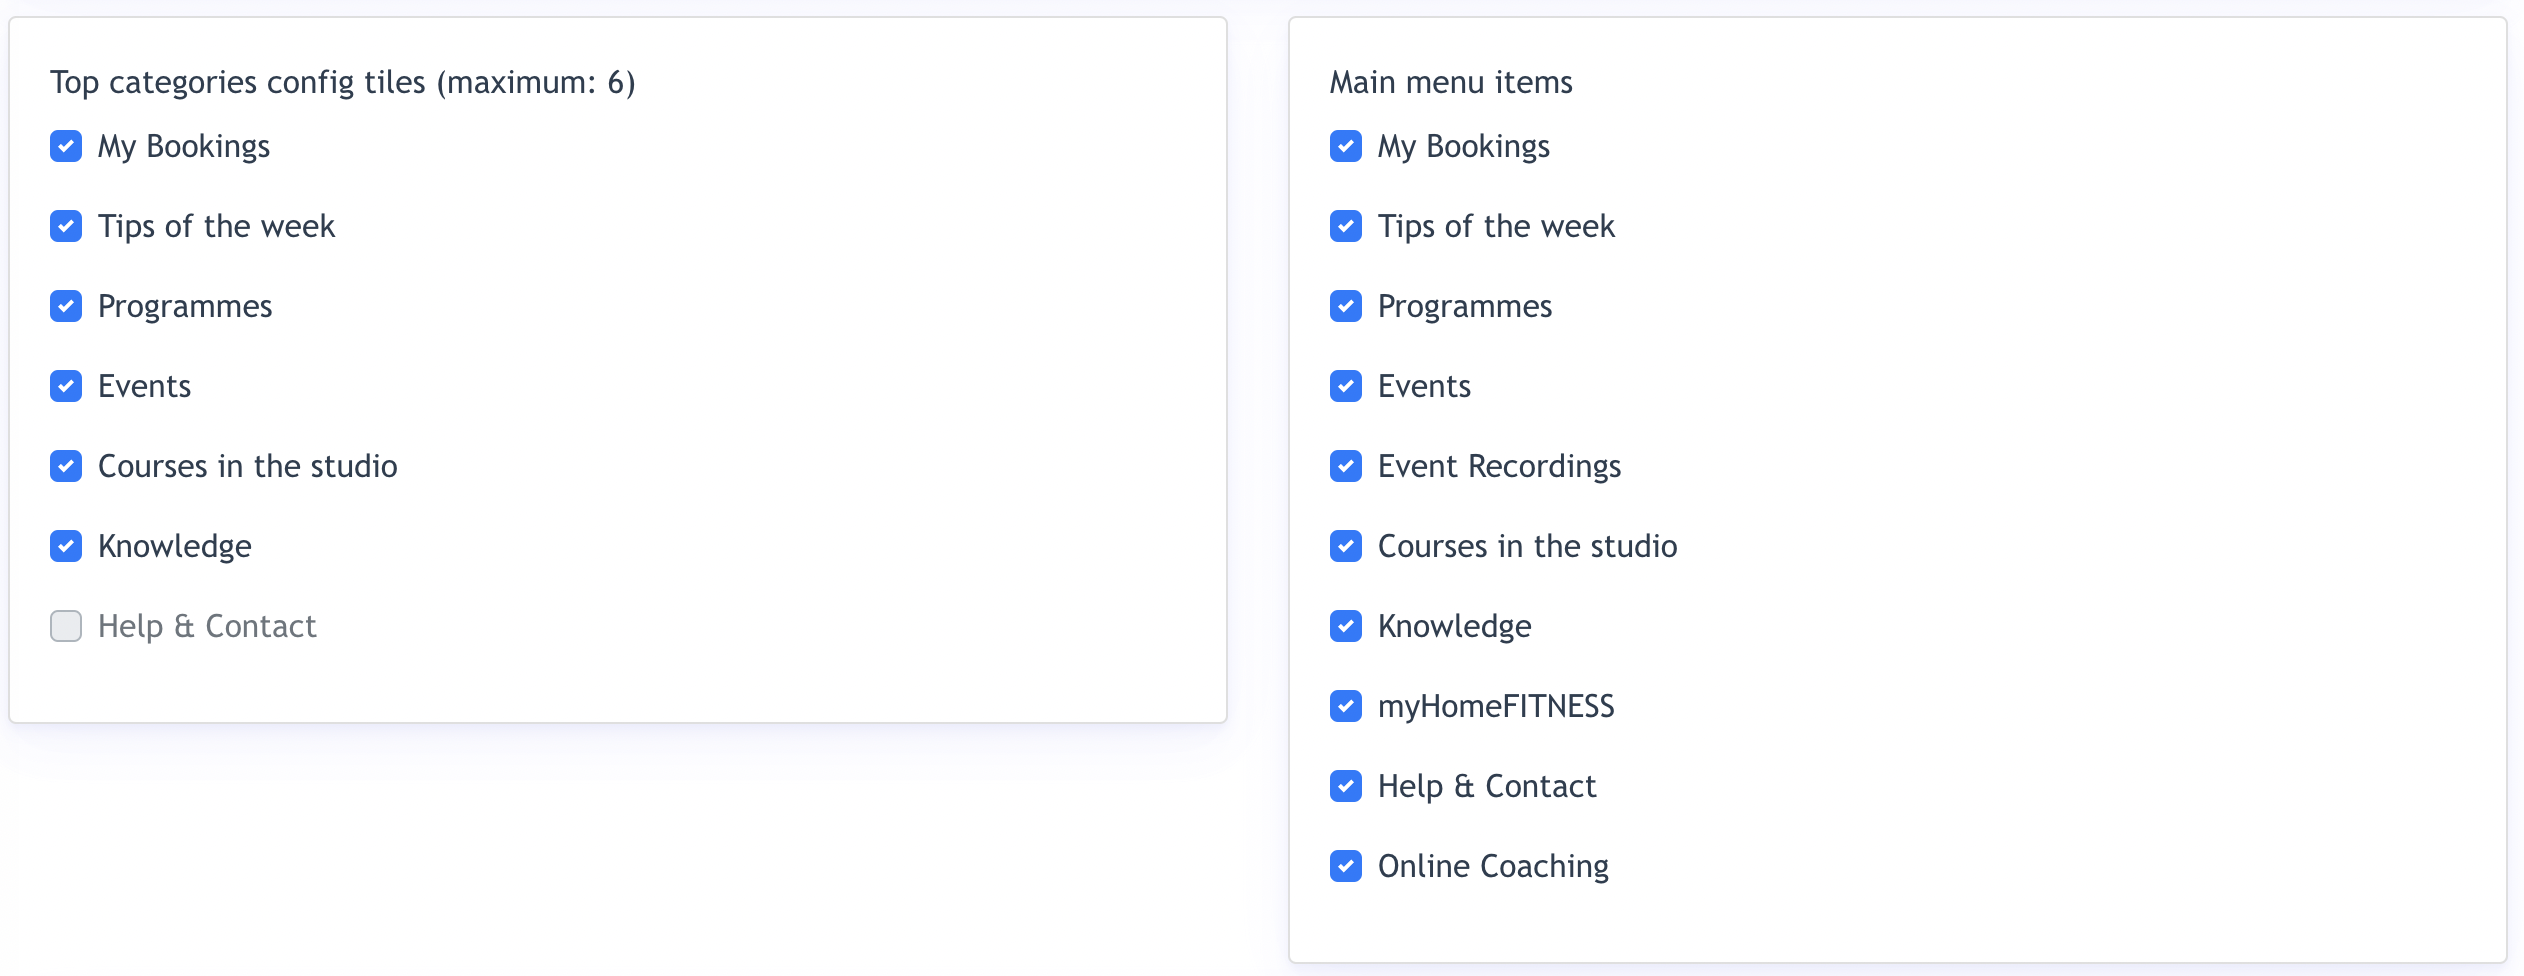
D. Menu / Navigation Configuration
Admin may configure which menu item to appear on the [ Top category tiles ] on MemberArea Dashboard.
A maximum of 6 tiles can be displayed. [ My Booking ] and [ Tip of the Week ] is default checked.
Screenshot example of "Top Category Tiles"
E. Login Button Setting
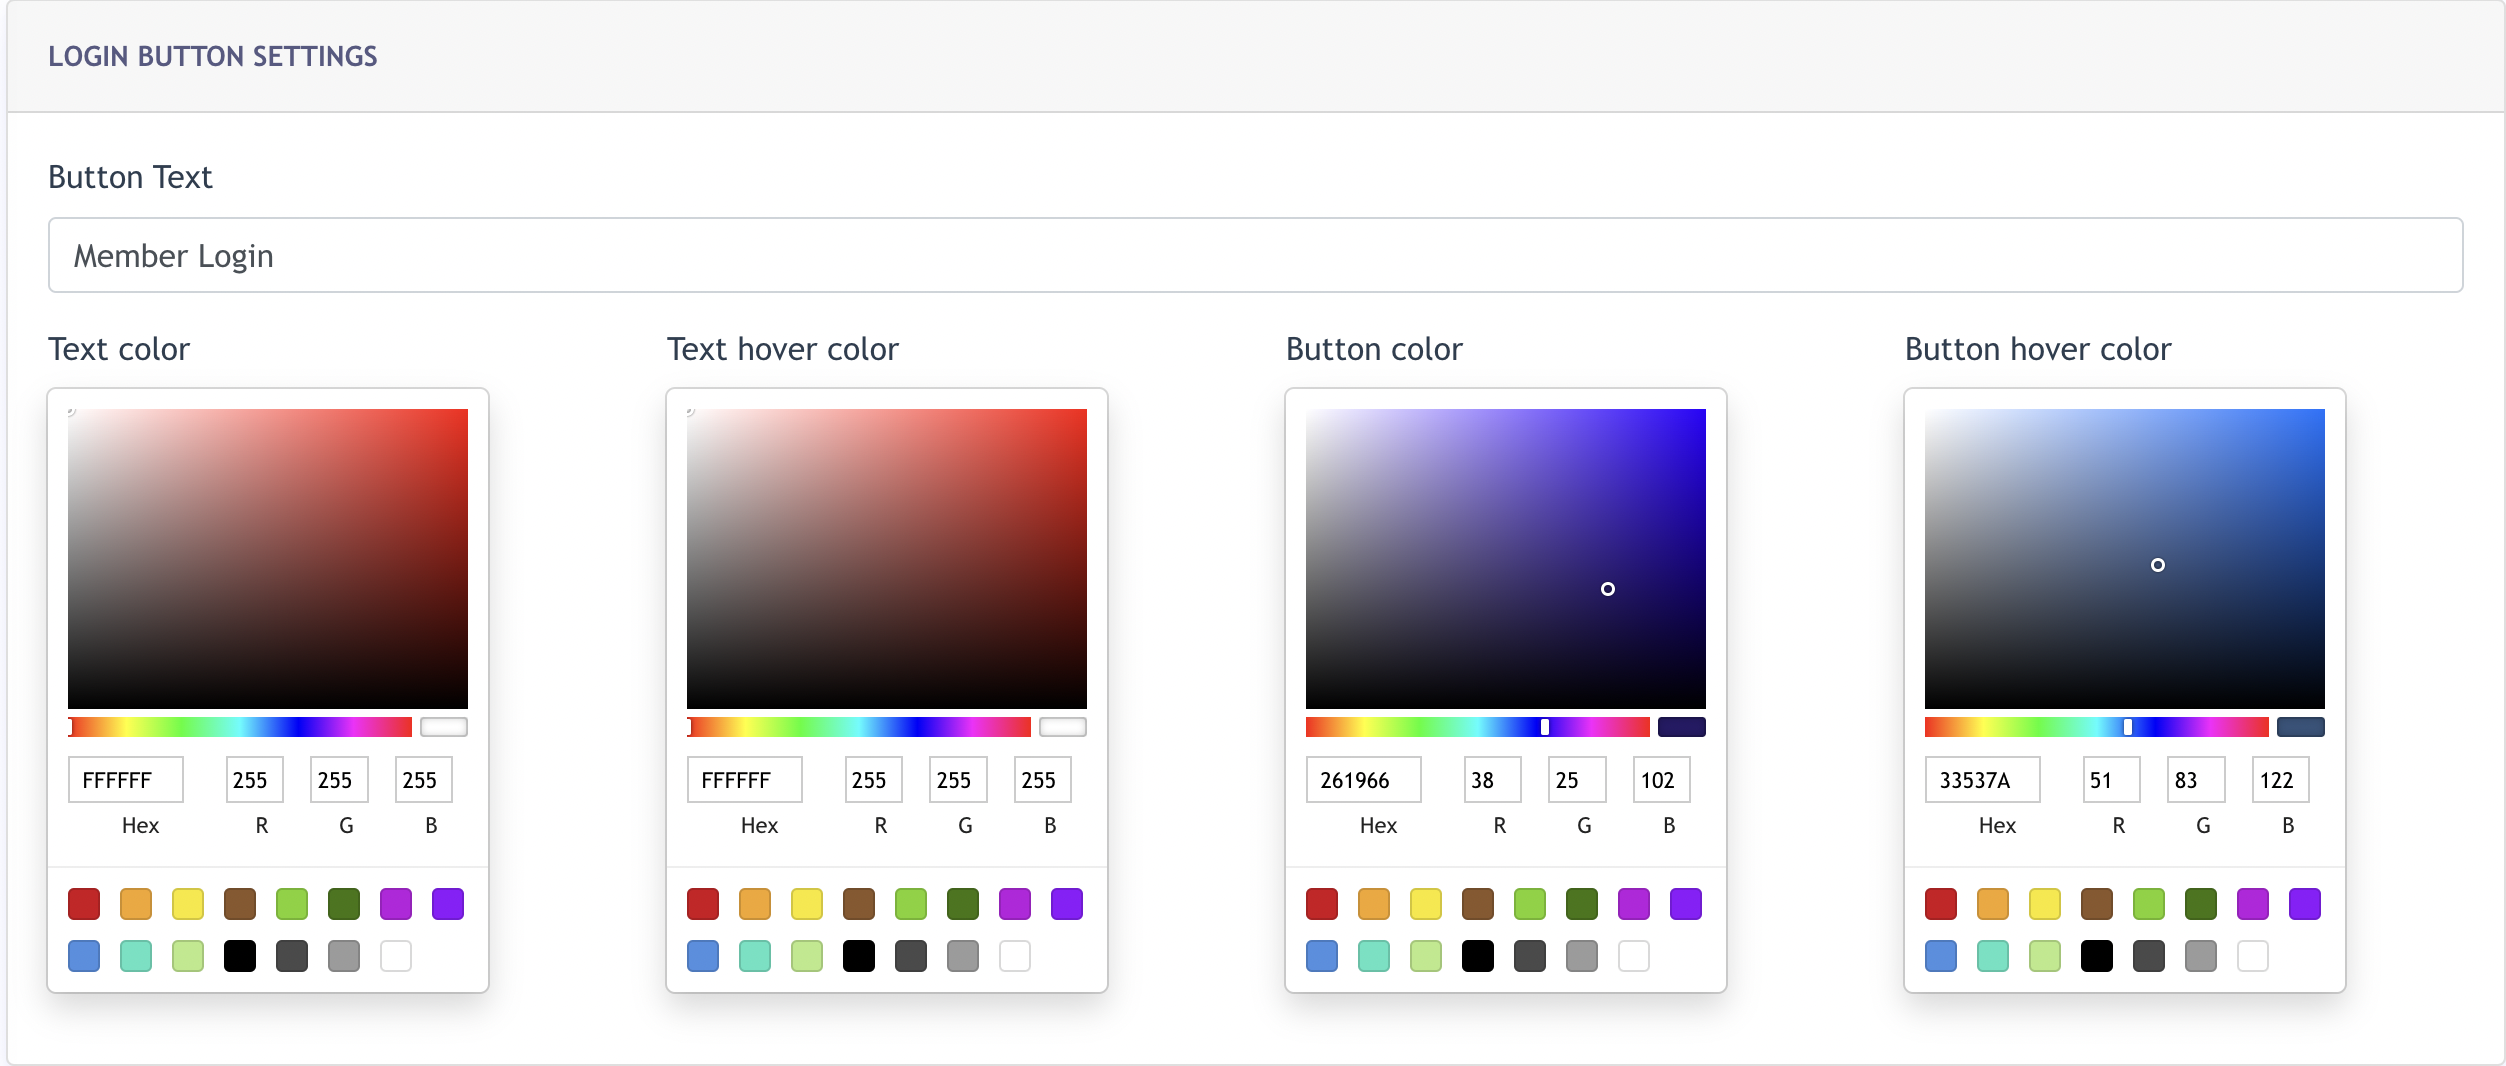
The configuration of button colour will applies in 2 areas:
Screenshot 1

Screenshot 2

Screenshot 3
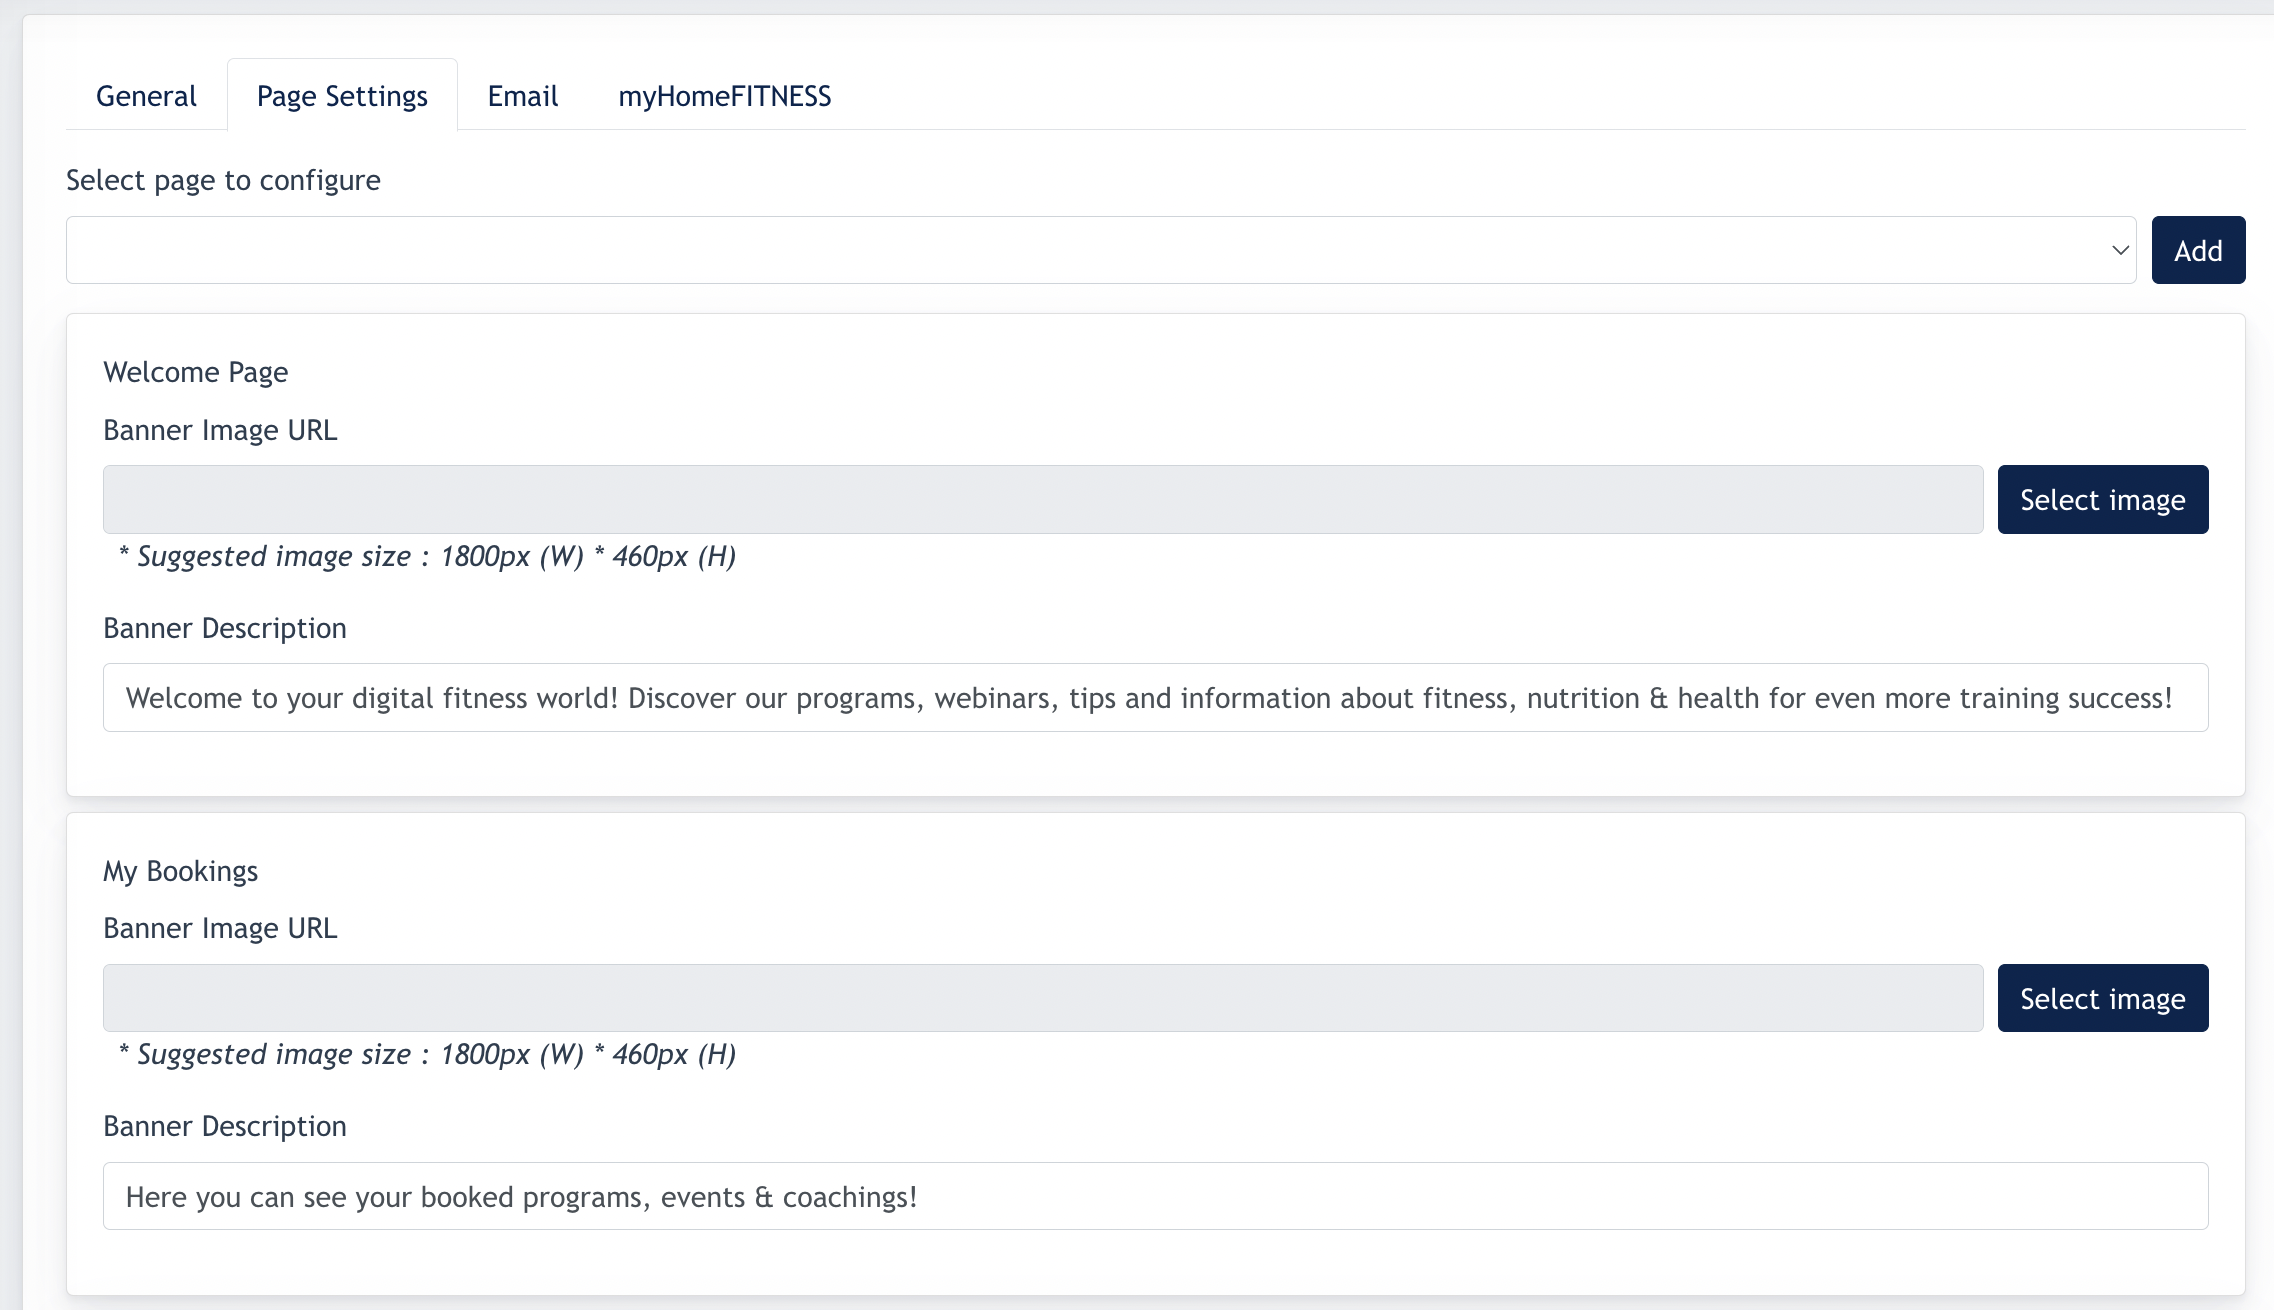
3.2 Page Settings Tab
Under this page, Admin can update the banner image for every page of the Member Area.
There are default image and banner headline upon subscribing to this Module. Admin just need to upload new image by clicking "Select image" or update Banner Description and click "Save"
3.3 Email Tab
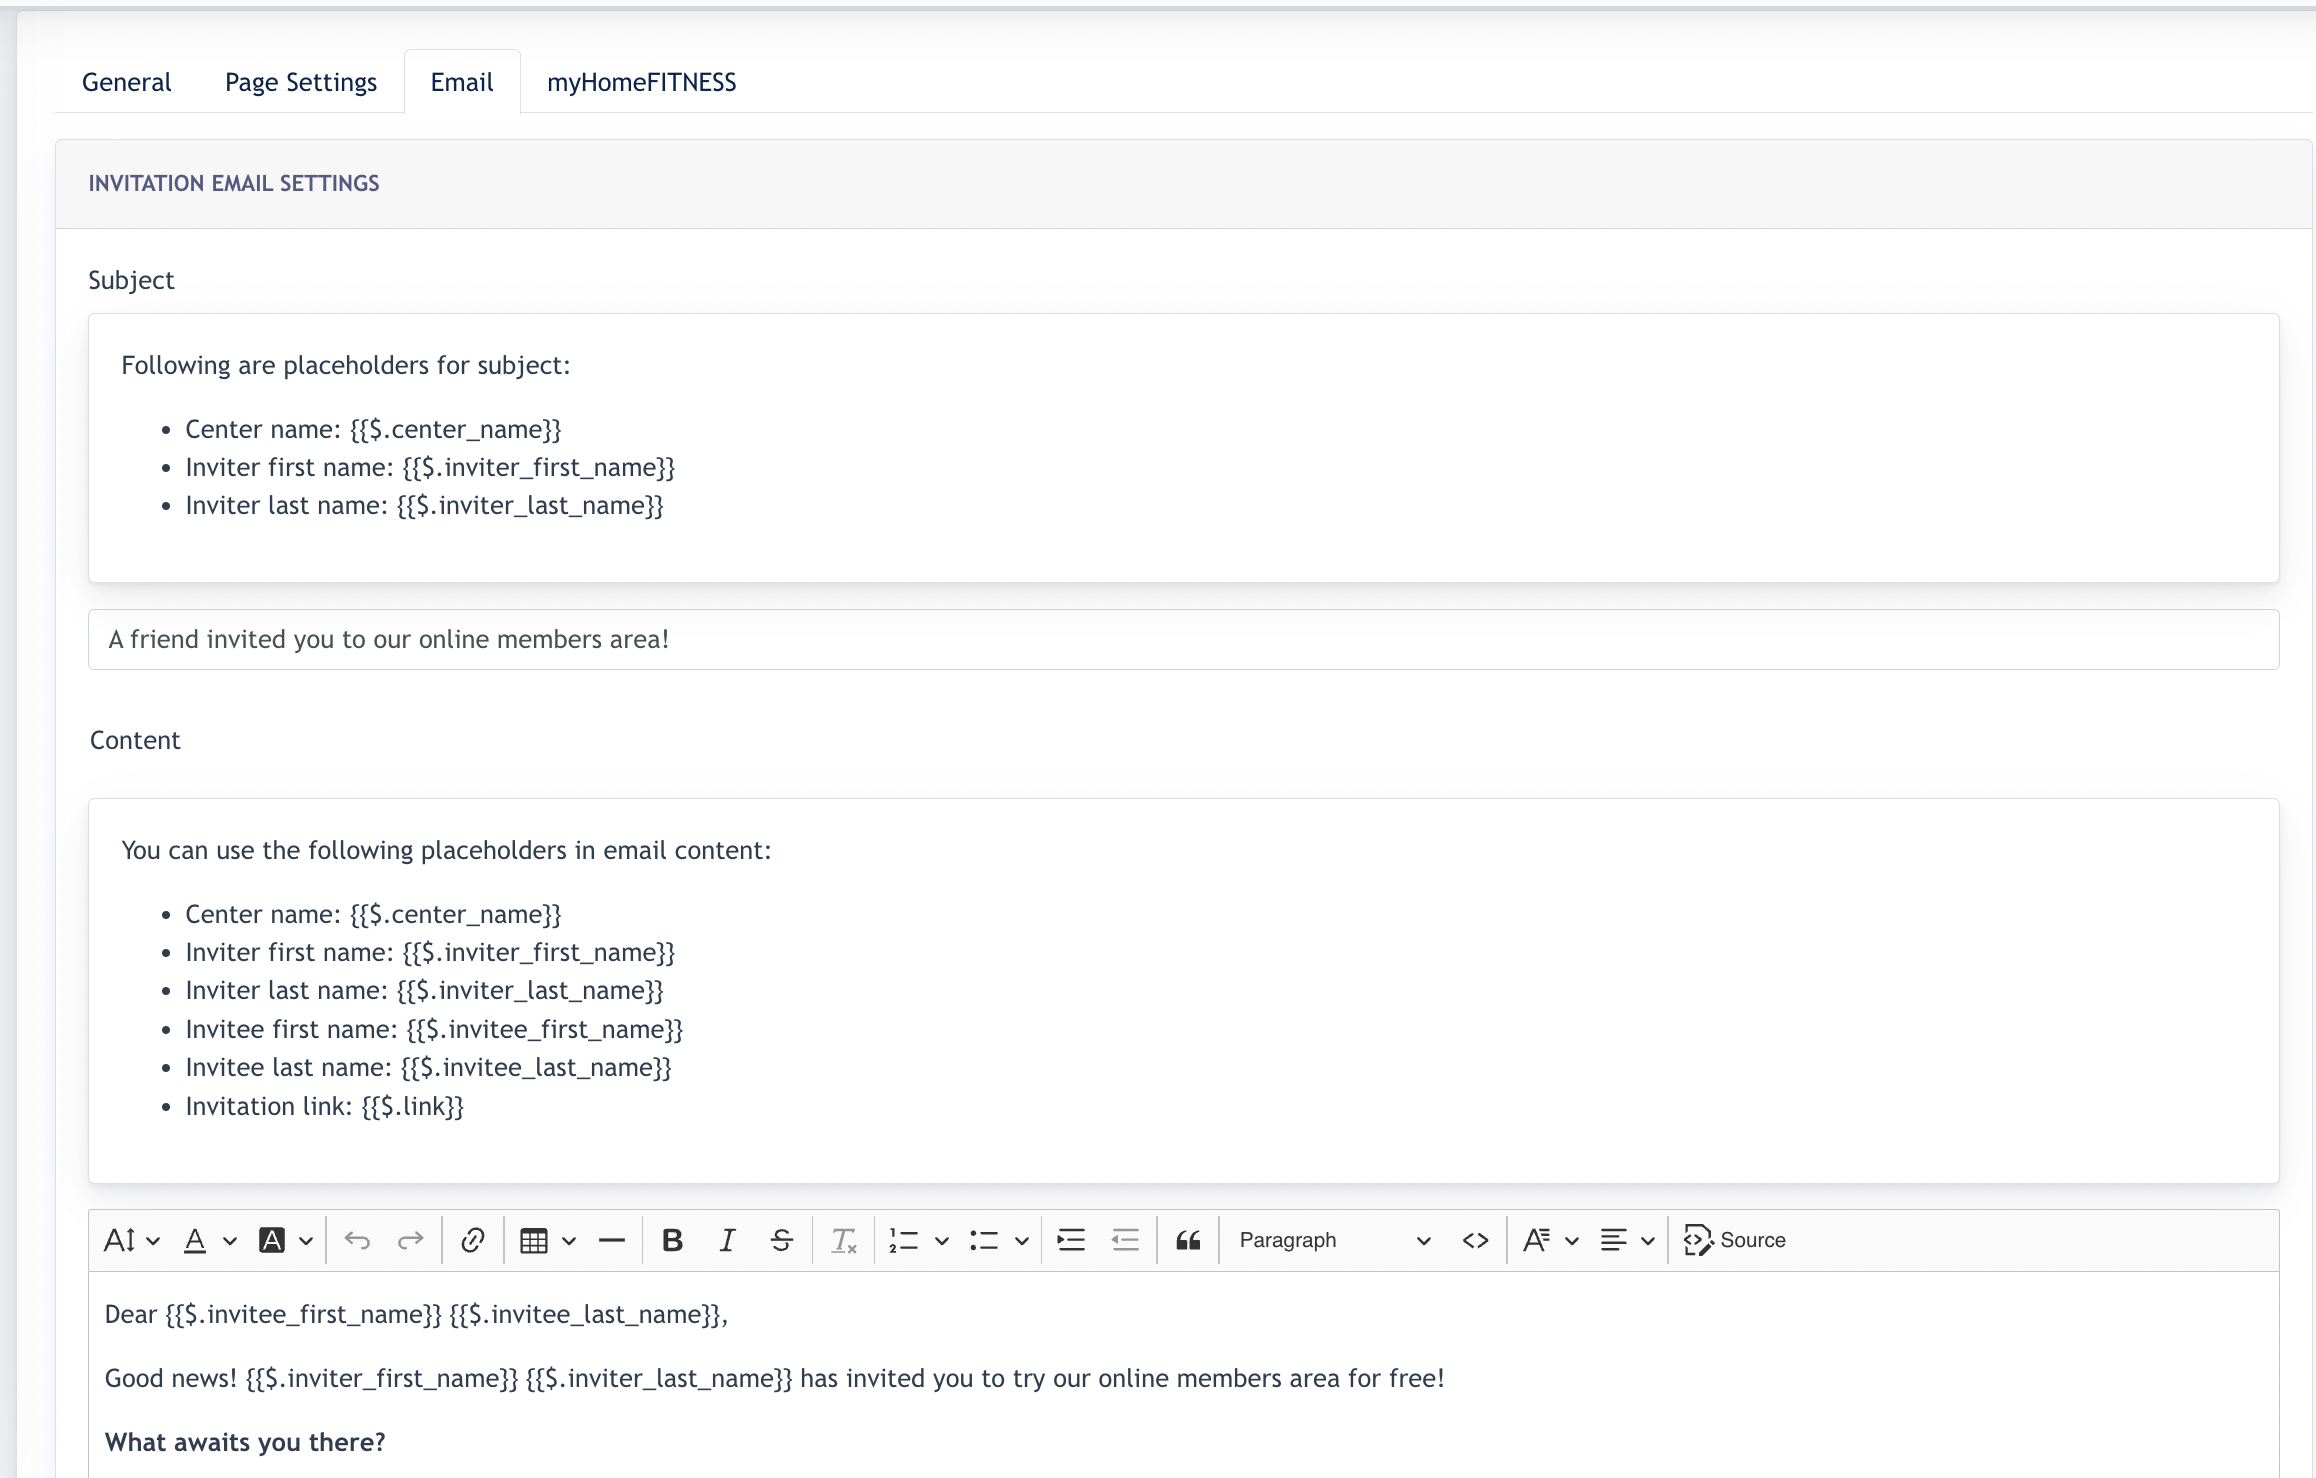
On this page, Center Admin may craft their own content for Invitation Email.
Invitation email is email sent to person invited by existing Online Members through Members Profile > Invite Friend
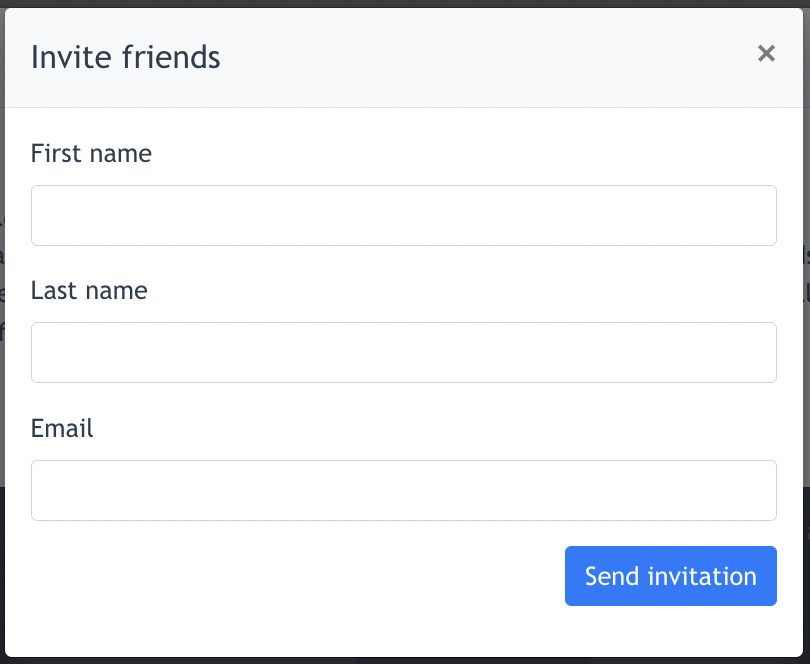
Screenshot of "Invite friends" :
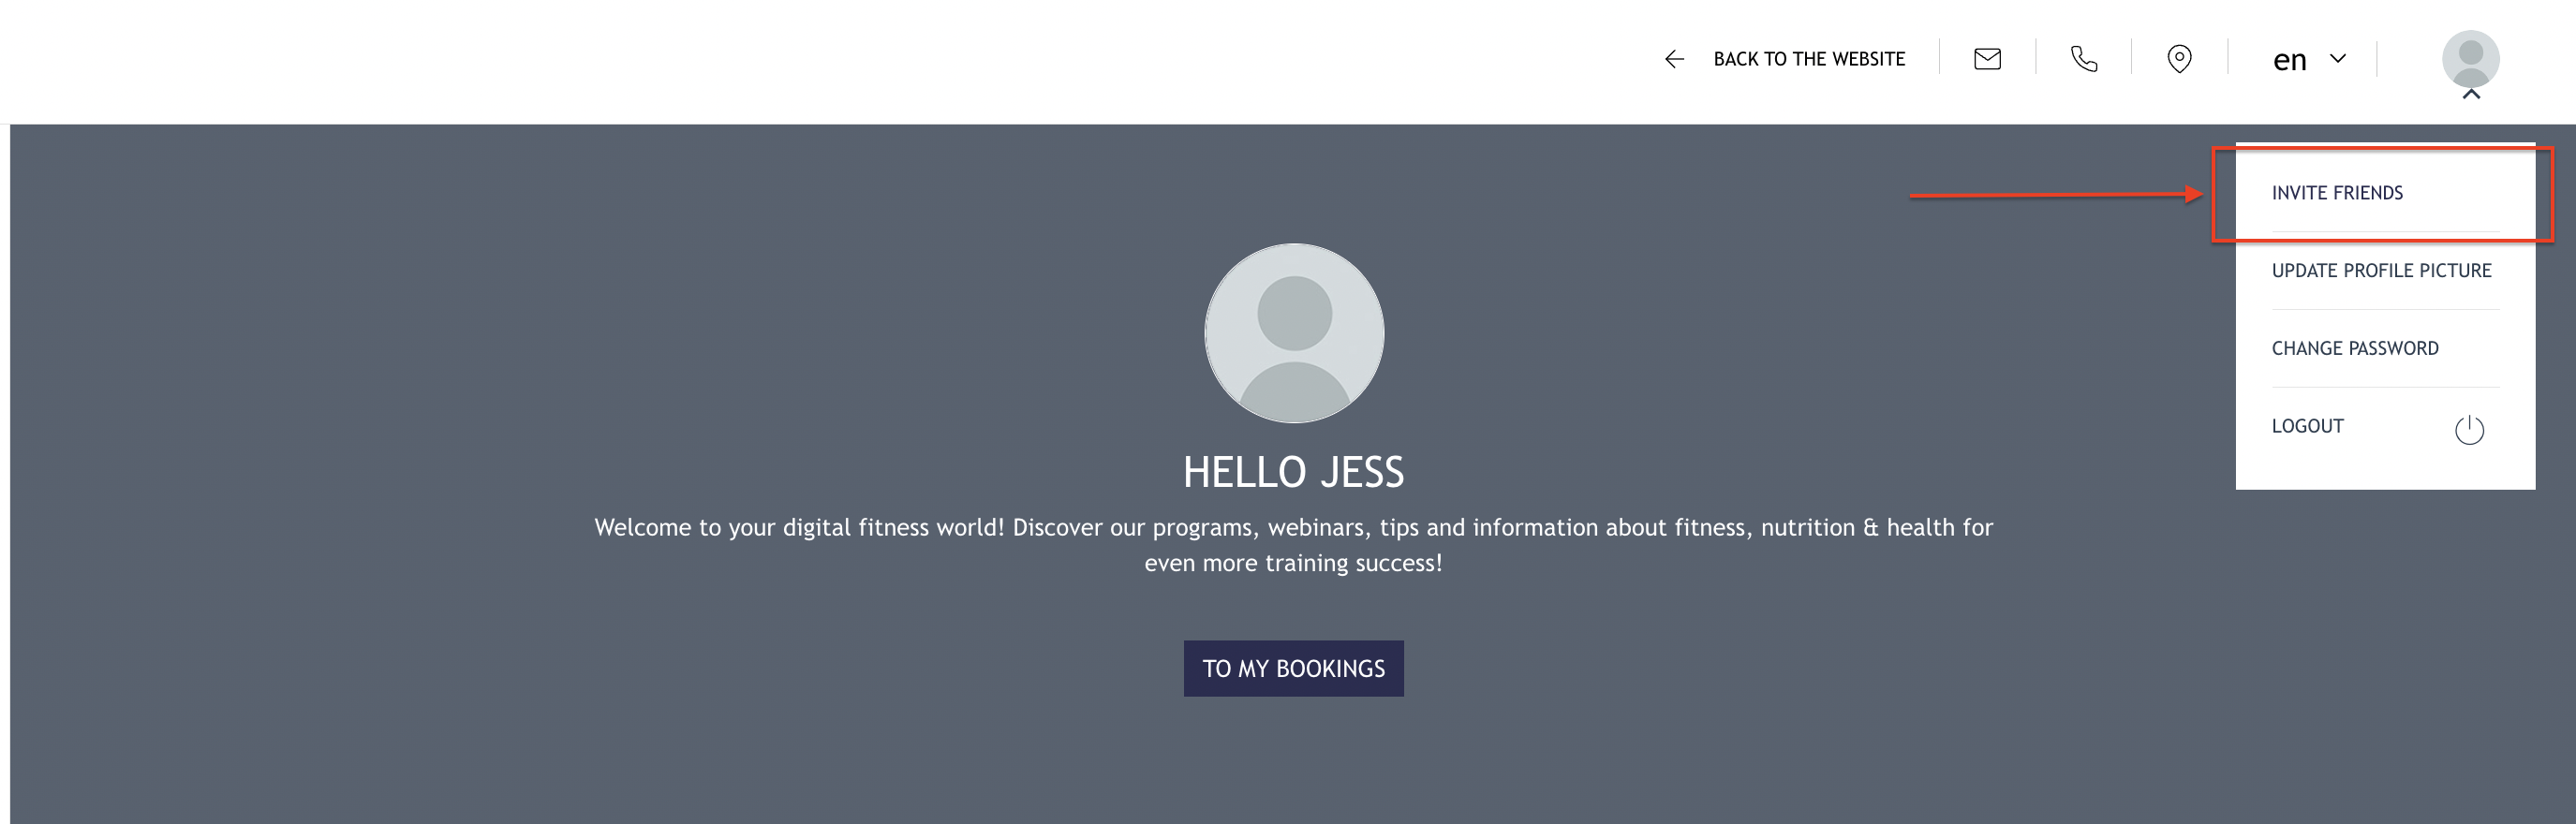
A member fill in the following form, click "Send Invitation" and this invitation email will be sent to the email address filled in here.
Default content for the Invitation Email :
Dear {{$.invitee_first_name}} {{$.invitee_last_name}},
Good news! {{$.inviter_first_name}} {{$.inviter_last_name}} has invited you to try our online members area for free!
What awaits you there?
- Tips about training, nutrition and motivation
- Expert webinars & events related to fitness & health
- Knowledge blog with valuable content on the topics "weight loss and nutrition", "figure and muscle training", "back and joints" and "relaxation
- ... a digital fitness world to really get started!
Simply log in to your digital fitness world now at the following link: Invitation Link
Your free access to our online member area expired after 4 weeks use.
We wish you a lot of fun!
Your {{$.center_name}}
By using this Email Configuration, Center Admin may update from this content, if he/she feels the needs to change to a different content.
3.4 myHomeFitness
needs clarification
4. Enquiries
This page is for Admin to manage different enquiries made via Members Area.

Admin can search by types of enquiries and click the "view" button to check the enquiries.

Screenshot of the enquiries:
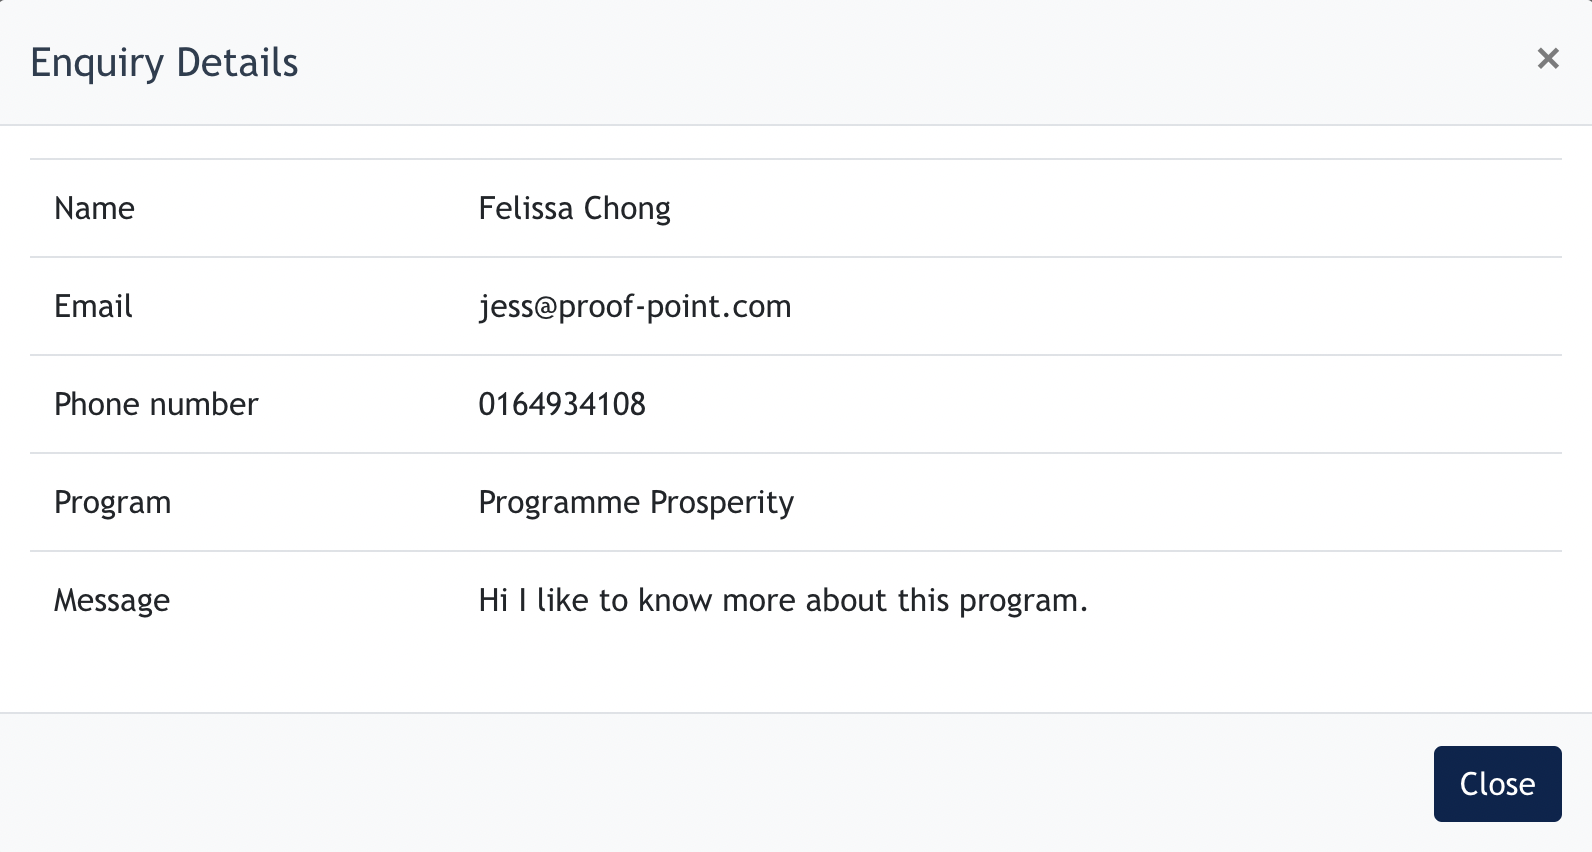
Example of Enquiries form on Members Area
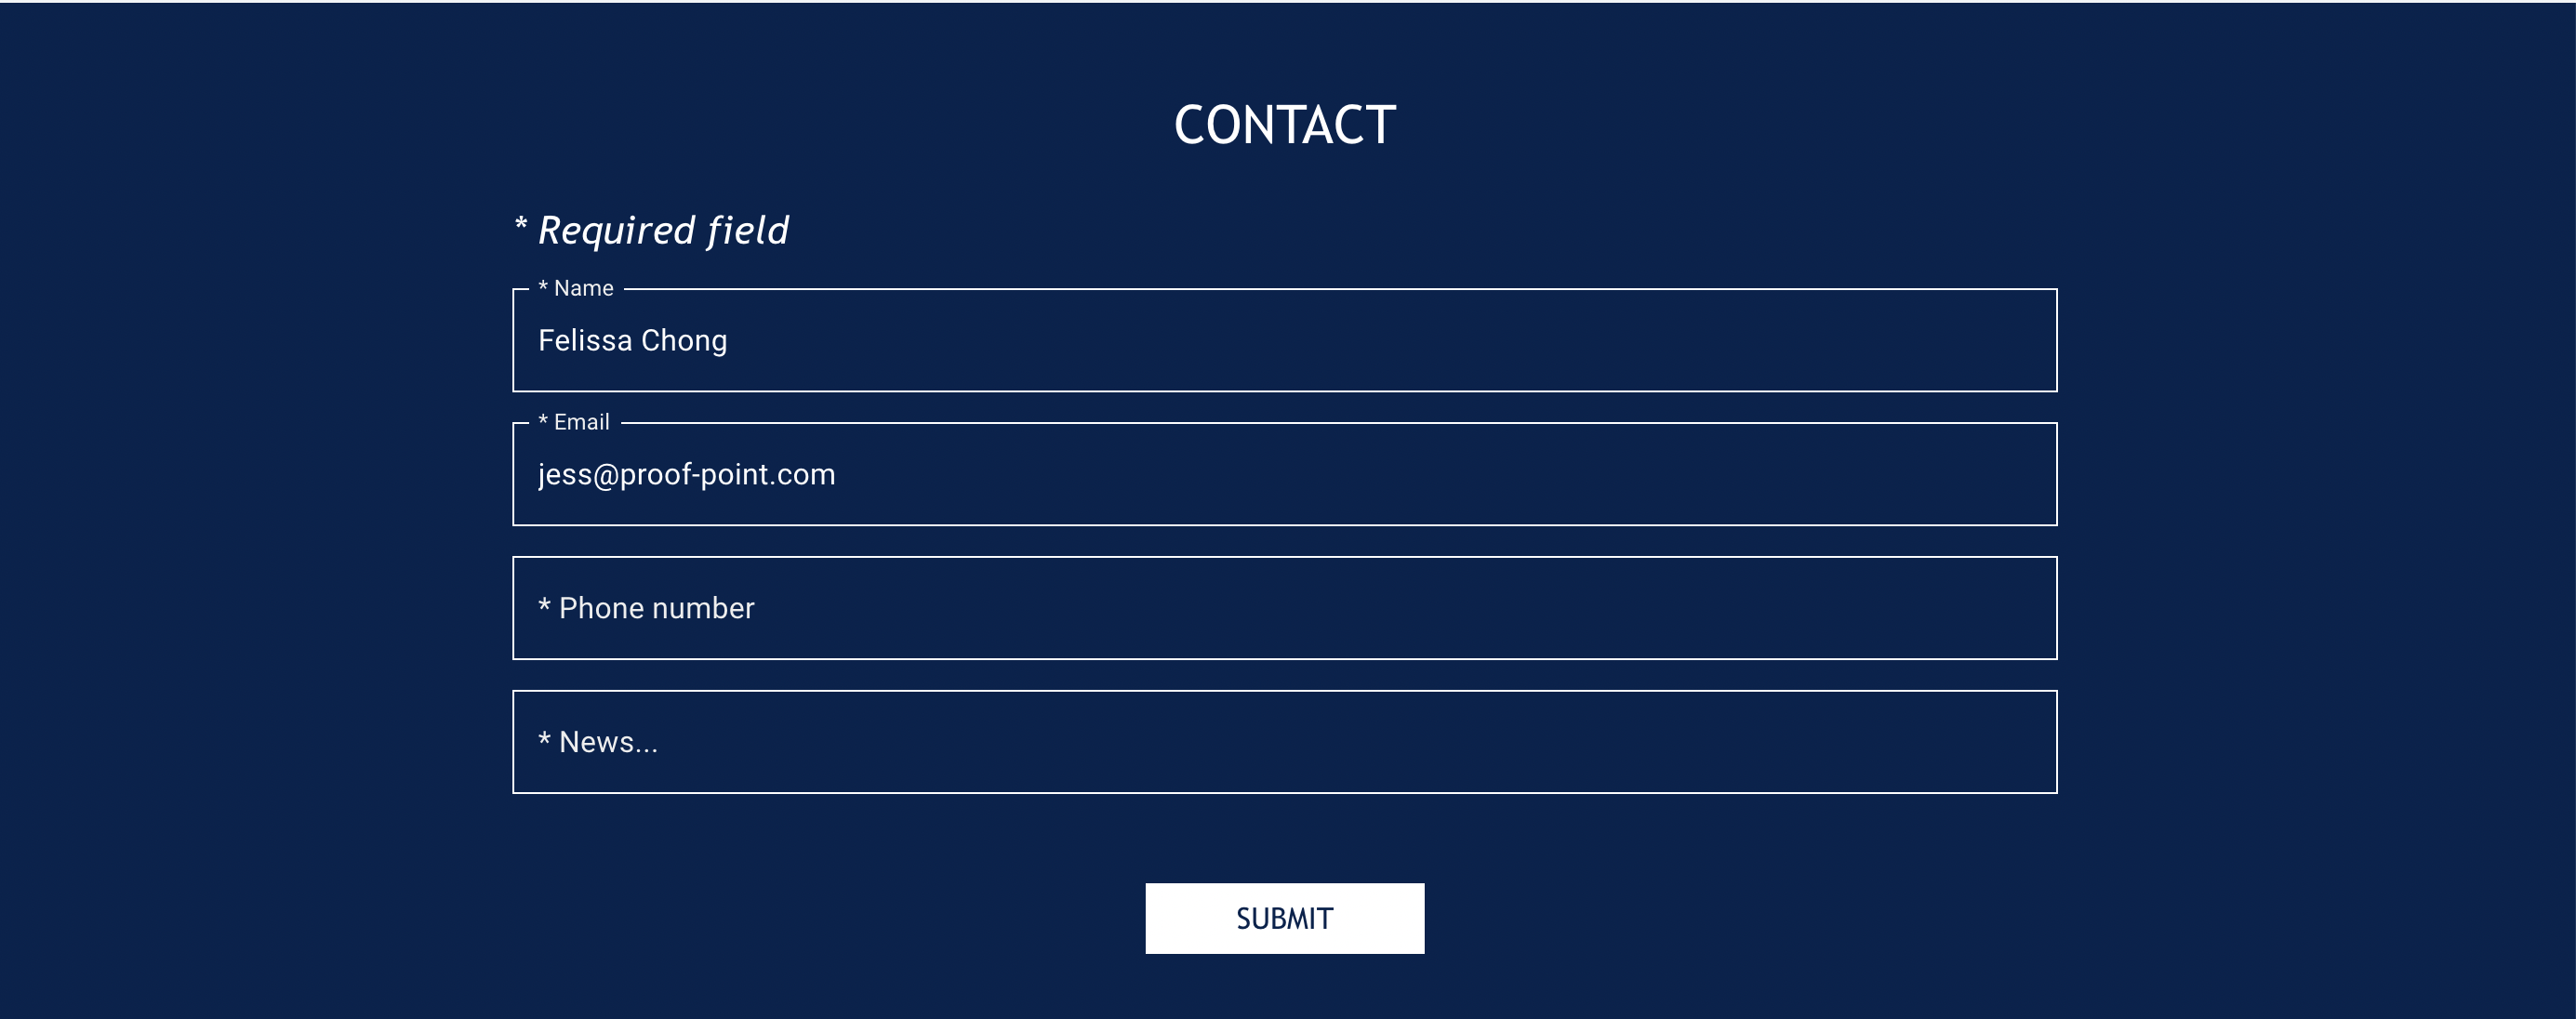
Remarks : Enquiries form only appears in "Programme" and "Contact" page on Members Area.
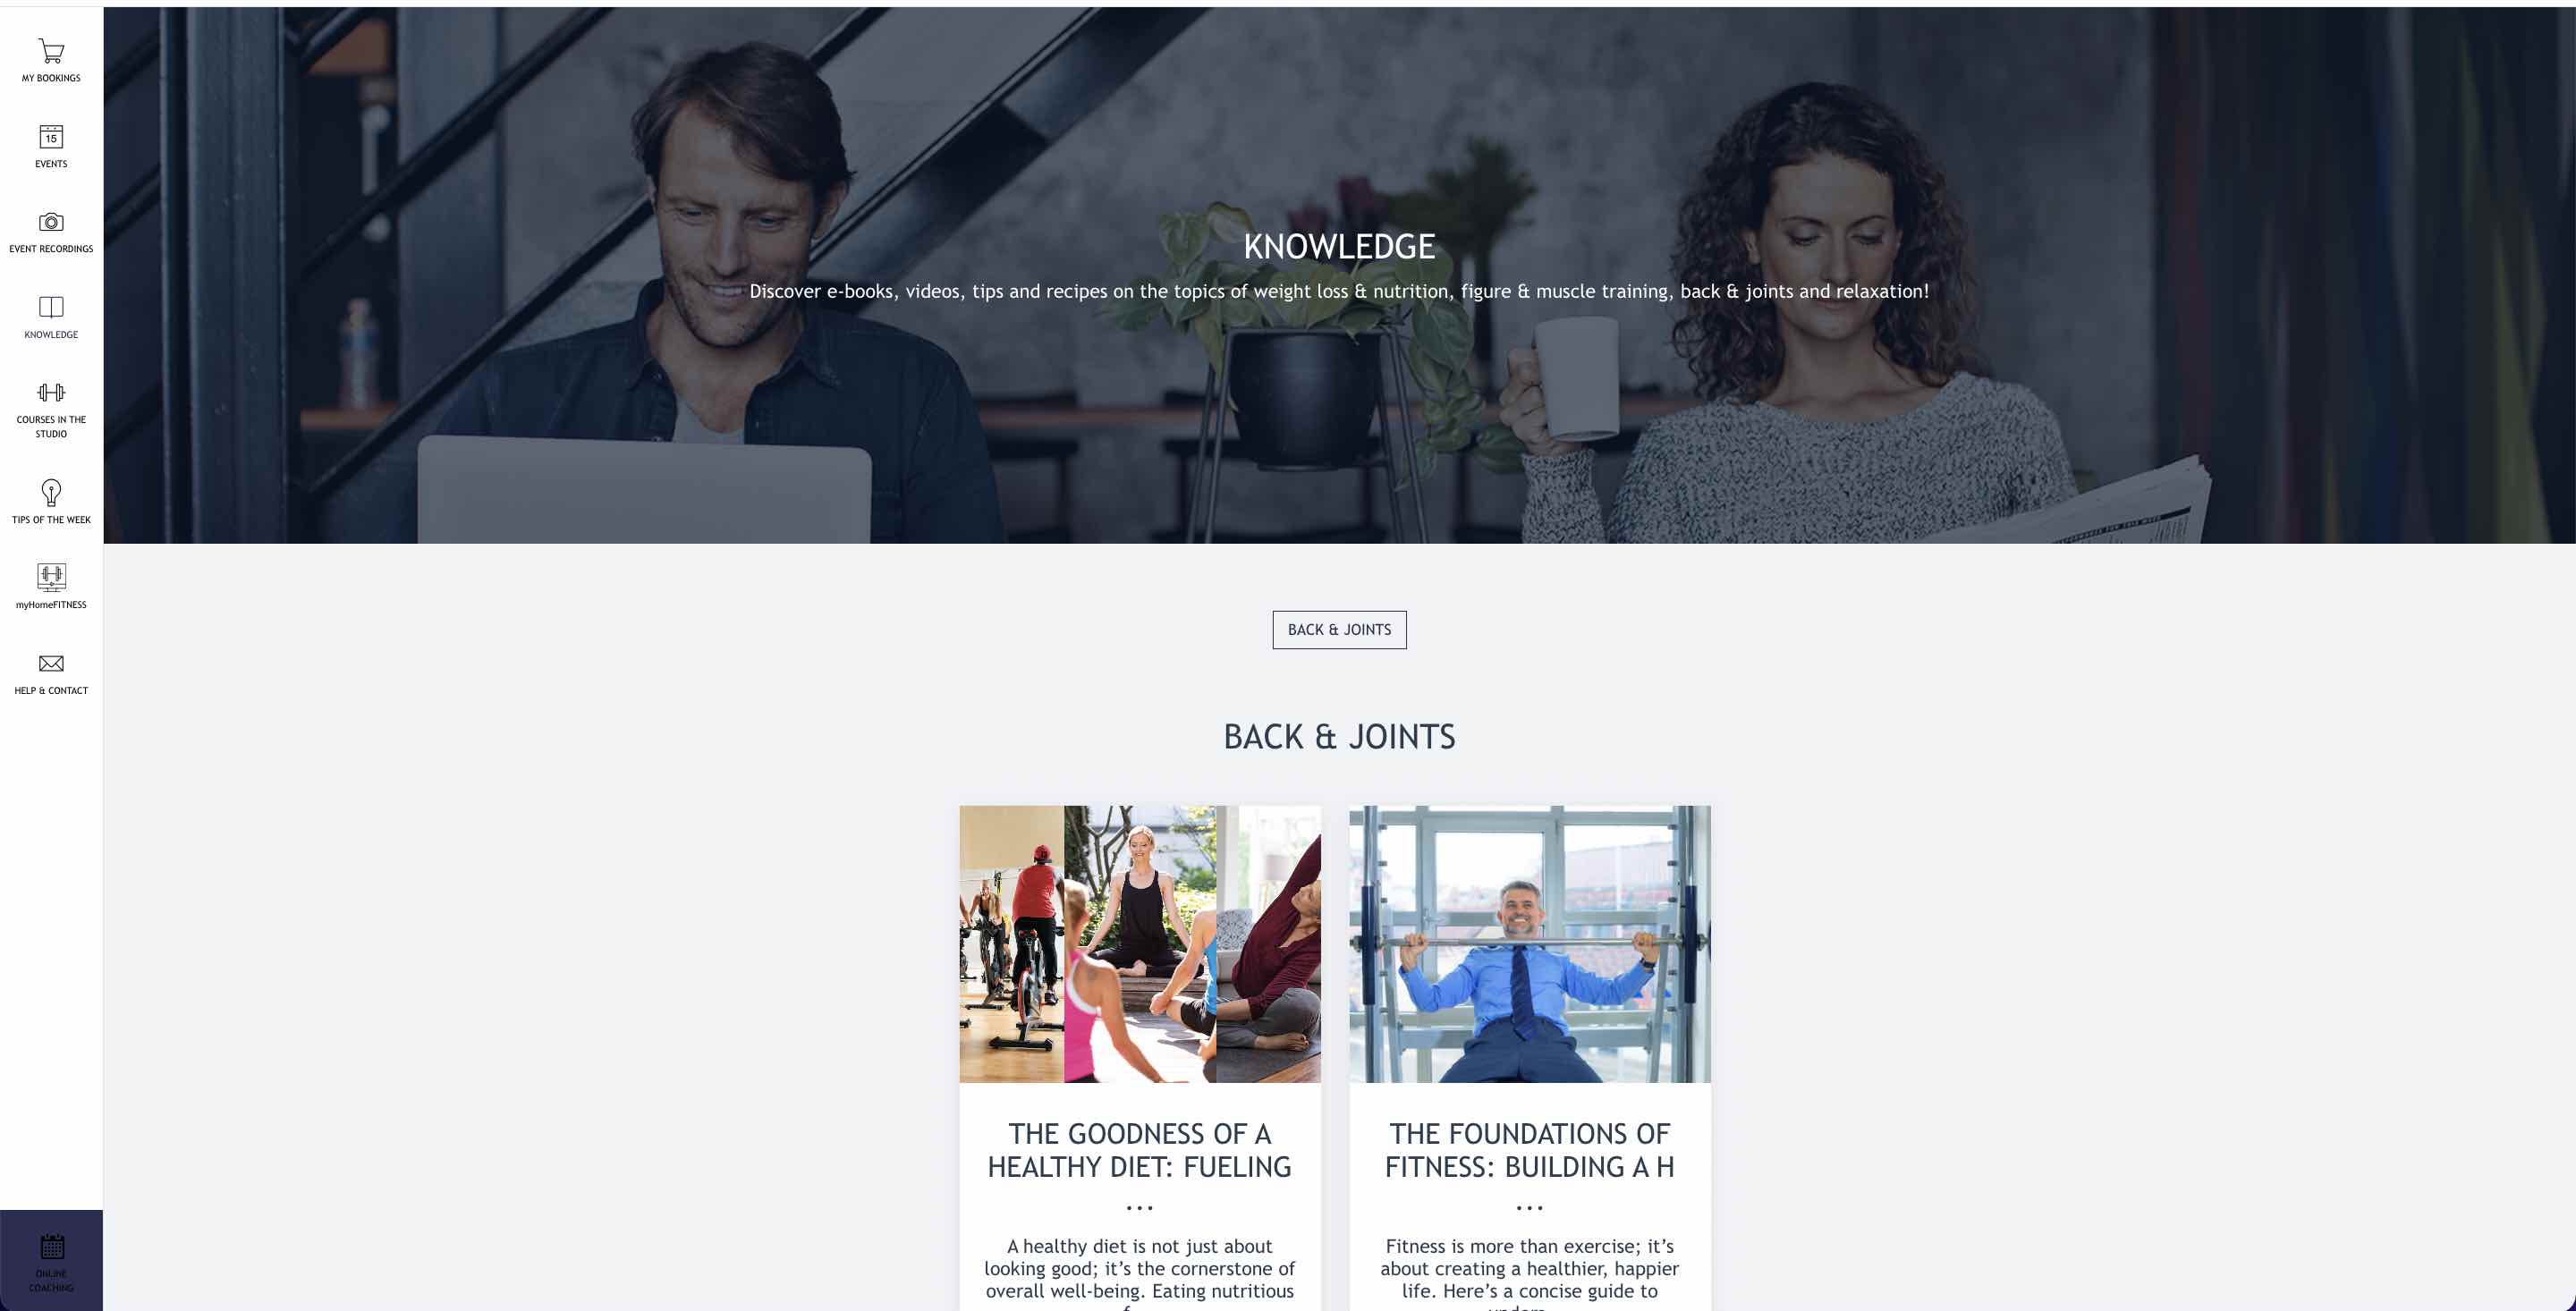
5. Knowledge
Members Area > Knowledge showcases articles and contents by the Center.
Members can access health and fitness related articles via this page.
Screenshot from the portal :
5.1 Setting up Knowledge page

Click on "Create" button, following modal will be opened :
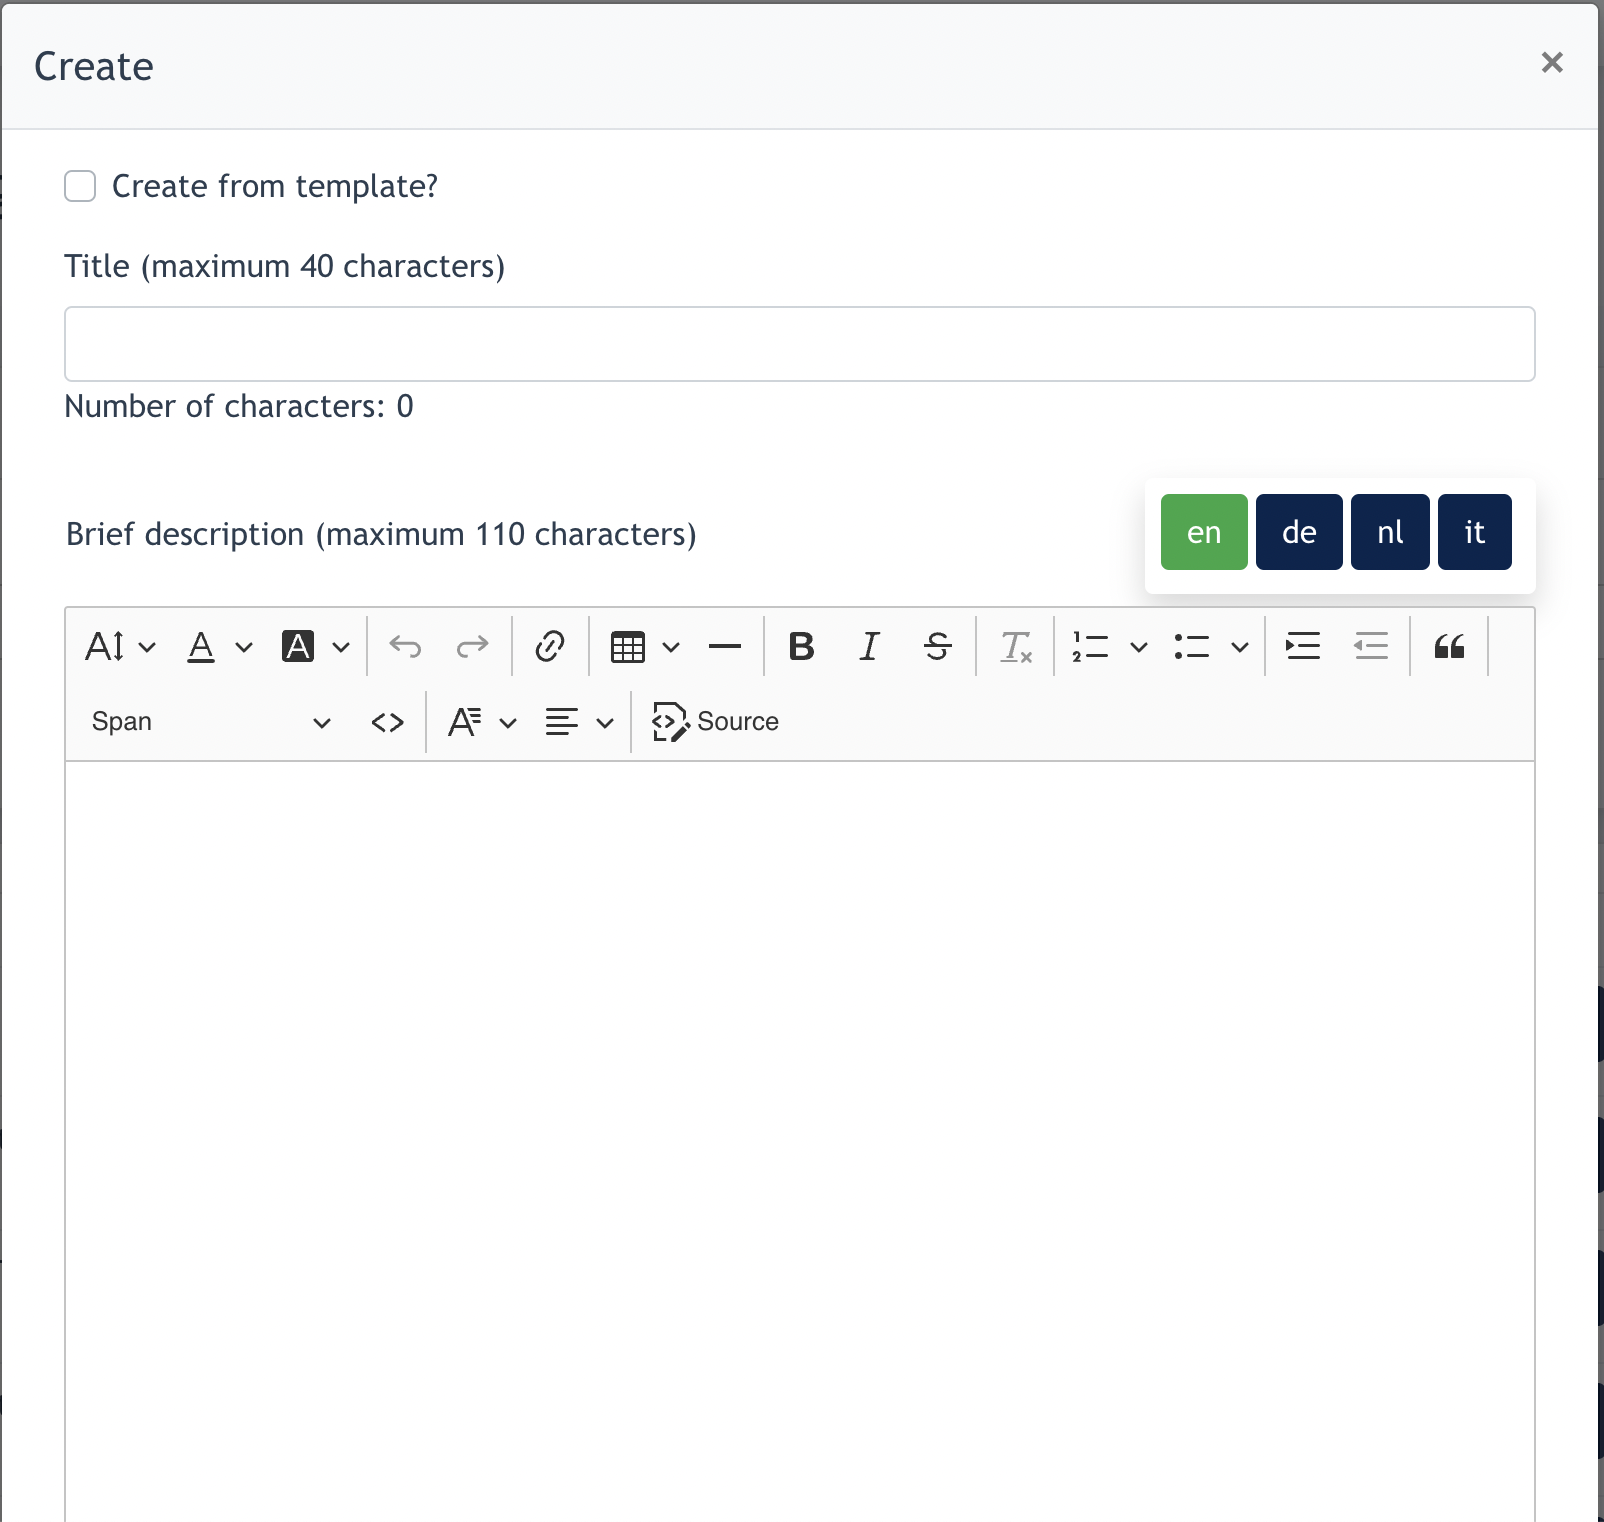
In the Form :
- Title : Knowledge article title
- Description: Short description about the content
- Center Groups : To which center this knowledge template can be used
- Category : Assign a category for this knowledge article. Only one category for one content.
- Status : Active / InActive
- Image : The preview image of this knowledge article
- Content (Edit) : This is where you created the content by using the empty editor.
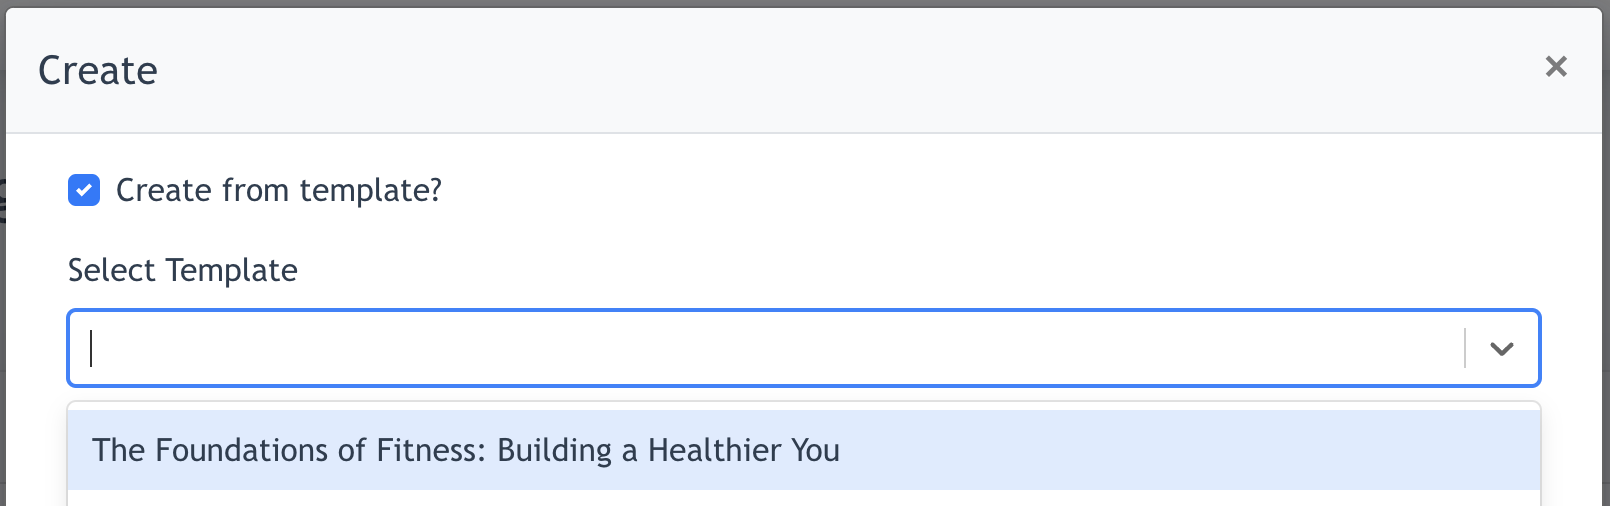
Alternatively, Admin may also tick the checkbox "Create from template" to select article prepared using Content Service through Ark-M platform.
Example screenshot:
Once all the content are filled in and click "Save", this content will be displayed on the Members Area > Knowledge page
6. Tips of the Week
Tips of the week or TOTW is one of the Content Service features in Member Area. Client role prepares 52 tips via Ark-M > Content Service > Member Area > Tips of the Week for Centers under this Client.
Center that subscribe to Member Area will be able to import these tips to their Member Area portals, making these content available for online Members.
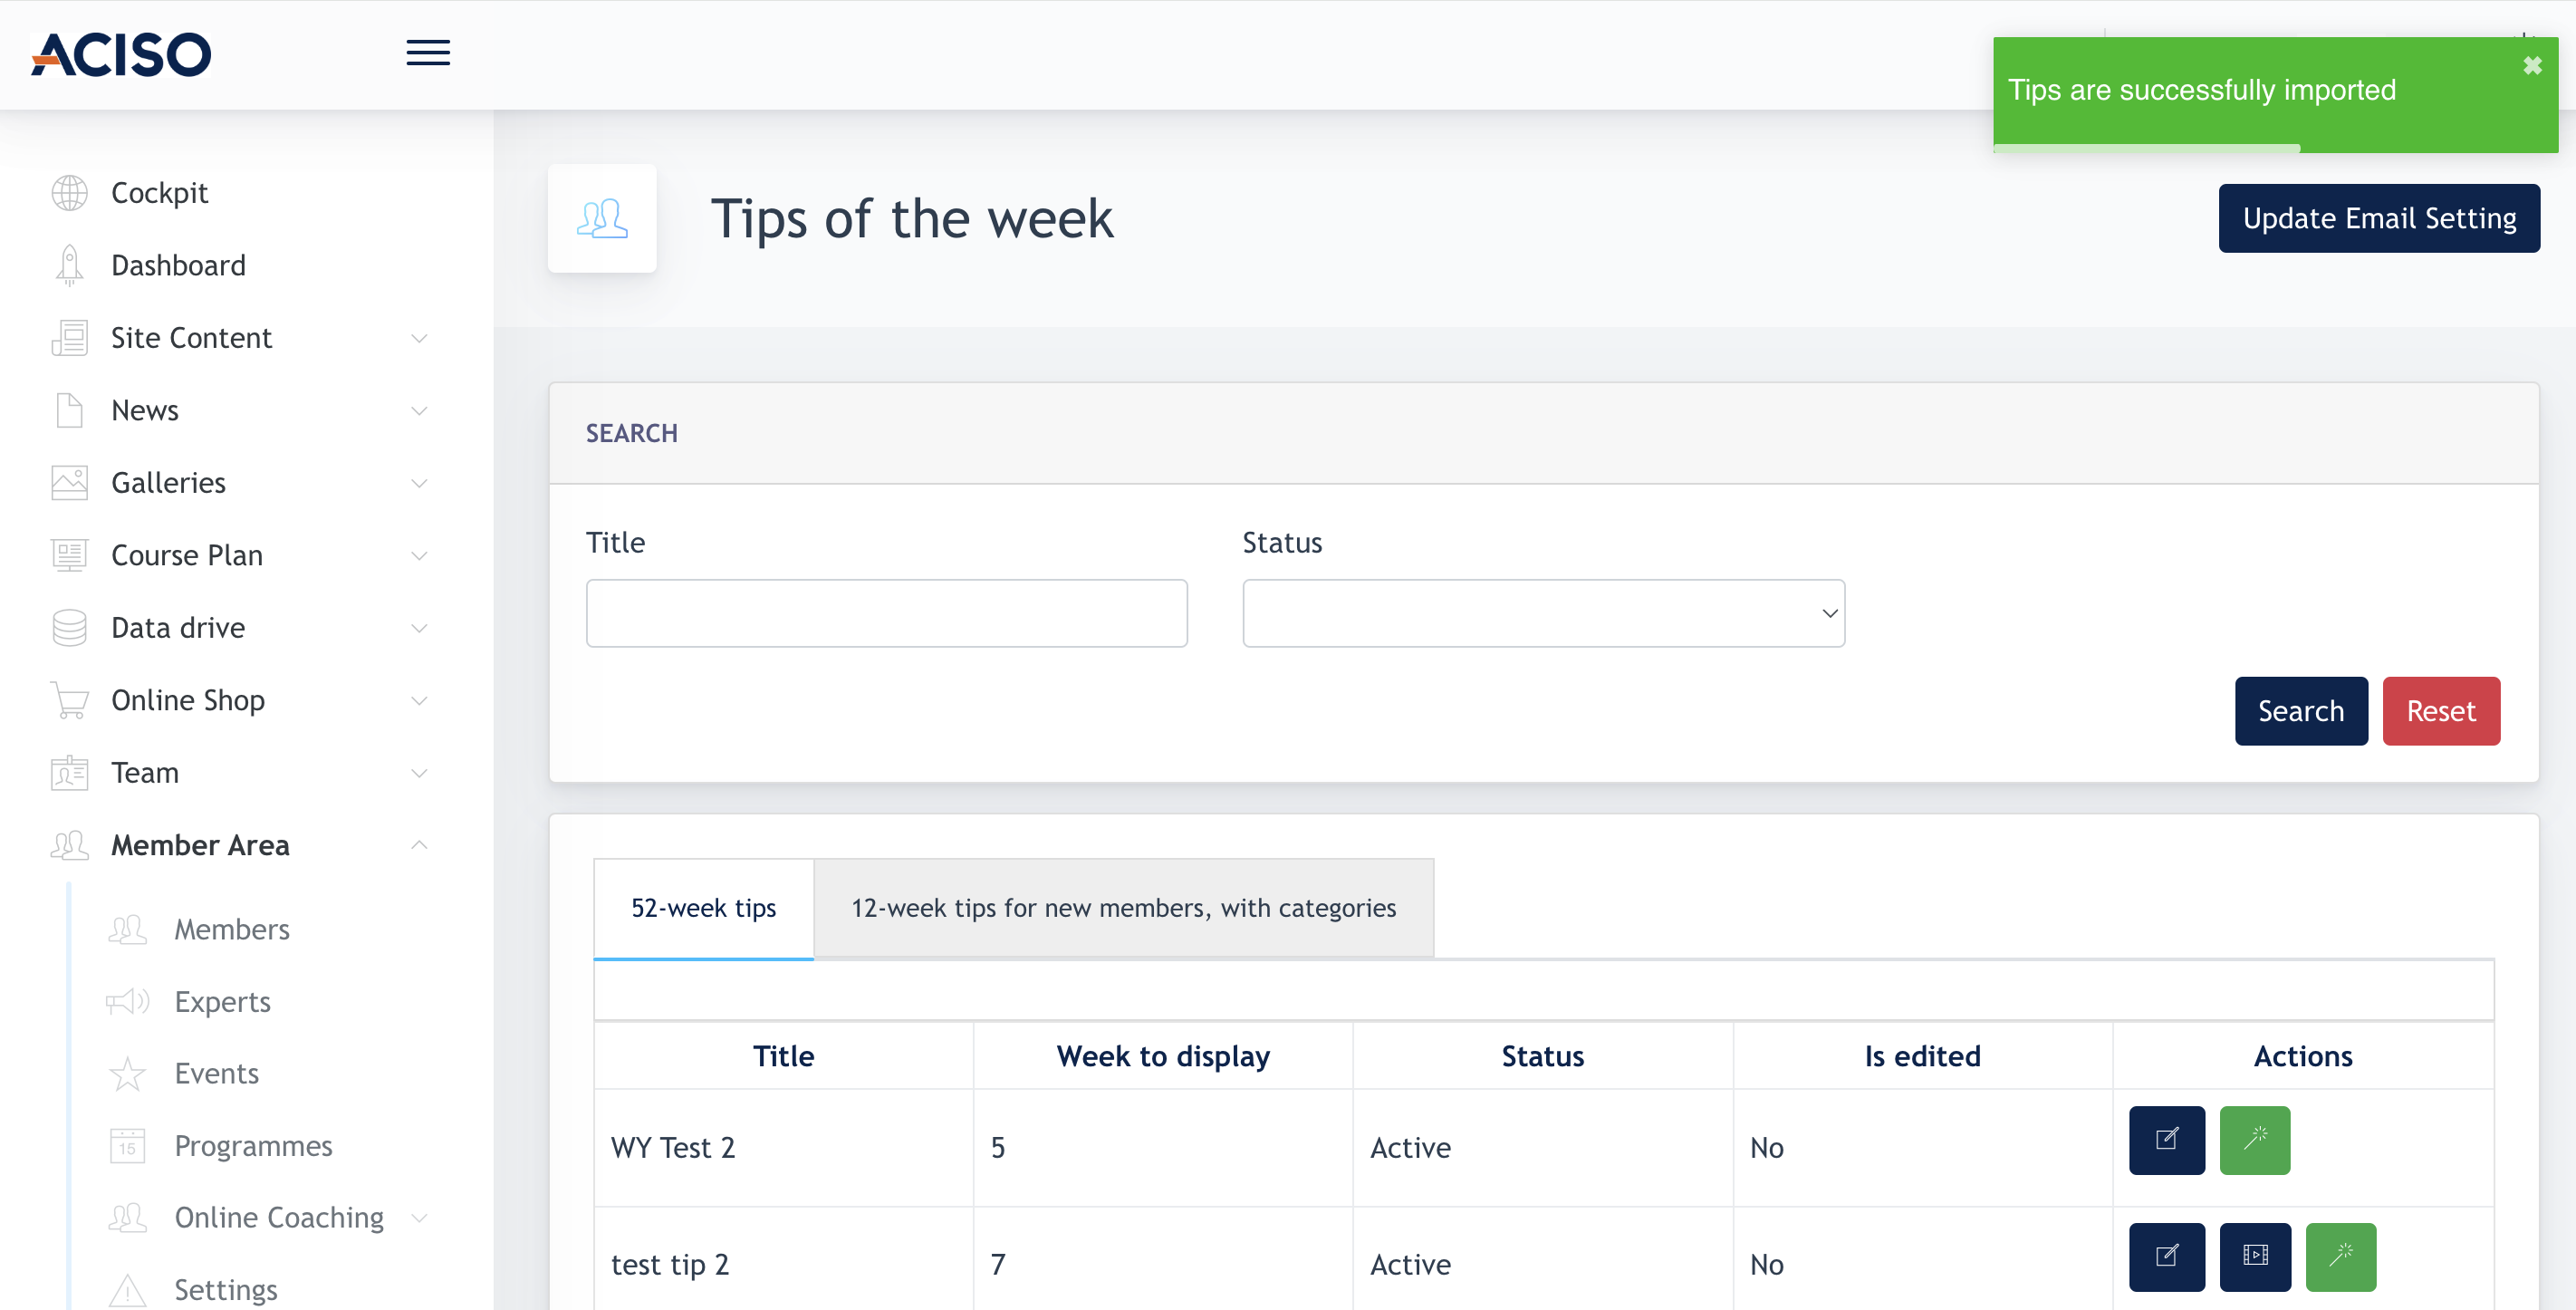
6.1 Import Tips
When Admin first access the Tips of the Week page on the Admin Panel, the listing is empty.
Admin needs to click on [ Import Default Tips ] button to import all the content from the Ark-M.
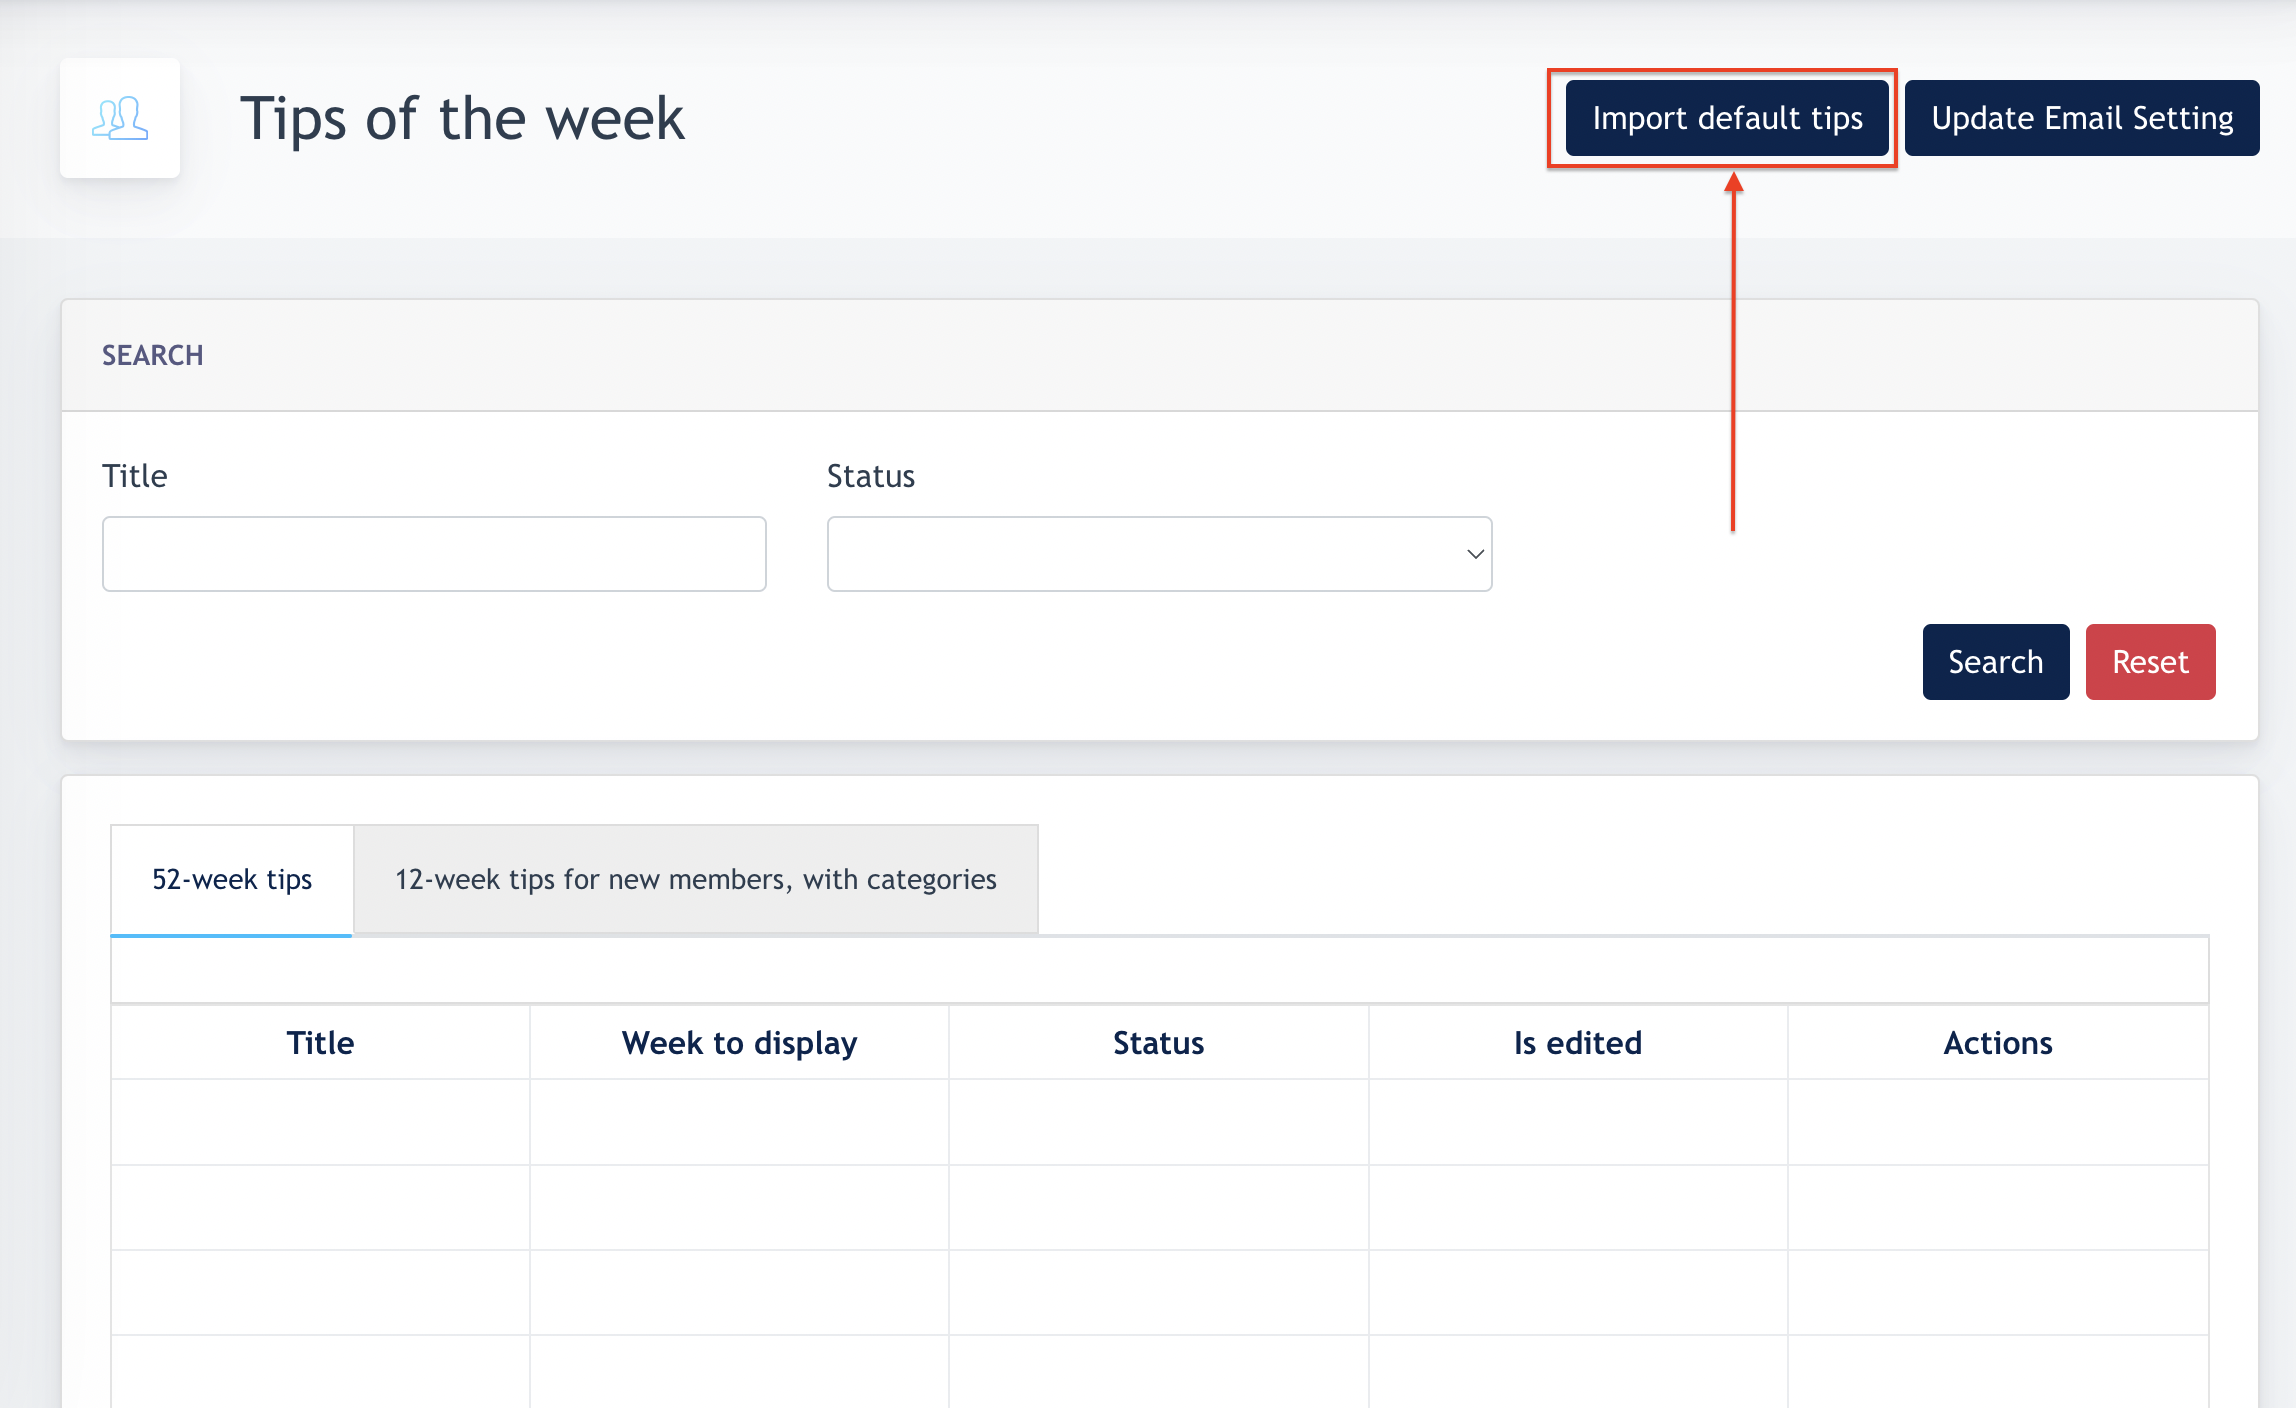
Example shown below :
2 types of [ Tips of the Week ] :
- 52-week tips : There are one tip each calendar week. One year has 52 weeks thus there are 52 tips created.
- 12-week tips for new members :
- These are only available for new members in the following scenario :
-
When a new user login to Member Area, he/she will see this message on a pop up modal :
"Are you new to {center name} (less than 4 weeks’ member)?"
-
If [ Yes ] is selected, this member will be given the option to choose which category of the wellness he/she is interested in.
- Upon selection, these new members will receive these tips tailored to his/her preference for a duration of 12th weeks. From 13th weeks onwards, he/she will receive the default 52-week tips, just like the old members.
6.2 Editing Tips Content
Every center is allowed to change the content of the tips.
Click [ Edit ] on the Tips :
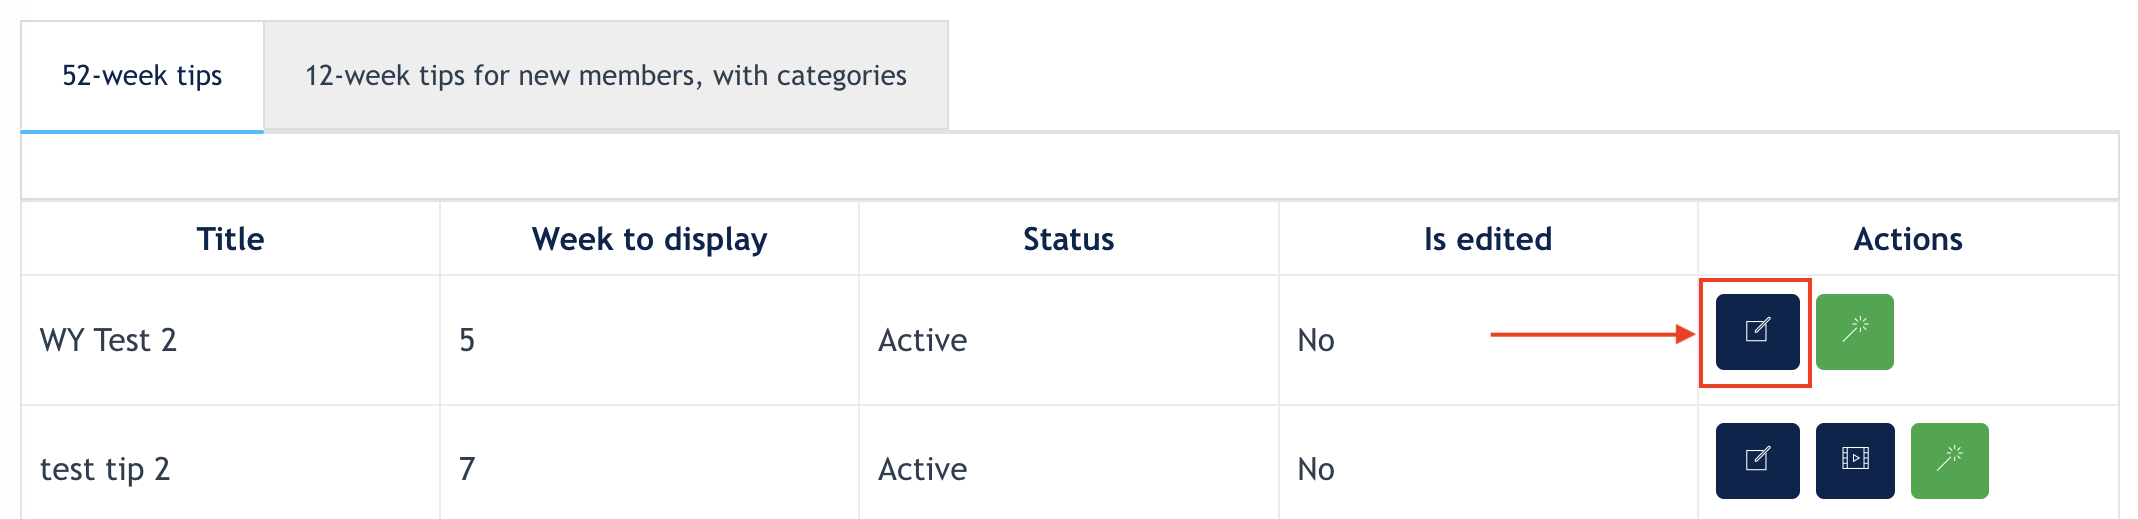
The following modal shows up :
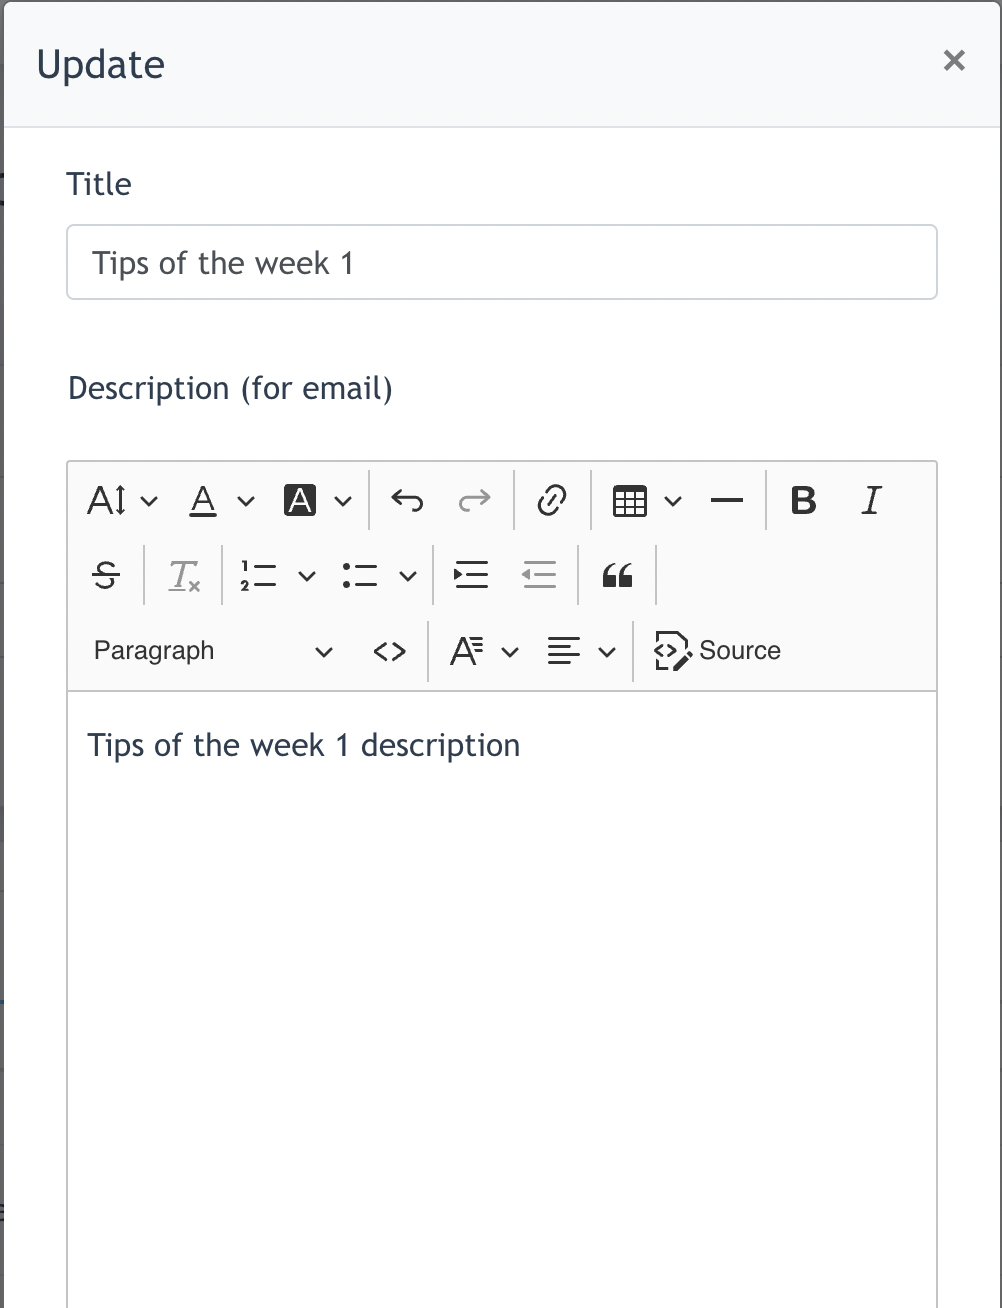
In the form :
- Title
- Description (for email)
- Categories**
- Content Type ( Video or text )
- Week to Display**
- Status
- Content / Upload Files / Video URL
- Submit
Remarks : Admin can update the content but those mark as ** is not changeable and have to follow default setting.
6.3 Update Email Settings

For every tips sent to the members, there is a default email template that came with it. However, Admin may further customized the email content to suit their own preference.
Click on "Update Email Setting" button, the following modal shows up :
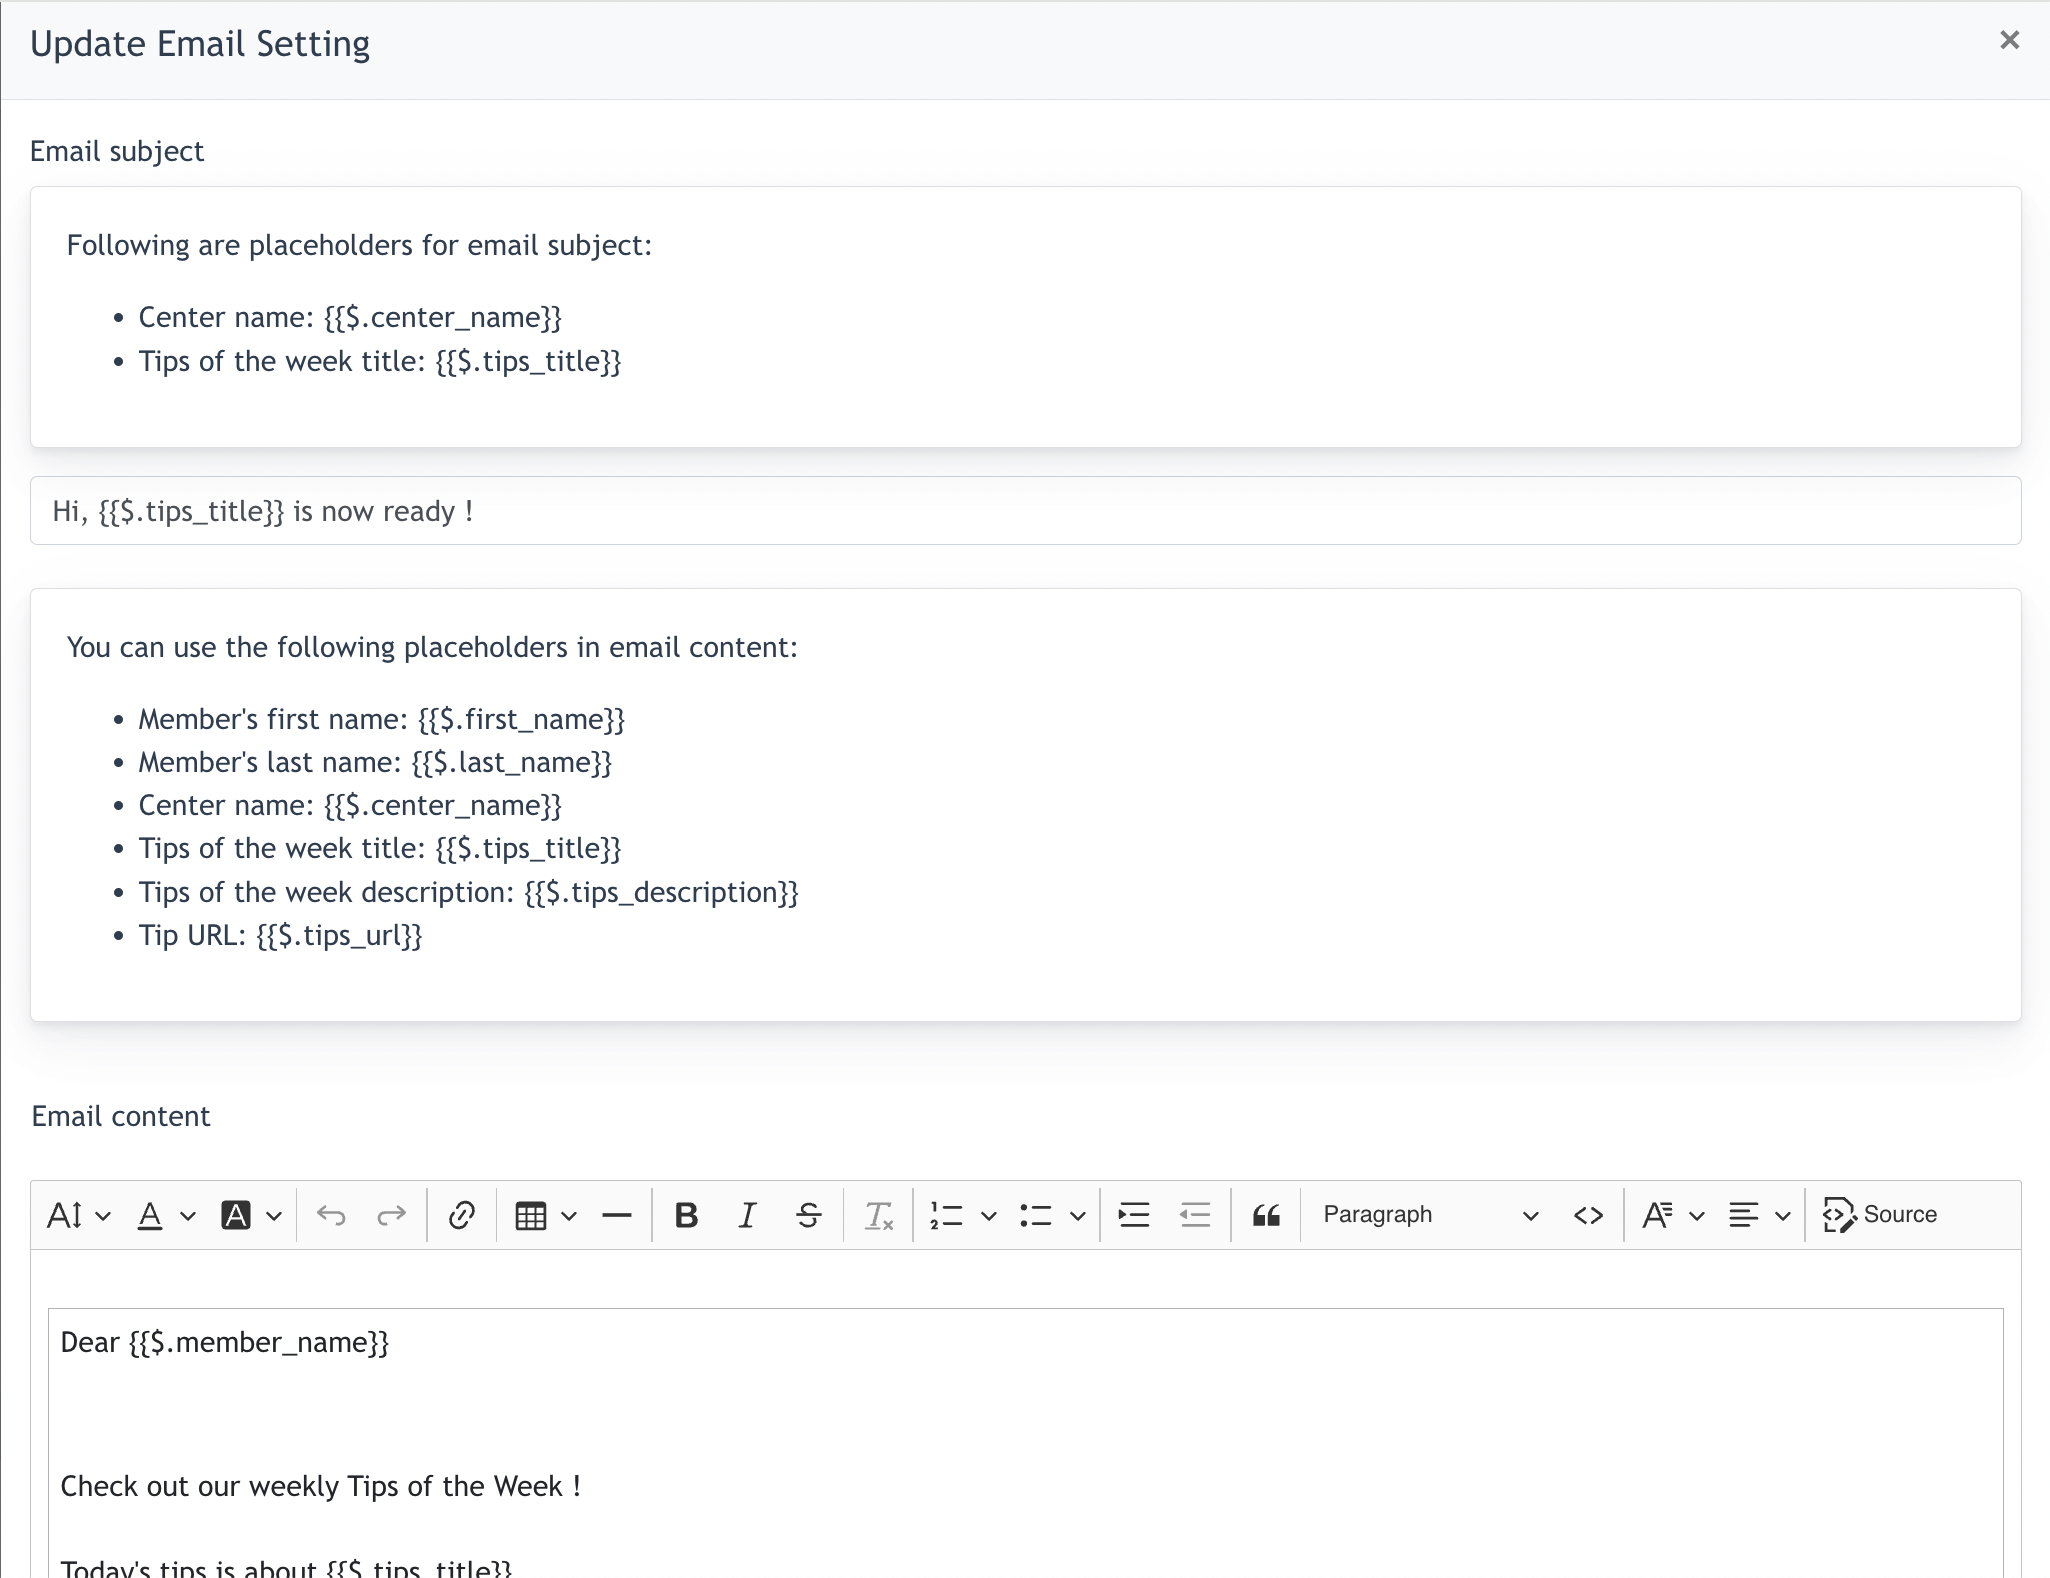
An example of the Tips of the Week email is :
Subject : Hi, {{$.tips_title}} is now ready !
Content :
Dear {{$.member_name}}
Check out our weekly Tips of the Week !
Today's tips is about {{$.tips_title}}
You will get to know more on {{$.tips_description}}Click here : {{$.tips_url}}
Regards,
Your {{$.center_name}}
6.4 Other features
On the listing, there are 2 buttons under the [ Action ] column :
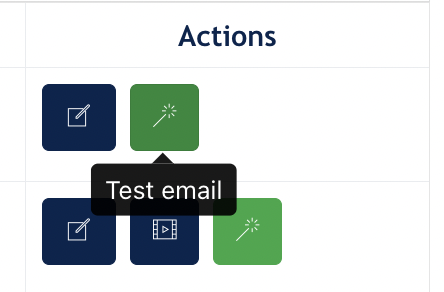
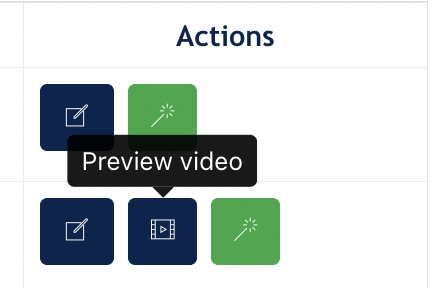
- Preview Video : If there are video tips coming from Content Service, this button allows Admin to click and directly preview the video.
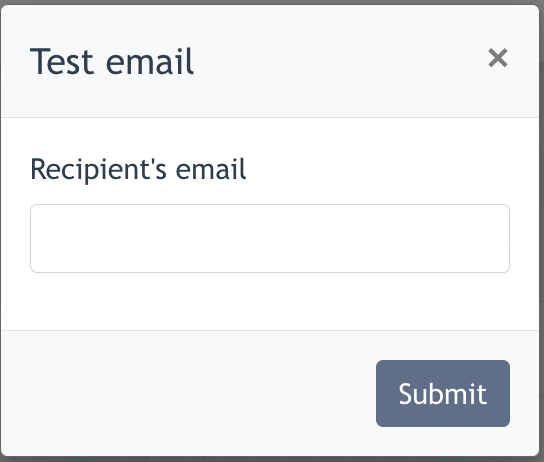
- Test email : Click on this button and the following will shows up :

- Purpose of Test Email : Admin can resend the same tips to any person who claims they have not received the tips, by filling in the email address and clicks "Submit"
7. Reporting
Under Member Area > Reporting, Admin may check the Sales generated from Programs and review Statistic.
7.1 Sales Tab
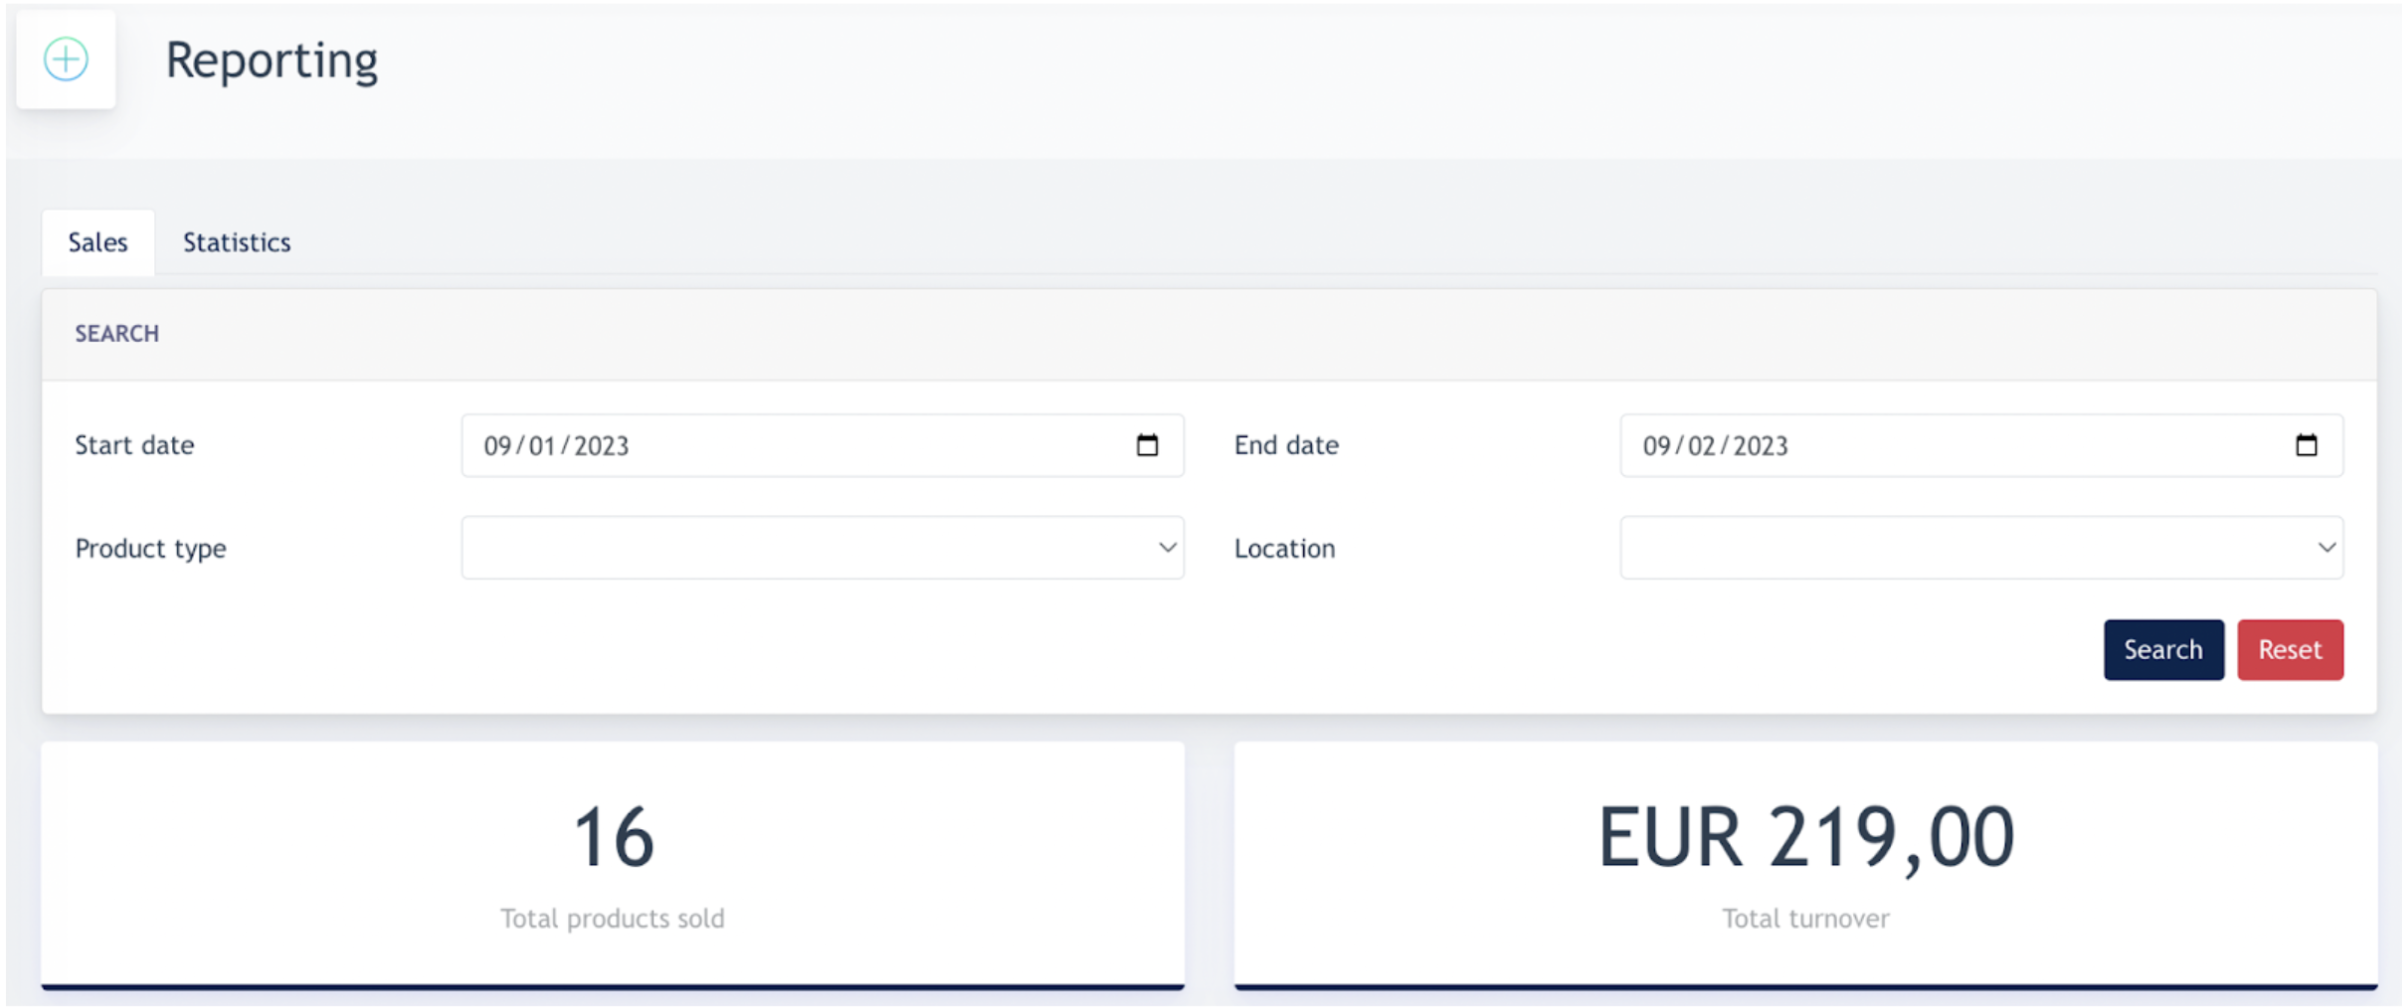
Under the [ Sales ] tab, Admin may select a duration, product type, and center location to perform a search.
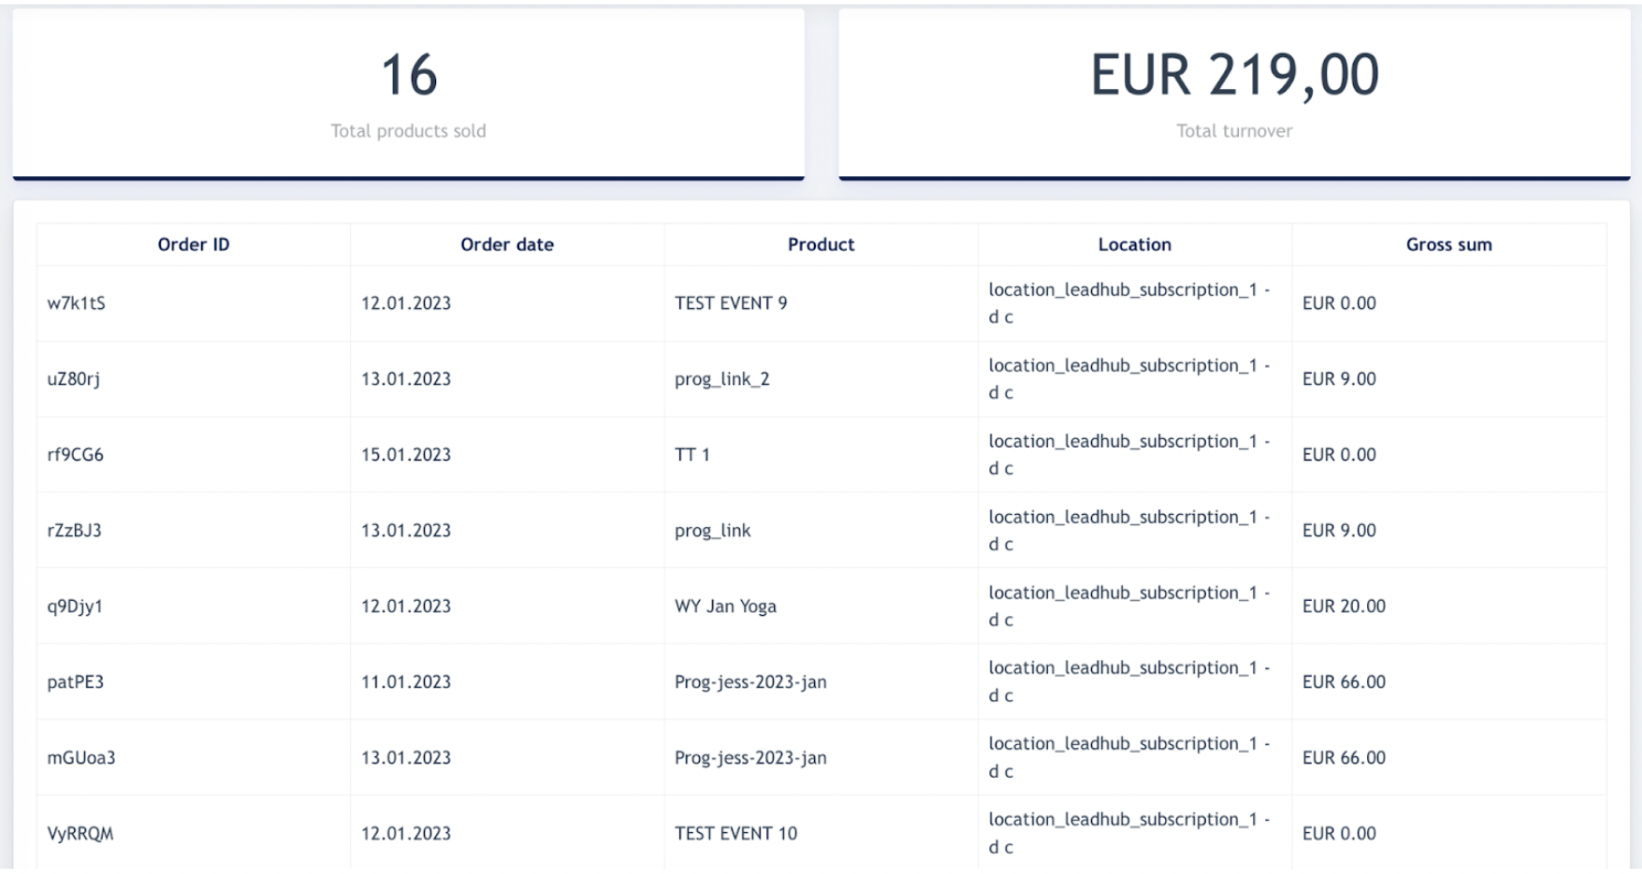
The result will be displayed on the listing below :
7.2 Statistic Tab
Admin may review numbers of logins and clicks on the Members Area portal.
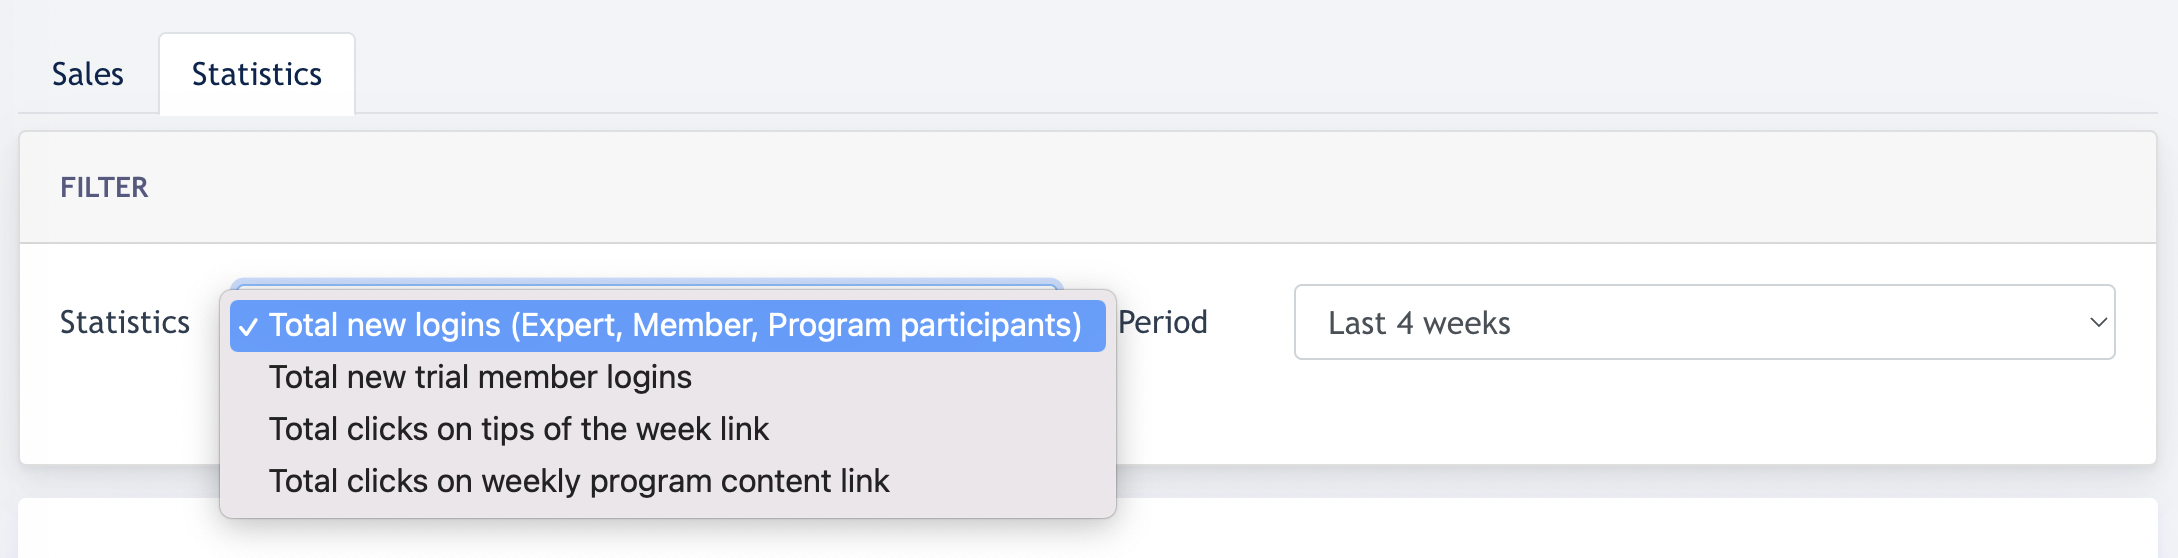
- Total new logins (Expert, Member, Program participants) - Total number of first time login to the Member Area (via memberarea or egym) (count only the first-time-login)
- Total new trial member logins - Total number of clicks on the magic link in the invitation email sent by a member (count only the first-time-login)
- Total clicks on TOTW link - Total number of clicks on the magic link sent under the weekly TOTW email (count only the first click & not the returning clicks)
- Total clicks on weekly program content link - Total number of clicks on the magic link sent under the weekly program content email (count only the first click & not the returning clicks)
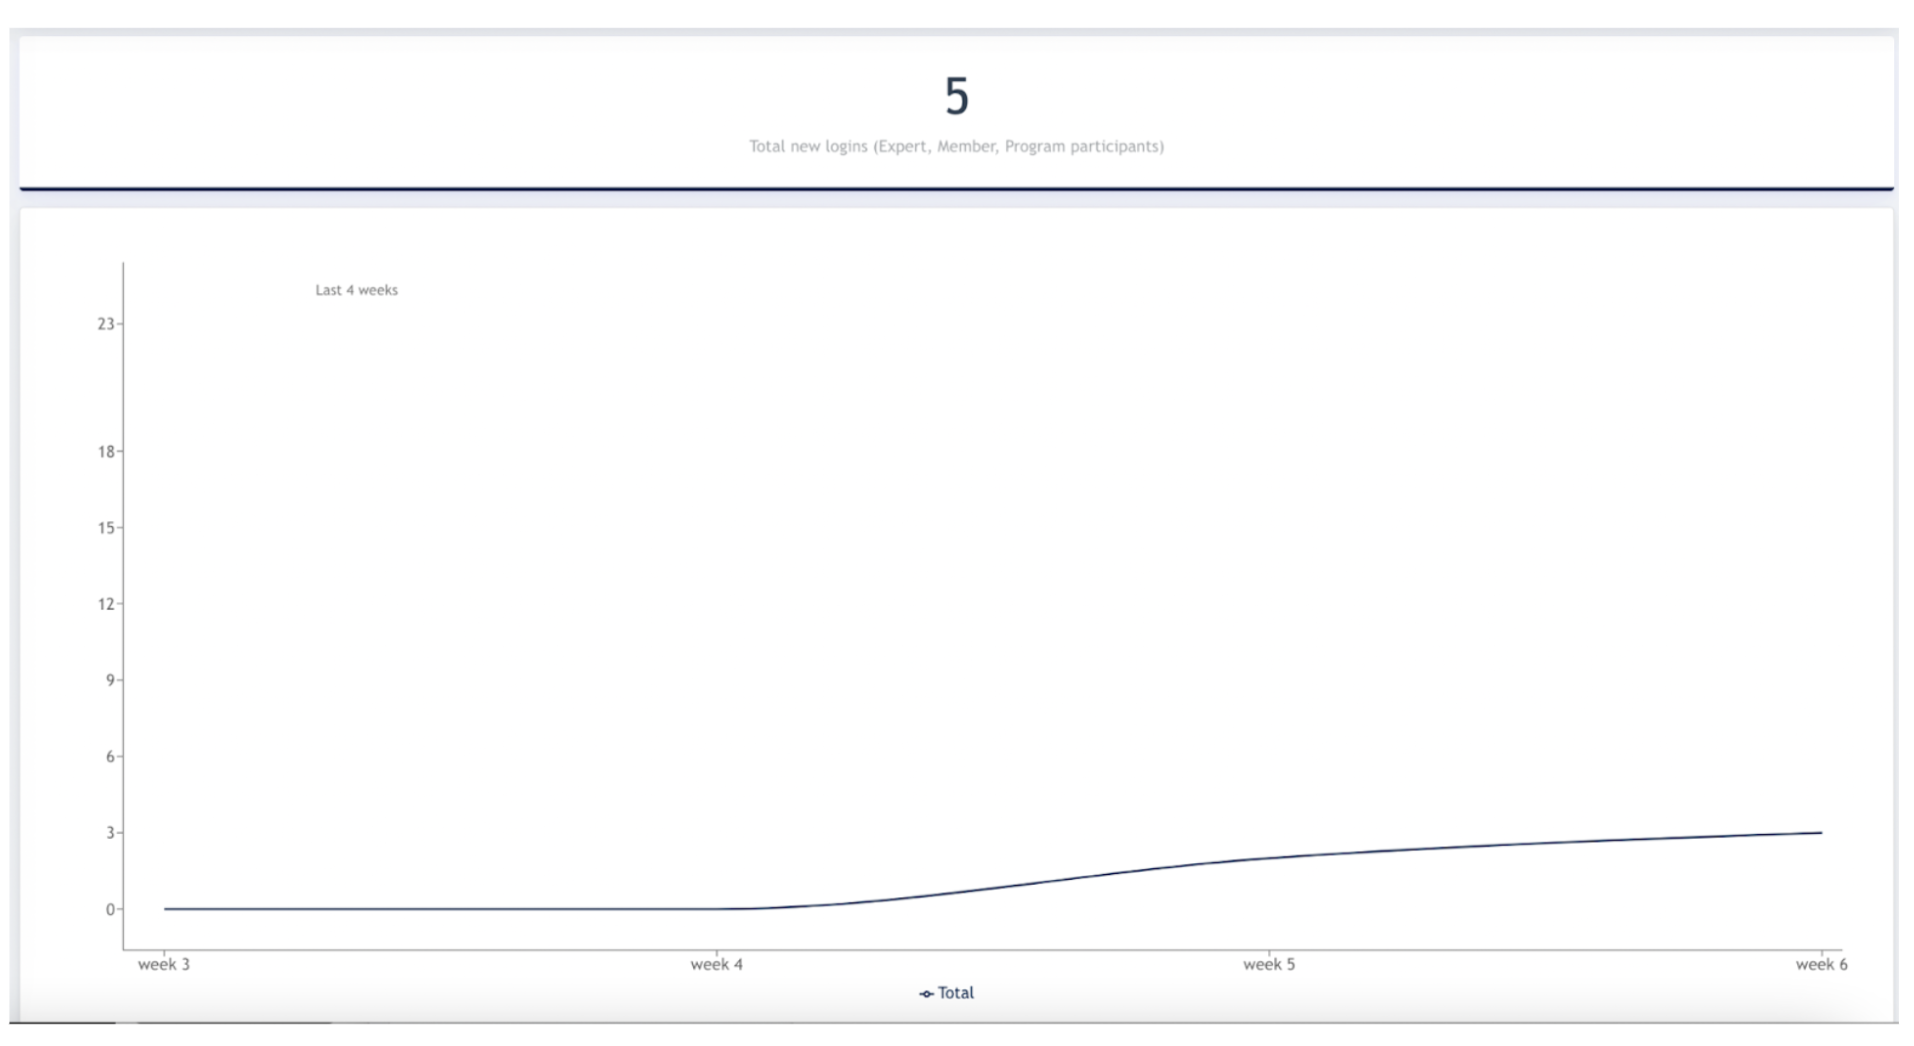
Admin may select which Statistic and period to perform a search.
After configuring the above info, the statistics will be generated. Below is an example of the graph :
Conclusion : Above are all the main features under Members Areas Portal.
- the end -