Ark-M : Digital Order Form ( for Admin )
Overview
Digital Order Form (DOF) allow Admin to create a comprehensive order form in digital format.
Admin creates DOF via the Ark-Management under Content > Digital Order Form > Form Builder.
1.0 Create a Digital Order Form
Only 'Art Director' role is allowed to access Form Builder to build a Digital Order Form.
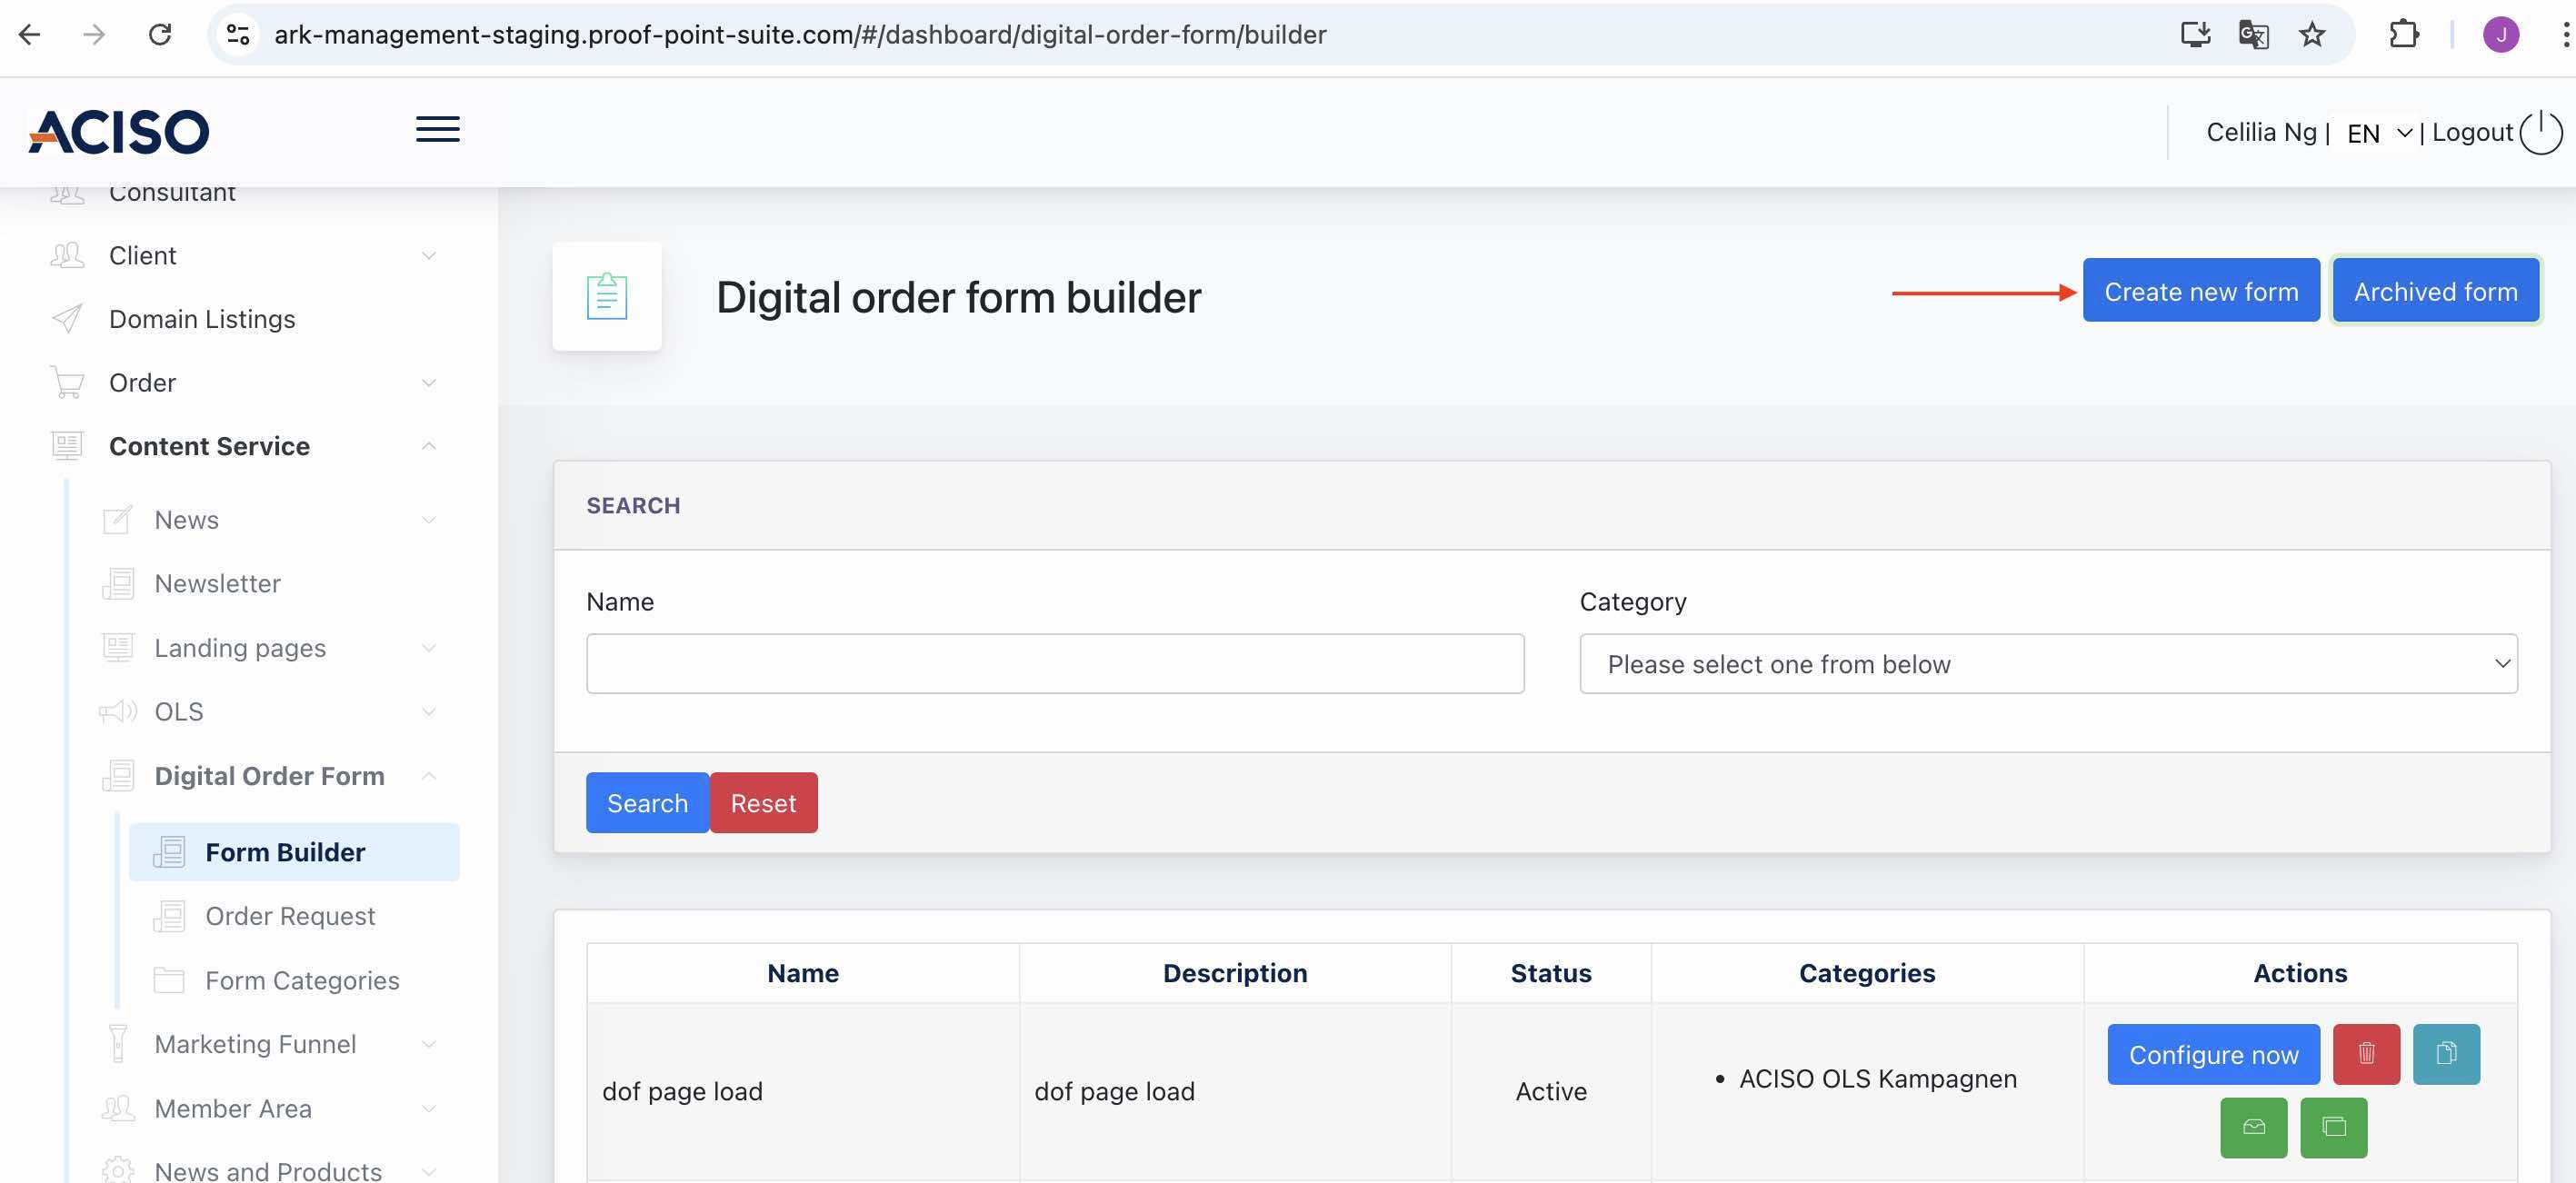
Click on [ Create New Form ] Button, following modal will appear.
Steps to create a DOF :
Step 1 :
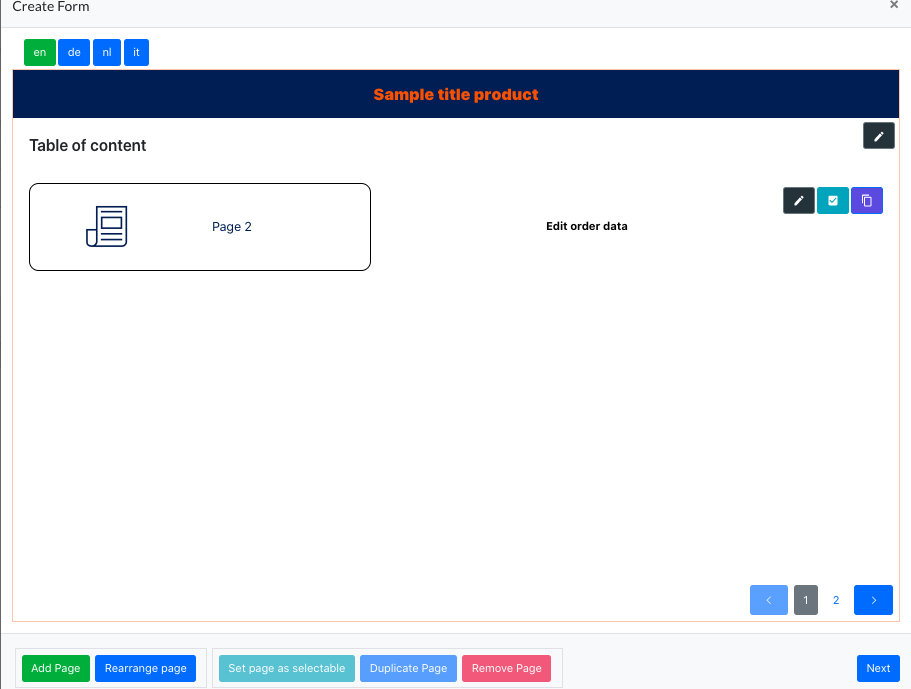
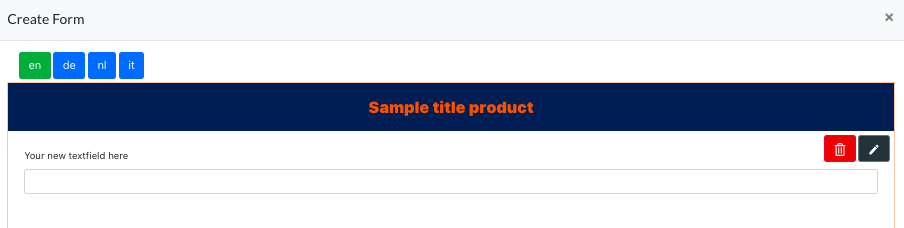
Select your language by clicking on the multi-lingual tab on the top left of the form. The form will be displayed in the language it is created.
Remarks: The default page will be the Table of Content configuration (shown in screenshot)
Step 2:
You can do configuration via the tabs at the bottom :
- Add page - add a form/cover page to the DOF
- Rearrange page - when click, you can move the page around to arrange your pagination
- Set page as Selectable - config a form page to be ‘selectable’ by the user based on their preference ( will further elaborate in the following page )
- Duplicate Page - duplicate the same form in the DOF
- Remove Page - Remove the form page in the DOF
Step 3:
Sample Title Products - This is where the Form title located. Click on the title, and you will come to below modal, where further configuration is allowed, example : Changing the title, configure the fonts and form's background color, and etc.

Step 4:
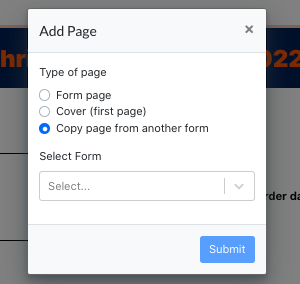
Creating Cover & Form pages - When you click on [ add page ], the following modals appear. Here, you may choose to add [ Form Page ], [ Cover page ] or simply [ Copy page from another form ].
All form and cover pages created will be displayed on the table of content like below.
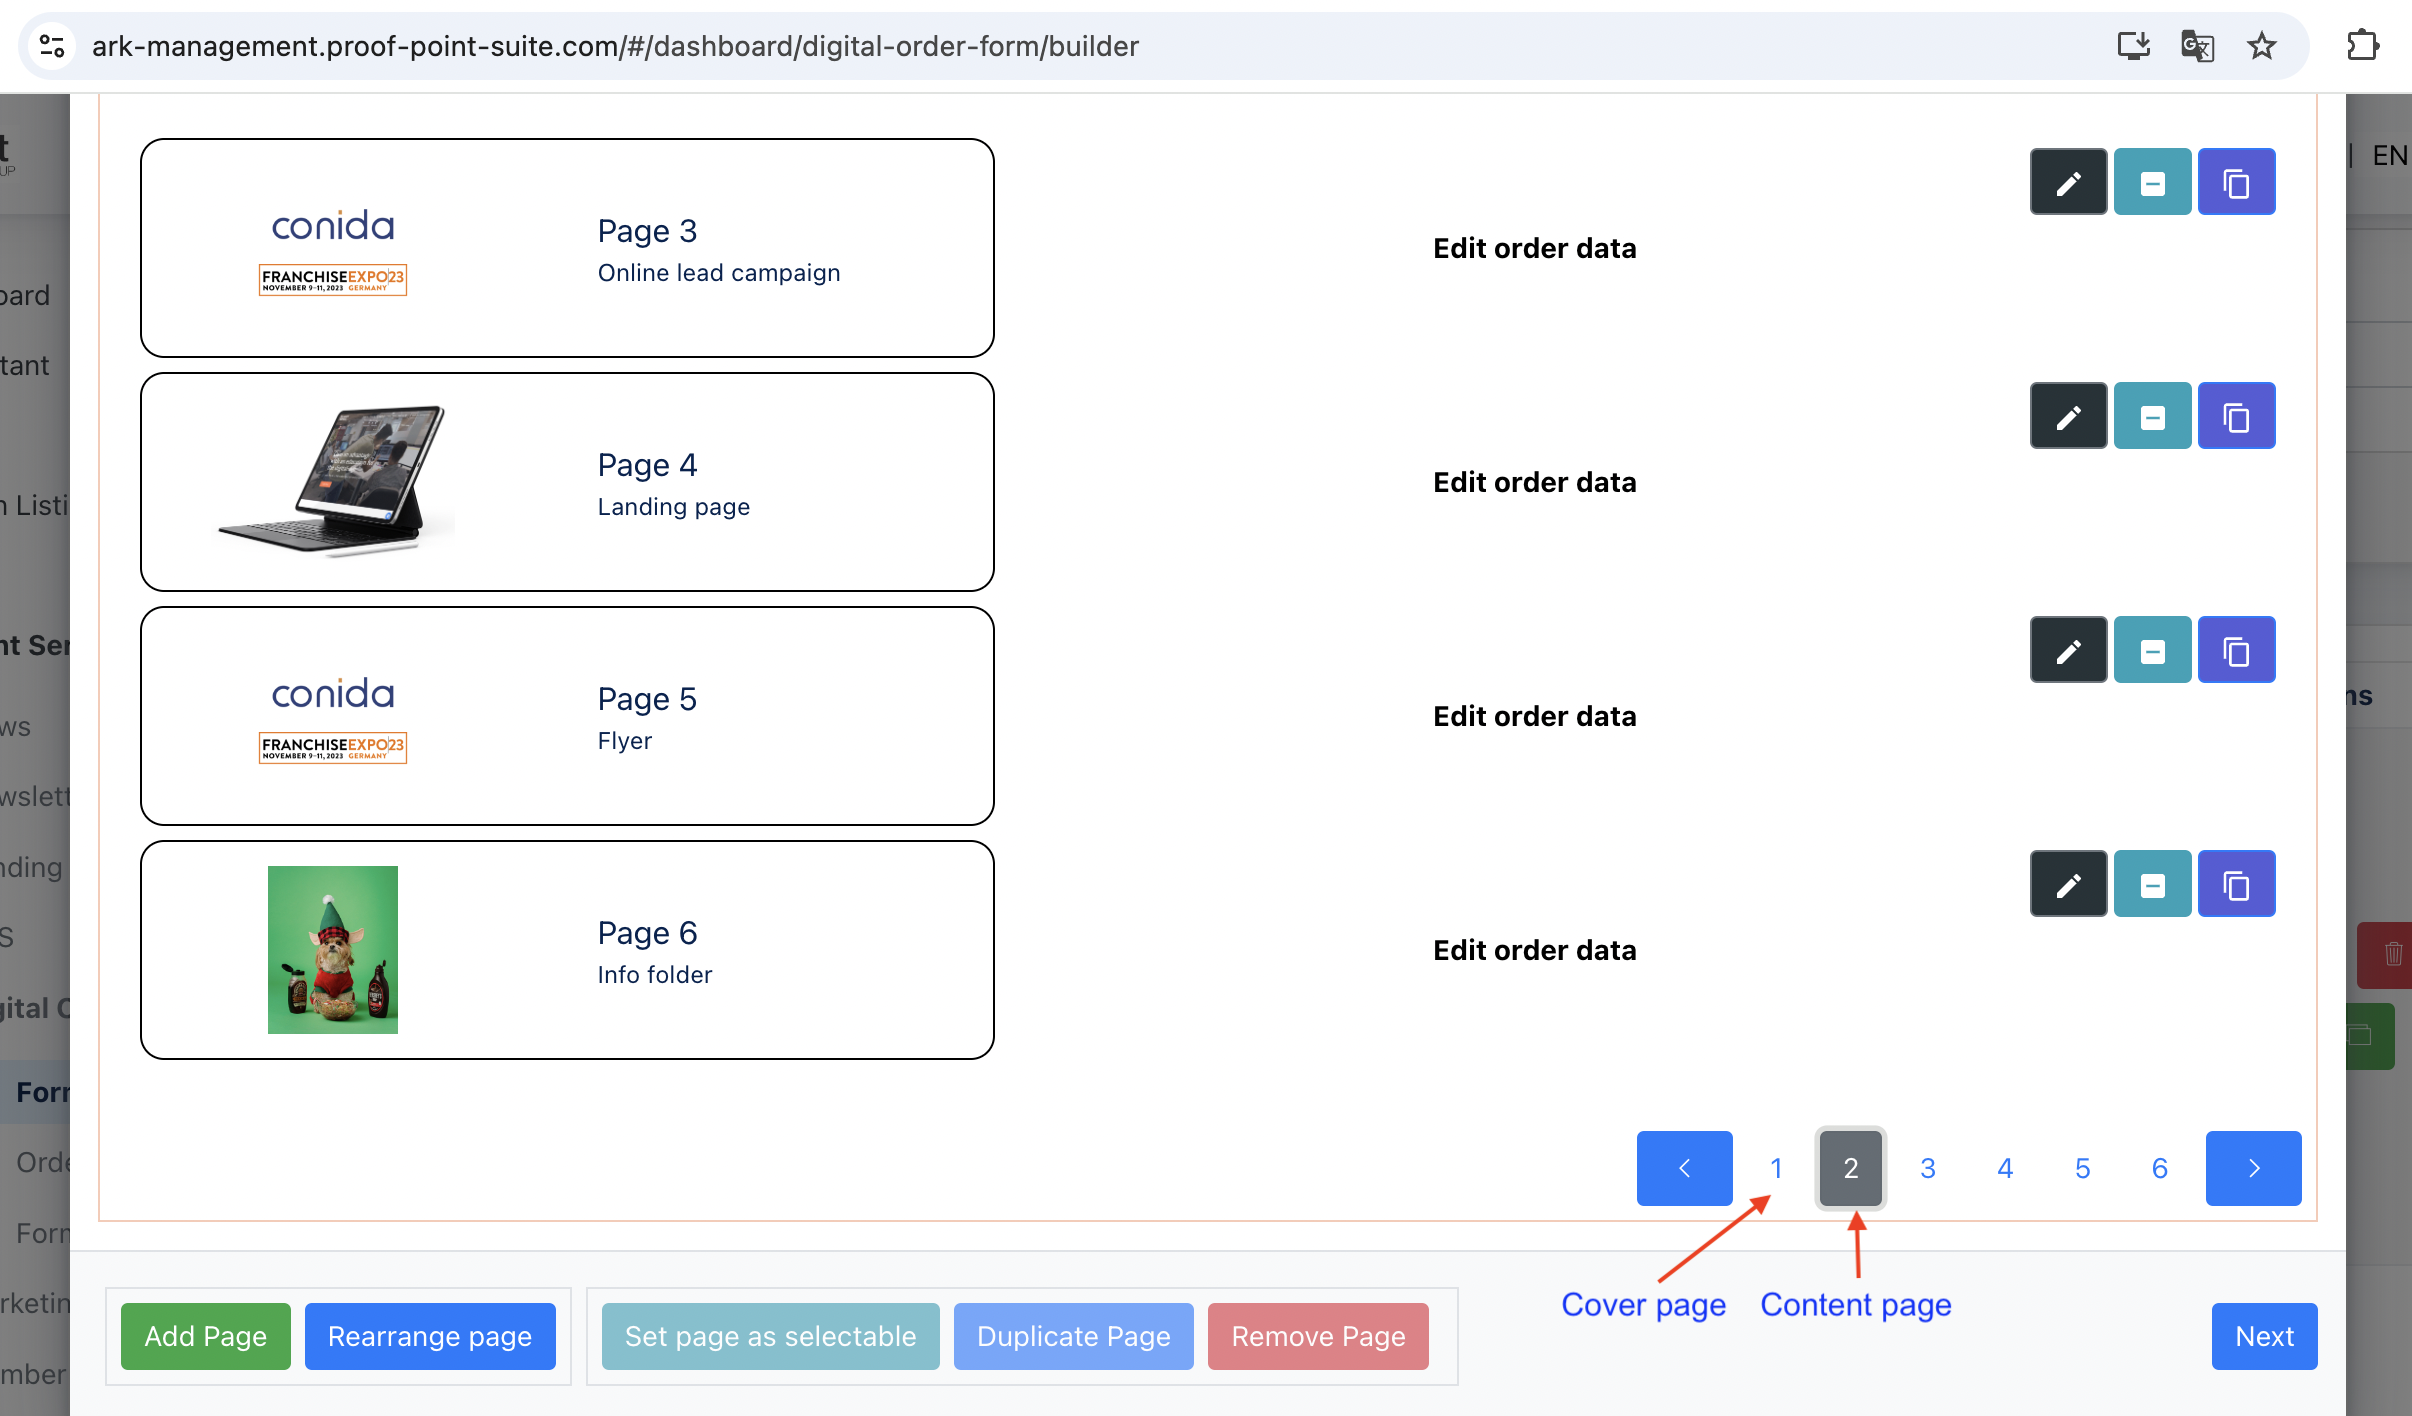
Remarks : When a cover page is created, it will always appear as PG 1. And the Table of Content will always be PG 2.
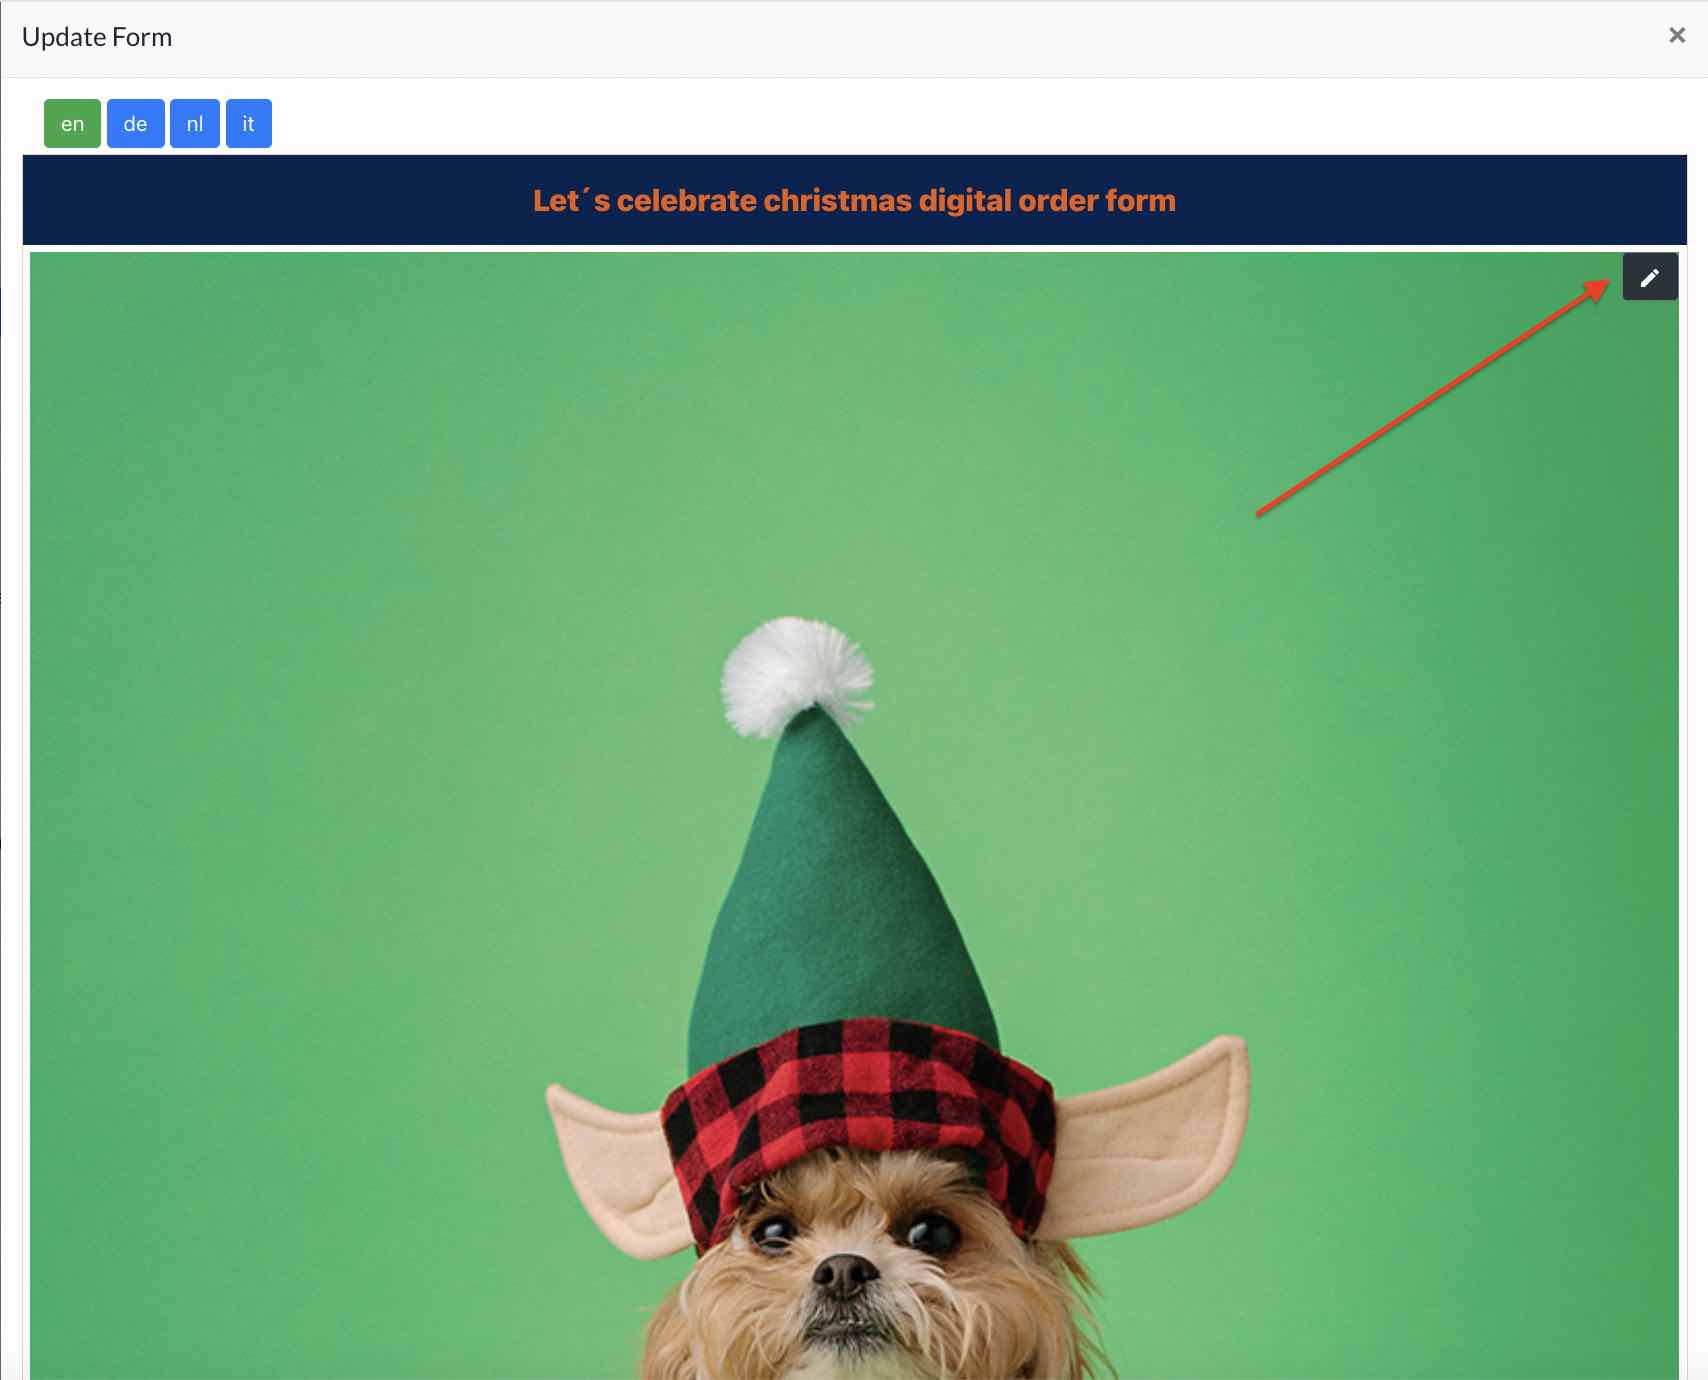
Users can edit each form page by clicking the [ pagination number ] or [ Edit Order Data] .
User can click on the [ pencil icon ] on the right, to give this page a name and upload a thumbnail picture for this page.
If you click on [Rearrange page], you enter into a mode where you can drag and drop the pagination to rearrange a new order for them. Once you’re done, just click on [Stop Rearranging]
Step 5:
Creating Cover Page : An edit icon on the right allows the user to upload a cover image for the DOF, and also other basic configuration of the cover page.
Step 6
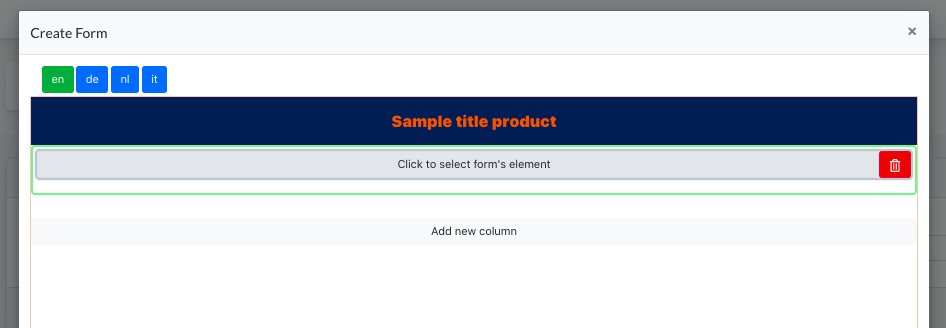
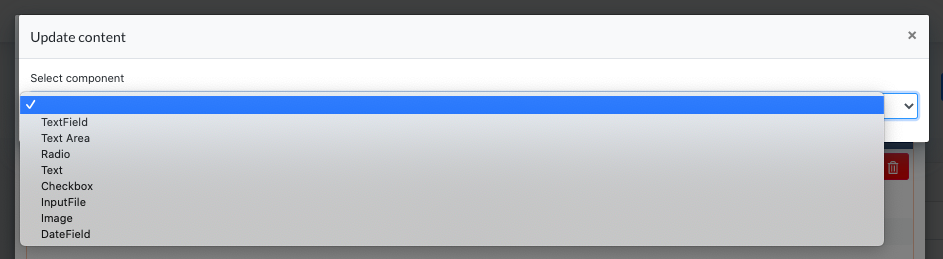
Creating Forms Elements : Every form page is made up of different components. Here, you [ Click to select form's element ] and select the components required to build your form.
Step 6:
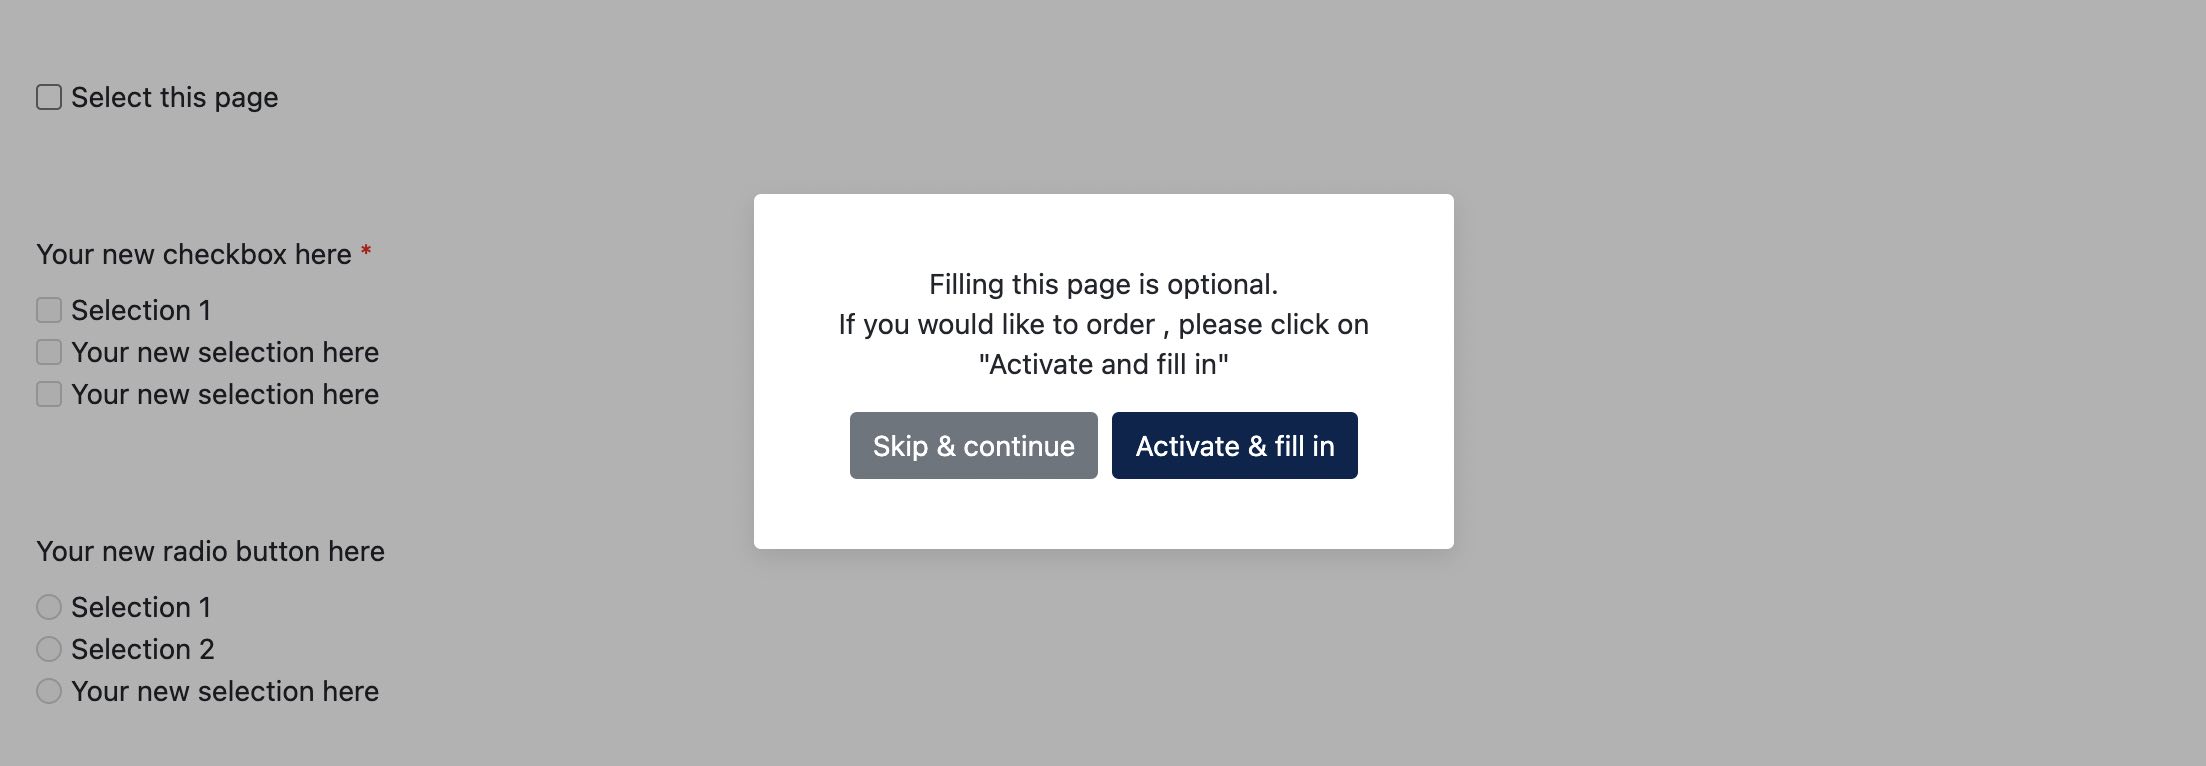
There is also an option to allow Admin configure the form page is optional for the user to fill in.
Go to the Content page, click on [ Set page as selectable ] :

On the Cockpit, the form page for user will look like this :
2.0 Form Listing
Under the DOF listing page, you will see a few buttons below 'Actions' column, they each have a specific function :
- Configure now - edit form
- Delete button - delete form
- Copy button - Creates a copy of this form
- View submitted data button - view the form submitted by different Centers
- Copy URL - allow Admin to copy and share the unique URL of this form

3. Form Components
Our form builders consists of different components. Hereby explain further on each components, its purpose and usage.
3.1 Text Field
Text field component allows the user fill in text data. Most of the time, this is used to create Name field, email field, mobile field…etc.
Click on the Edit button for further configuration:
In form:
- Column width - To set the column width of this component.
- Padding - Able to set padding for Top, Bottom, Left, Right of the text field
- Colour - To configure the background colour for this column
- Field label - To set a label for this field, for eg: Name : ________________
- Checkboxes - The 3 checkboxes here have a special function.
- Is a required field
- Admin can tick this checkbox if this is mandatory field for the users to fill in. Users won't be able to submit form without filling in this field.
- Is pre-filled
- This feature allows admin to select either [ Center Name ] or [ Consultant Name ] to be pre-filled in this text field for users. So when users (eg: Center Admin role) fill in this DOF, they will see their Center Name has been already pre-filled on this text field.
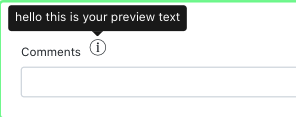
- Show Quick info
- This feature allows further explanation on the text field (example screenshot as below)
- Is a required field
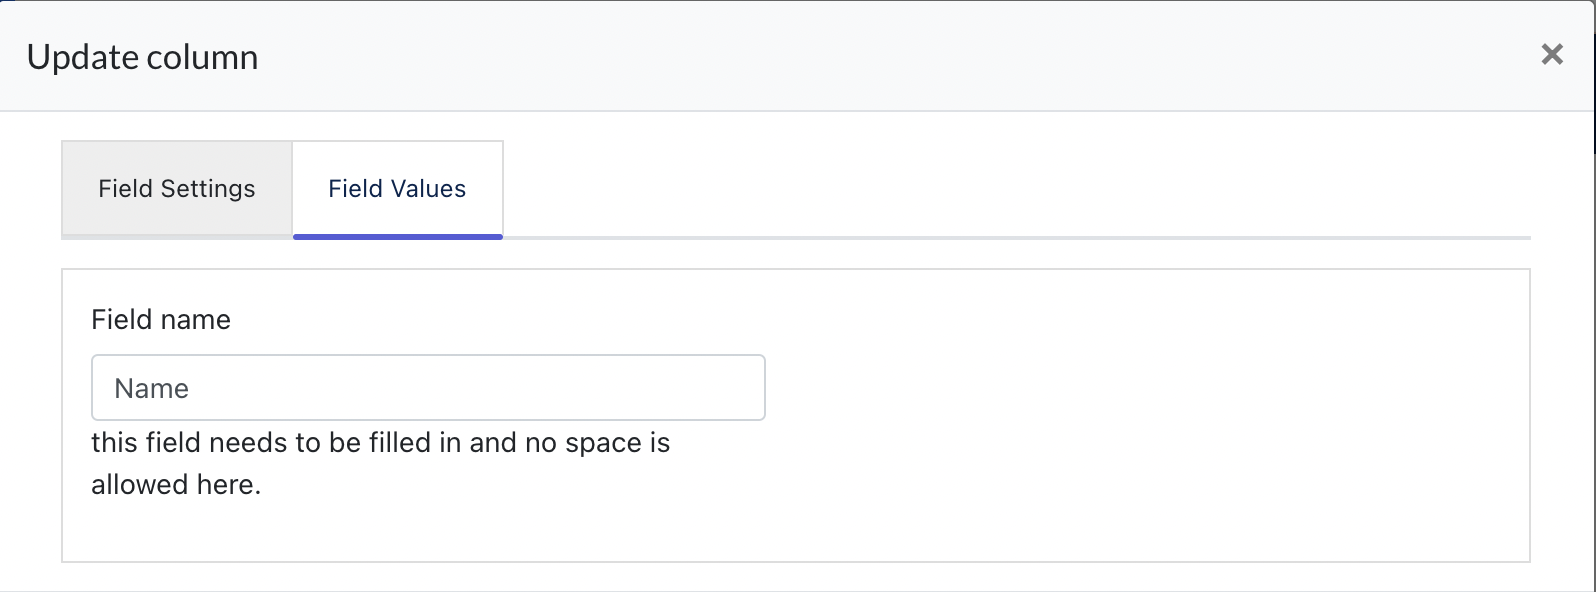
- Field Values - This is to name the category of data this field is receiving. In this example, this field is to collect { name }, and the names data collected later on, example "Jess Ng" will be the value stored in our database.
3.2 Text Area
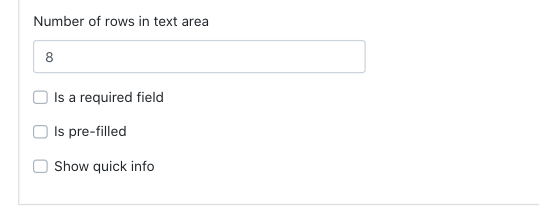
Text Area configuration is the same with text field, the only difference is we can configure how many rows a text area consists of, which is the actual height of the textfield that is shown for the user.
3.3 Radio Button

Field values tab : This is main configuration for radio button selections.
From screenshot below, there are 2 tiles - {selection 1} and {selection 2} - these are the default radio buttons selections.
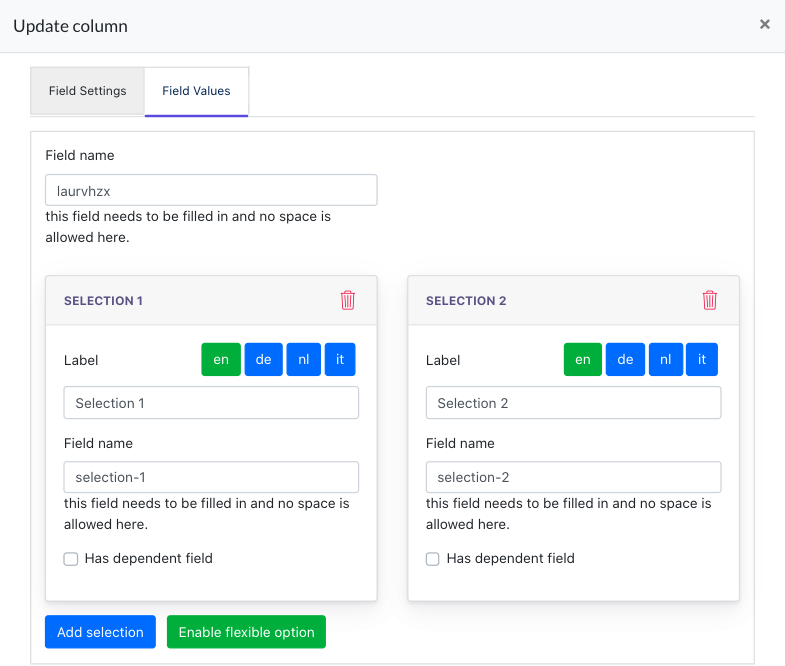
- Label : This is the label of radio selections displaying on the DOF form.
- Field name : This is the name of data category we want to collect, and usually will be in the users' form submission.
- Add Selection: Click on this tab when you wanna add more radio button selections.
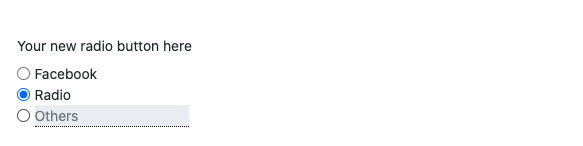
- Enable Flexible Option: When this is clicked, it allows you to create a radio button selection which enable text input.
Example outcome:
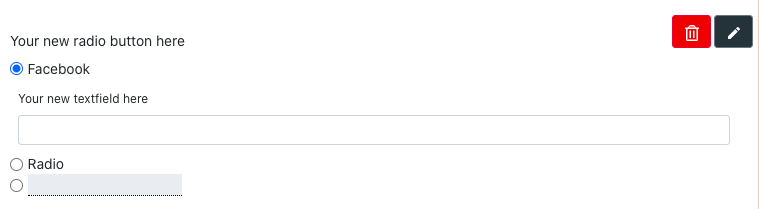
- Has dependent field : to allow Admin to configure dependant field ( Text / Text Area / Input File ) for any radio button selection.
Example Screenshot of Dependent field
3.4 Text
This component will be used when ACISO needs to create a block of text for the form.
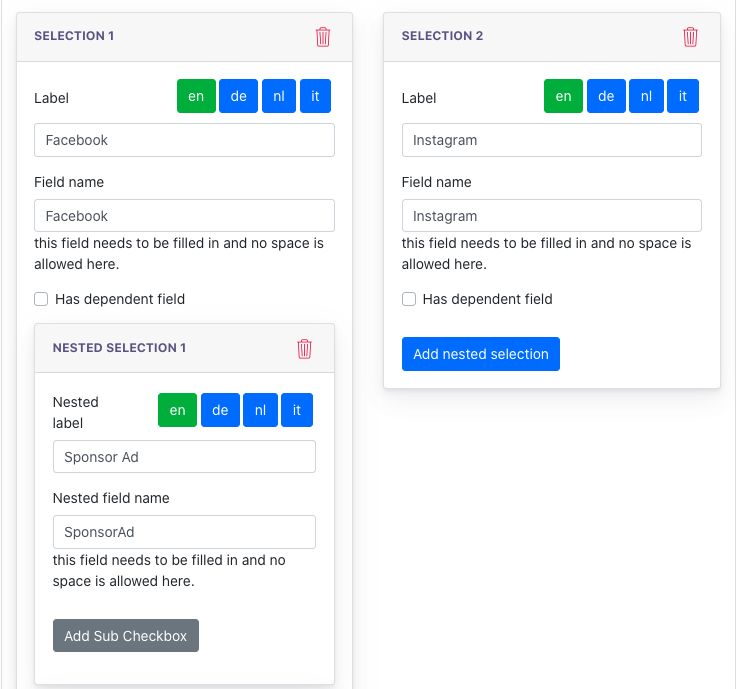
3.5 Checkbox
Checkbox component allows users to create checkboxes for multiple selections.
The configuration of the checkbox is basically the same as how you create the Radio Button.
Under this feature, we can do the following:
- Create Dependent Field & enable Flexible Option (explained under 3.3 Radio Button)
- Allow configuration of multi-level checkboxes by adding {Nested Selection} & {Sub-checkbox}
Example outcome like below:

3.6 Input File
This component allows users to upload files for ACISO.
By adding the input file component, this is what will appear on your Digital Order Form.

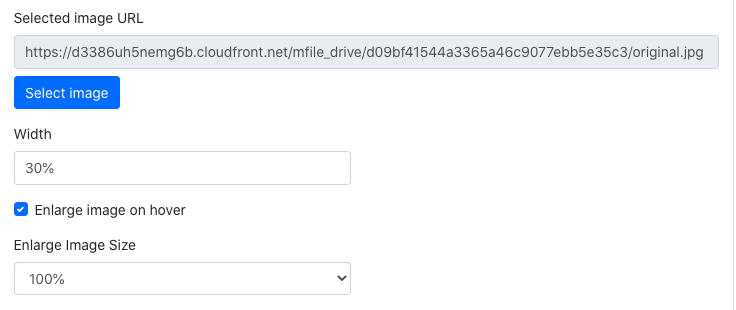
3.7 Images
This component allows ACISO to add image into the form. This is what you can do with this component :
- upload image
- set width of image
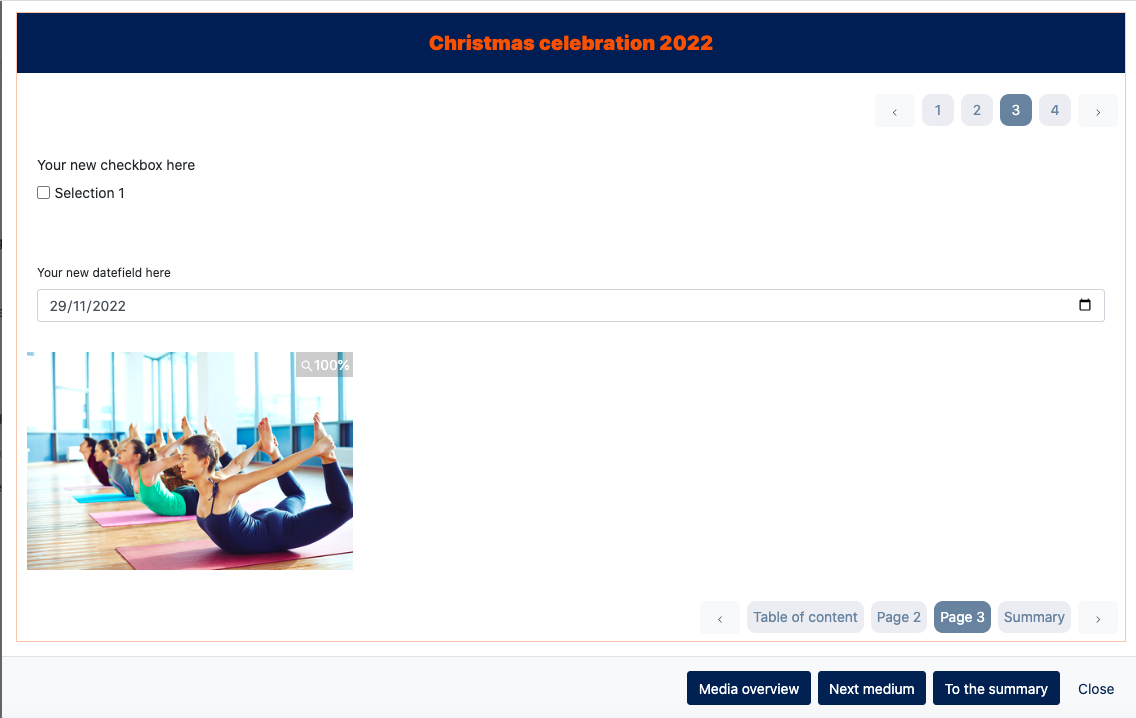
- set enlarge image on hover ( special feature)
An example of 'before hover' and 'after hover' as below:
Before Hover:
After Hover: 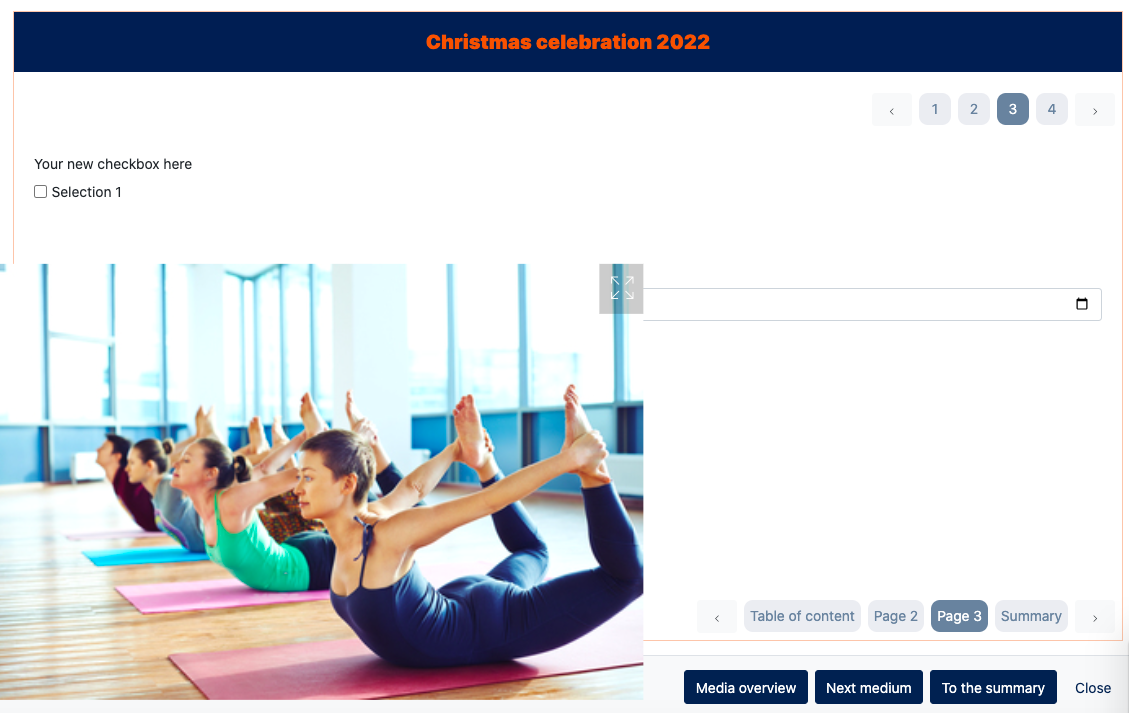
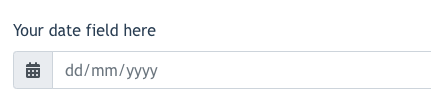
3.8 Datefield
This component allows ACISO to create a datefield on the digital order form.
An example of how a date field looks like after added:
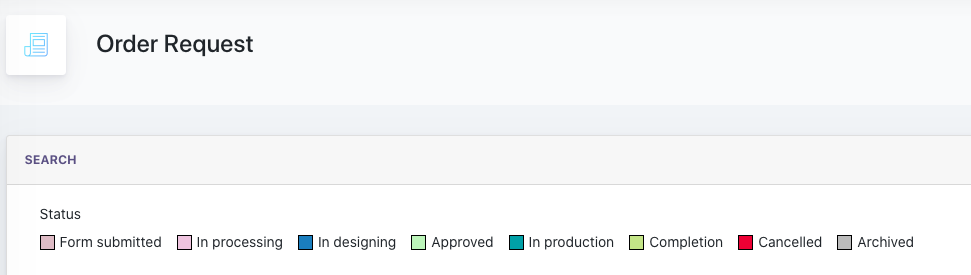
4. Ordering workflow in DOF
After a DOF is submitted by center, it will go through the following process. These status are shown on the Ark M > Digital Order Form > Order Request page. Staging URL : https://ark-management-staging.proof-point-suite.com/#/dashboard/digital-order-form/order-request
- Form Submitted : when a center submit a form
- In processing : When Aciso Production analyse & process the order request
- After processing, Aciso Production can set the status to one of these { in designing, In production, In printing}
- In designing : when ACISO designer starts designing
- Approved : when the center provide approval for the design
- In Production : when ACISO send the design to production
- Completion : when the job is completed
- Cancelled : when the job is cancelled
- Archived : is used when the job is completed, and ACISO wanna archive this form.
4.1 Emailing system & different status of DOF
Status 1: Form submitted
After the form is submitted, the system will send an order confirmation to the Center admin's email, which is configured under Ark-M > Edit Center > Email
Refer Email Template 1
Subject: {Centername} - {DOF Title}
Sender Email: production@aciso.com
Hello {User Firstname} {User Lastname},
We have received the digital order form {DOF Title}.
A graphic designer will contact you as soon as questions arise
or at the latest with the layout design. Any questions about the layout
our graphic designer directly via the ACISO-Cockpit at the respective
order form. You will be notified as soon as a question arises there.
You can track the status of the order directly in the ACISO-Cockpit by clicking on the following link: {Link to Cockpit -> DOF -> Submitted Forms}
With sporty greetings
Your ACISO Team
{Imprint}
======================================================================
Remarks :
After form submitted, an email will be sent to Role : Consultant and Production.
Remarks: Production Email is not based on user but all email to production will send to this address produktion@aciso.com
A PDF format of the order will be attached in the email for Consultant.
======================================================================
Below is the Email Template 2 which sent to Consultant and Production
Subject: {Centername} - {DOF Title}
Sender Email: no-reply@aciso.com
Hello ACISO Team,
A new digital order form has been received:
Center: {Centername}
Project: {DOF Title}
Order ID: {order id} note: taken from the URL if its there
Date: {datetime like this 15.08.2021 14:23}
Best Wishes
ACISO-Cockpit
======================================================================
Status 2 : In Processing
This status is set when ACISO Production would like to analyse & process the order request.
After processing, ACISO Production can set the status to one of these { in designing, In production, In printing }
Status 3 : In Designing
This status is set by ACISO Production after he finished processing the order.
System will send an email to Aciso designer when the status is set to { in designing } - Remarks : using the same email template 2 sent to Consultant & Production.
This is the centralised email address for Aciso Designer: grafikauftrag@aciso.com & info@bestresponse.de
Workflow of In Designing Stage:
- In this stage, designer starts to design the flyer, post card etc
- Designer can upload the design for client review
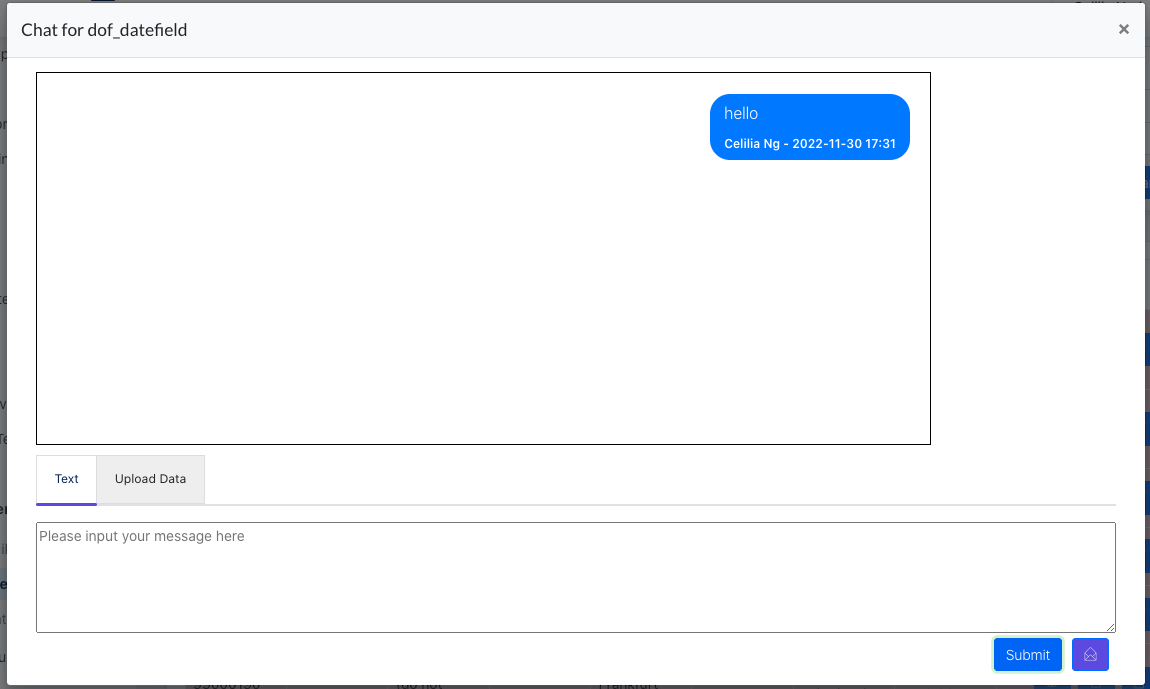
- Communication using chatbox between the 2 parties (dialogue can be tracked back) Chatbox should allow pictures to be uploaded as well.
- Designer will get approval from the center via chatbox. Once approval is received, designer will change the status to {Approve}
4.2 Communication between Graphic Designer & Client
For DOF, we have built a chat feature for Graphic Designer to interact with clients.
Under the Order Request page ( Staging URL : https://ark-management-staging.proof-point-suite.com/#/dashboard/digital-order-form/order-request )

As graphic designer, [ Action ] column is required to monitor designer's communication with clients.
- [ view ] icon - to view the submitted data
- [ Download ] icon - to download what client has uploaded into the DOF
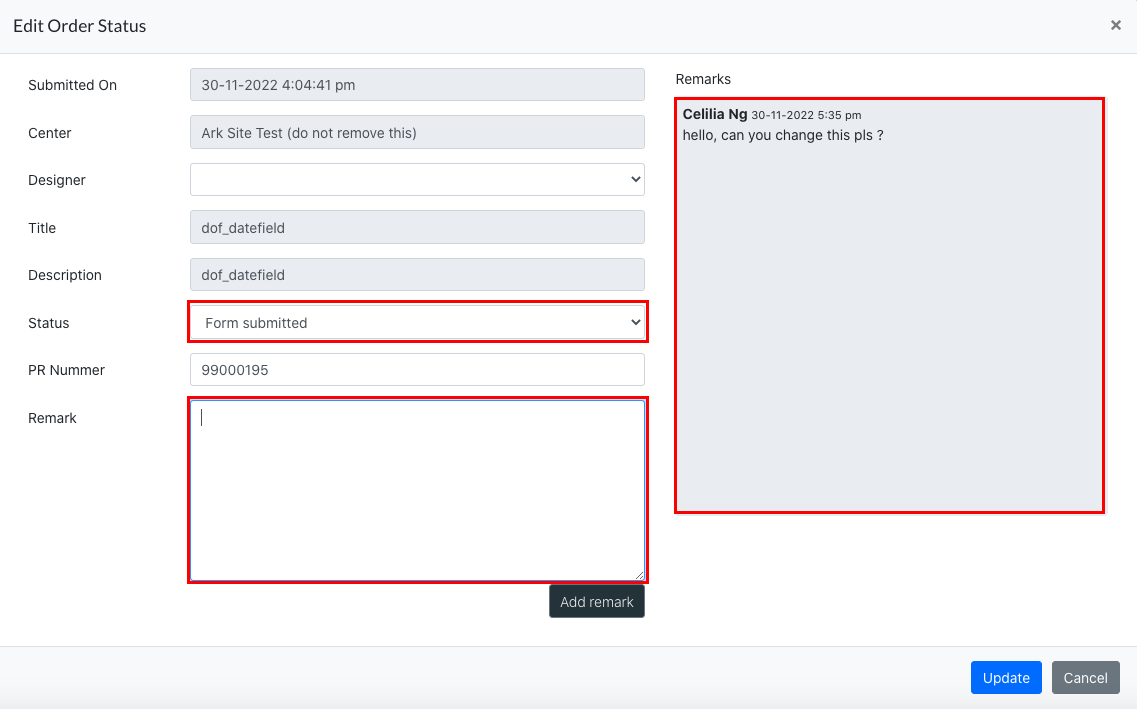
- [ Edit ] icon - to do the following things:
-
- Change status
- Add Remarks
- Check remarks from other ACISO roles
Screenshot of the Modal after clicking [ Edit ]
- [ chatbox ] icon - to communicate with clients.
- Screenshot of the chatbox modal :
Status 4 : Approve
Graphic designer will update the DOF status to "Approve" once client has provided confirmation. (Chatbox recorded all the conversation history including the "Approval" from clients.
When the order status is changed to APPROVE, an email will be sent out to ACISO Production.
Refer Email Template 4
Subject: {Centername} - {DOF Title}
Sender Email: no-reply@aciso.com
Hello Production Team,
A client has given approval for the following print media:
Center: {Centername}
Project: {DOF Title}
Order ID: {order id} note: taken from the URL if its there
Date of approval: {datetime like this 15.08.2021 14:23} note: this is the approval datetime
Sporty greetings
ACISO-Cockpit
Status 5 : In Production
After ACISO production sees the status changed to approved, he/she will start the preparation. When ready to go for production, he will set the status to { In production }
Status 6 : In Printing
Not every DOF involves printing. If printing service is involved, Production Role will update the status to "In Printing"
Status 7 : Completion
Once a job is finished printing/produced, and ready for delivery. ACISO will mark this job status as [completion].
Status 8 : Cancelled
This status will be set if a job needs to be cancelled ( for whatever reason ) . At this status, the form will not be displayed on the listing anymore.
Status 9 : Archived
ACISO Admin can archive a DOF after a job is completed. Archived DOF will not be displayed on the listing.
5. Different ACISO Roles in Digital Order Form
|
Roles |
Action |
|---|---|
|
Production |
Access full function of DOF feature |
|
Designer |
Access and manage all orders under "Order Request" page Access DOF form (View only) |
|
Art Director & Management Admin |
Access full function of DOF feature |
|
Consultant |
Able to view DOF form, not allowed to create/delete form Allowed to view Order Request and add remarks/comment, Not allowed to update status of DOF |